If you’ve been following this blog, you know by now that I’m a big fan of the Laurel Burch stamps and dies from Stampendous that Patti keeps in stock at The Queen’s Ink and sells through the web store. If you’re a new subscriber, I hope you’ll scroll back through older tutorials to check out some previously-published projects…
One of my favorite sets is also the newest addition to my collection: Magical Horses. It includes two horses, a unicorn, two different wings (one facing left, one facing right), whimsical stars, and a sentiment – “You make this world a magical place,” as well as templates (both stencils and masks) for the horses and wings. As my grandmother would say, “Such a deal!”
Saying that there are endless possibilities for this set is an understatement. The wings can be combined with other stamp sets. Winged dogs and cats come to mind. The horses and unicorn can be winged, or not. Wings can be added via masking (as I’ve done on the horses shown below) or can be cut out and adhered with foam tape for dimension. Are you envisioning a herd of horses on a long accordion card? I am… Stay tuned for more projects in the near-future.Oh, and I would be remiss if I didn’t mention the matching die set! I haven’t used it for today’s tutorial but have tested them and there are many ideas in the works. The dies cut so beautifully, right up to the stamped outlines, no halo. If I’m starting to sound like I’m on Stampendous’s payroll, I can assure you that I’m not! I’m simply an unabashed fan, grateful that Laurel Burch’s legacy continues via the stamps, templates and dies they’ve made available and grateful that Patti orders and re-orders so often.
Experienced paper crafters – use the photos for inspiration, skip the instructions, and head to the supply list.
Beginners – I’ve written detailed instructions, treating this like a class where you’d want to know the ‘how’ as well as the ‘why’. It’s a lot to read, but I hope it’s worth your time!
Design Strategies/Instructions:
1. To duplicate the projects as shown, choose a mid-value background color rather than white. I picked Kraft brown. Stamp with dark green, dark blue, or dark brown ink. Shown: Dark green. (If you prefer a more traditional approach, start with white and stamp in black.)
2. To duplicate the projects as shown, use 2.5” x 4.75” tags, 3” x 5.5” end-flap envelopes (a good fit for the tags!), and standard 2.5” x 3.5” Artist Trading Cards (ATCs). (If you prefer envelopes and tags in other sizes, go for it, but remember that ATCs are always 2.5” x 3.5”.)
3. Tags: Stamp a ghost print with the Mixed Mesh background, then stamp a horse or unicorn. Color with pencils, markers, white and gold pens as shown or as you choose. (A ghost print, also called a second-generation print, is when the stamp is inked and stamped on scrap paper, then stamped a second or third time on the project without re-inking to create a lighter impression.)
4. Envelopes: Orient the envelope so it is vertical or horizontal. Two horses or a horse and a unicorn will fit when the envelope is horizontal, but only one will fit when it’s vertical. To add wings – practice on scrap paper, use lightweight paper masks. Refer to the photos. Add stamped stars or draw white dots for the stars. Add the stamped sentiment above the horse as shown, or hand-letter a name or message. (Notice that the little bird on the smallest horse must be carefully masked so the wing won’t cover its face, or you can use the gold paint pen to fill its face and not worry about overlapping the stamped images.)
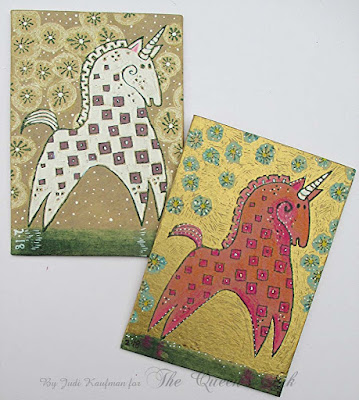
5. ATCs: Keeping the ATC as a vertical rectangle, stamp a unicorn (shown) or a horse. Add stars. Color with pencils, markers, white and gold pens.
6. Things to Notice (beginners, this is especially for you!):
I chose an Extra Fine (EF) nib gold pen so the marks remain visible when coloring large areas like the background around the pink unicorn and the winged horse on the right side of the horizontal envelope. The EF nib also makes it easy to color inside and around the stamped lines and add fine details. A broader nib would create smoother gold areas, but I wanted evidence of my hand at work! Test several Pen-touch pens in other nib sizes, you may like a different one or want to mix several.
I used broad nib alcohol markers to color the unicorn and horse on the tags, the pink unicorn, and the background on the two-horse envelope. I like the smooth flat color these markers provide on Kraft brown. The colors are transparent, therefore they will darken rather than remaining bright and true, so test on scrap paper before working on the actual project.
Colored pencils work great on top of marker-colored areas. The pink unicorn’s cheek, neck and legs are shaded with pink pencil and is face, neck, and haunches are shaded with orange pencil. Colored pencils also work well on the Kraft brown substrate, no markers added. For example: Use a white pencil around a shape to highlight it and help it pop off the background as I did on the horse tag.
Tiny lines and dots in white and gold abound! The more, the better, I think. (Skip them if that’s not the look you’re after.)
Supplies:
- Magical Horses (Stampendous)
- Mixed Mesh (Stampendous)
- 6” x 6” Handle for temporarily mounting Mixed Mesh (Stampendous)
- Smaller acrylic blocks for temporarily mounting other stamps
- Dark green ink
- Envelopes, tags, ATCs in Kraft brown or color(s) of choice
- Gelly Roll White 08 (Sakura of America)
- Pen-touch EF Gold (Sakura of America)
- ProMarkers (Winsor & Newton)
- Colored pencils


Great stamps; fun projects.
ReplyDelete