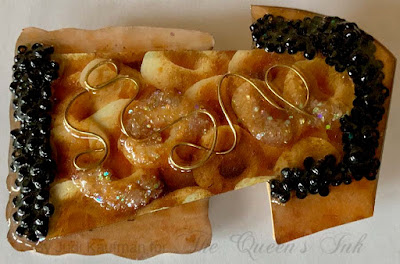
I hope you’ll have fun cutting up some of those boxes before they go into the recycling bin to make your own mixed media brooches. Whenever I don my whimsical wearables I get tons of comments and compliments!
1. Using the photos for inspiration, cut pieces from the fronts and sides of cereal, cracker, pasta, and other boxes. (Cut with scissors or a craft knife - whichever gives you the best control.) Allow some of the edges to be straight, other edges rippled and curvy. Layer, arrange and rearrange the pieces and when pleased with the layout, glue them together.
OPTIONAL: To add yet another layer of pattern and further abstract the cardboard pieces, stamp or stencil onto them prior to layering and gluing them!
2. Arrange, pile on and glue in place wire, beads, glitter, buttons, or whatever embellishments please your eye. Allow glue to dry.
3. Seal with one or more coats of pour-on resin.
OPTIONAL: Add chunky glitter to the wet resin rather than starting with it underneath the coating. The brooch won’t be as smooth, but it will have more sparkle.
DESIGN STRATEGIES/TIPS:
*Let the boxes guide your design decisions and color palette. I chose black seed beads to create the effect of caviar and used slightly larger red beads to embellish the red section of one of the pins (a strawberry on the original cereal box).
*Stand back from the brooch while working on it to envision what someone else will see when you’re wearing it.
*For an especially striking effect, always wear two or more box brooches at the sme time!
FINISHING:
*Per the photo below, cover the back of the brooch with synthetic suede. Add a pin back. Also cover the bar of the pin back with synthetic suede.
SUPPLIES:
- Printed cardboard boxes
- Scissors or craft knife
- Cutting mat (if using craft knife)
- Wire, beads, buttons, chunky iridescent glitter
- Pour-on resin
- Gem glue
- Pin back


No comments:
Post a Comment