Monday, November 25, 2019

Cat Person, Dog Person by Judi Kauffman for The Queen’s Ink

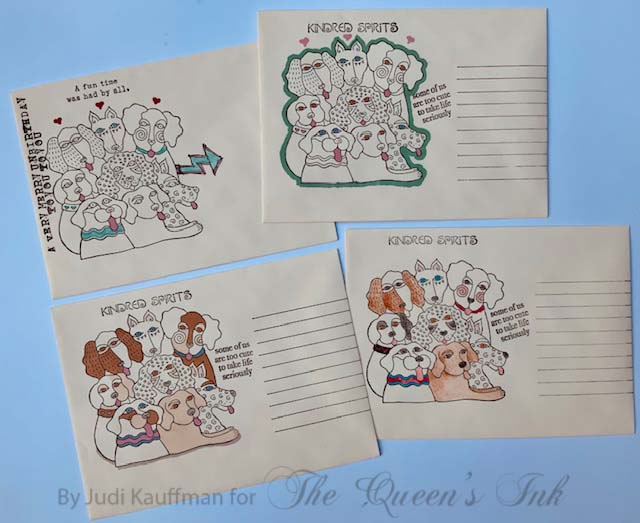
As always, the first thing I do when I get new stamps is experiment on envelopes. Because they’re meant to be torn open and discarded, I never worry about precision and it gives me a chance to putter! But just because I go this route doesn’t mean you have to: Start with ATCs or stamp straight into an art journal or right onto card fronts. The worst thing that can happen is you waste a sheet of cardstock or two. The best thing? That’s easy...you’ve had a relaxing, fun time with a calorie-free activity that I find hard to beat!

Laurel Burch stamps from Stampendous are always available at The Queen’s Ink, but the full collection isn’t always there at the same time so I have a hint: Buy your favorites when you see them just in case they’re out of stock next time you are shopping! The row of cats (Cat Clan) was an instant favorite of mine. I get a kick out of adding a pink tongue, eye liner, and extra fancy whiskers (see photo below).
Not a cat person? Laurel Burch may be best known for her decorative felines, but she drew many amazing dogs as well. Her Dog Clan reminds me of rest time at the dog park, all the canines with their tongues out while they’re gathering energy for another run-and-tumble!
Oh, you ARE a cat person...Well then, back to the kitties! 
Coloring envelopes requires very few supplies and it’s a portable activity that’s just right for TV watching, time spent in waiting rooms or at the gate at the airport. Tuck some colored pencils, markers and pens into a baggie, along with the already stamped envelopes and you’re good to go.

SUPPLIES:
  • Stamps - Laurel Burch: Cats, dogs, Kindred Spirits, Share Dreams, Hello There (Stampendous); Too Cute (Stampendous); You Got This and A Fun Time (RubberMoon)
  • Other - Envelopes; Ink(s) in dark color(s) of choice; Colored pencils: Prismacolor; Opaque ink pens: Gelly Roll, Pen-touch Gold (Sakura of America); Markers: Pigma Micron Black (Sakura of America), ProMarkers (Winsor & Newton)

Friday, November 22, 2019

“Boy, was she old.” by Judi Kauffman for The Queen’s Ink

On my last trip to The Queen’s Ink I picked up a stamp that made me laugh out loud right in the store - a quirky saying from RubberMoon: I want my tombstone to say, “Boy, was she old.” (You know how it goes...some stamps shout Take Me Home Right Now!)

That same day I picked up the Elizabeth St. Hilaire set called “Peacock Collection,” stamps I’ve been using a lot lately, as well as “MUSE,” a super versatile little word that has been working its way into many projects. For today’s projects* I used these images plus other RubberMoon stamps from my ever-growing collection.
  • *Two A2-size cards shown ABOVE -
  • Mask as needed
  • Optional: Use craft sponge to smudge on some color here and there
  • Coloring: Alcohol markers

  • *Five A2-size cards shown BELOW -
  • Coloring: Alcohol markers for  four cards shown in pairs; color inside OR around the stamped images; Finetec Pearlescent watercolors for the card shown on its own (difficult to photograph, lovely in person!)


SUPPLIES:
  • All stamps - RubberMoon
  • Dark green ink pad
  • Round craft sponge
  • Alcohol markers
  • A2-size smooth finish ivory card blanks (or cut, score and fold cardstock of choice)

Tuesday, November 19, 2019

The Cat’s Meow by Judi Kauffman for The Queen’s Ink

Laurel Burch’s stamps always make me smile and this new one with a pair of cats is a welcome addition to my collection. Hope you’ll want to add it to yours, too! I thought that the leaves and quirky circles by Elizabeth St. Hilaire, part of her Peacock Collection, would coordinate well with the cats. It’s a somewhat unexpected combination because the line quality is very sketchy, but there is a whimsical feel to them that I liked with the cats - I’m really pleased with the mix.

In keeping with my mantra that Easy Isn’t Cheating I used only one ink for stamping and a craft sponge to lightly apply smudged-on ink here and there. (A fussy-cut lightweight paper mask kept ink off the cats while sponging the color.)

Two cards measure 5” x 7”, the other two are 5” x 6.25”. Fun phrases, the word Muse, and some Cat’s Eye stickers round things out on three of the cards, while the fourth got some tiny glitter dot peel-offs under the eyes on the larger cat as shown in the photo below.
The photos below show each card on its own.


OPTIONS
  • Add color with pencils or ink-compatible markers.
  • Stamp envelopes to match.
  • Switch from whimsical phrases to birthday or other greetings and sentiments (stamped or hand-written).

SUPPLIES:
  • Stamps - Laurel Burch cats (Stampendous); Elizabeth St. Hilaire Peacock Collection (RubberMoon); You Got This, THE BEST DAY EVER, MUSE, Support your Friends (RubberMoon)
  • Ink in color of choice
  • White side-fold card blanks (5” x 7”)
  • Round craft sponge
  • Embossed cardstock in coordinating color (optional: Border for “Support your Friends”)
  • Cat’s eye stickers 5mm and 7mm (Stanislaus Imports, lasioux.com)
  • Glitter Dots peel-offs (Elizabeth Craft Designs)

Monday, November 18, 2019

Mary Engelbreit Wishing Upon a Star Shadow Box Project by Nancy Sheads for The Queen's Ink


GOOD MORNING EVERYONE! I'm back today with something a little different for me -- a shadow box project featuring the new Mary Engelbreit stamps from RubberMoon available at The Queen's Ink.

I've always loved Mary Engelbreit's illustrations so I was thrilled to see that they are now available available from RubberMoon, whose stamps are always high quality and give a great impression. The Queen's Ink is carrying the entire Mary Engelbreit collection which includes stamps and washi tape.

This particular project is sized for a 5.5" square shadow box. The steps are shown below.


PROJECT STEPS


  • Cut white cardstock to 5.5" x 5.5"
  • Ink blend background with Distress Inks - Wilted Violet, Shaded Lilac, Mermaid Lagoon.
  • Splatter background with water and blot dry as needed.
  • Splatter background with Nuvo Mica Mist in Violet Lustre, Nebula Blue, and Antique Gold.
  • Set background aside to dry thoroughly.
  • Stamp image on Copic compatible paper with an appropriate ink. I used Amalgam Ink from Gina K. Designs.
  • Color image with Copic markers as shown. Marker colors listed below.
  • Fussy cut image (the hat ribbon fell victim to my fuzzy cutting skills).
  • Stamp sentiment on background with Versafine ink in Onyx Black. Cover with clear embossing powder and heat set.
  • Apply foam adhesive squares to back of image and adhere to background.
  • With Swirling Stars die, cut stars from gold foil cardstock and glue to background.
  • Add drops of Nuvo Glitter Drops in Honey Gold to background.
  • Add Nuvo Crystal Drops to eyeglass lens.
  • Allow project to dry thoroughly.
  • Frame finished project.

SUPPLIES

Paper: Neenah Solar White 80#; Gold Foil cardstock
Stamps: Wishing Upon a Star (Large) by RubberMoon Stamps; To Imagine is Everything by RubberMoon Stamps
Inks: Amalgam Ink in Obsidian by Gina K. Designs; Versafine in Oxyx Black by Tsukineko; Distress Inks in Wilted Violet, Shaded Lilac, and Mermaid Lagoon by Ranger - Tim Holtz
Dies: Alterations Swirling Stars by Sizzix - Tim Holtz
Embellishments: Nuvo Glitter Drops in Honey Gold by Tonic Studios; Nuvo Crystal Glaze by Tonic Studios; Super Fine Detail Embossing Powder in Clear by Ranger
Copics: E11, E21, E50, E51, E93 (skin); E55, E57, E59 (hair); V01, V04, V06, V09 (dress & hat); BG11, BG09, BG23 (hat ribbon); B000, BG10, BV000 (eyeglass lens); Y32, Y35, Y38, YR04 (moon); BV20 (shadows)


Sunday, November 17, 2019

Acorn Caps, Part 4 by Judi Kauffman

Are you thinking ahead to holiday gift giving? I am! Today’s tutorial provides inspiration for some super quick, easy, and useful items, perfect for teachers, neighbors, and to keep for yourself!

If you’ve been following the blog you’ve already seen the collage papers I printed with Magic Stamp blocks made from acorn caps, as well as papers made with acorn caps as the paint/ink application tool. If not, scroll back.
The coil-bound 8.5x11 notebook and smaller note pads made with stacks of 3x5 cards show what the papers look like when laminated and cut to size. I chose 5 mil laminate so the covers are nice and sturdy. With a little snip of the coil so it can be removed and reinserted, the books are refillable! Use whatever binding system you have or head to a copy center where binding services are available.

TIPS
*Cut the covers to fit the inside pages rather than the other way around. For example, don’t make 3.5 x 6 covers and then have to cut pages to fit, buy 3x5 index cards and cut covers to that size.

*Skip the lamination if the covers have a lot of dimension. Use gel medium for durability instead.

Thursday, November 14, 2019

Acorn Caps, Part 3 by Judi Kauffman for The Queen’s Ink

The last installment of my Acorn Caps series showed how to use them for direct stamping and for creating circles in the surface of pigment ink pads. This time I turned to my go-to favorite: Magic Stamp blocks! I made two - one with the tops of the caps facing upward, the other with the edges facing upward.

The photo above shows some experimental prints - one color or two, one of the blocks or both of them.

The photos below show full 8.5” x 11” pieces of cardstock topped with collage bits torn from other sheets, along with some envelopes as well as the experimental prints (shown again for scale).


THINGS TO DO WITH THE PRINTS
  • Make cards or ATCs
  • Laminate to use for the covers of journals or notepads
  • Create bookmarks
  • Fussy cut pieces to use for collage

OPTIONS
  • Instead of a solid color, stamp onto book pages, sheet music, printed papers
  • Work directly into an art journal
  • Do some mark-making with colored pencils, pens, markers
  • Add paint, stamping, stenciling

SUPPLIES
  • Magic Stamp blocks
  • Acorn caps
  • Ink pads
  • Cardstock and/or lightweight paper
  • Glue stick

Tuesday, November 12, 2019

Start a New Chapter by Judi Kauffman for The Queen’s Inkling

I went to The Queen’s Ink last weekend to pick up some more inserts for my Traveler’s Notebook, I left with a new set of stamps (the Peacock Collection by Elizabeth St. Hilaire for RubberMoon), a little stamp with the word Muse (also RubberMoon), along with several dies and other stamps. What fun!!!
I already had the ‘Start a new chapter’ stamp (RubberMoon) and ‘Courage’ (Innovative Stamp Creations), a stamp I’ve owned for at least a couple of decades.*

Though I’m sure I’ll use it many other ways, the Peacock Collection is fabulous for backgrounds and that’s where I started. I stamped several pieces of cardstock, cut them into pieces and made four A2-size cards, shown above, and the two Artist Trading Cards and two ribbon/pennant style hanging panels (shown below).

In addition to simple stamping, cutting, and layering I added color here and there with alcohol markers and colored pencils.

YOUR TURN
  • Fill sheets of cardstock with randomly stamped Peacock Collection images using two coordinating colors (shown: Dark teal and butterscotch).
  • Cut into pieces in varying sizes.
  • Add a stamped word, phrase or sentiment.
  • Edge and smudge stamped pieces with the same inks.
  • Make ATCs, cards, or ribbon/banners.
  • Color as much or as little as you want!
  • Optional, not shown: Fussy-cut some of the shapes and use foam tape for dimension
SUPPLIES
  • Stamps: Peacock Collection by Elizabeth St. Hilaire (RubberMoon); Muse, Start a new chapter (RubberMoon); *Courage (if now discontinued, hand-letter or use die cuts)
  • Inks
  • Ink-compatible markers
  • Colored pencils
  • Cardstock
  • Round craft sponge
  • Twine
  • 1/8” hole punch
  • Optional: Cellophane sleeves for ATCs

Saturday, November 9, 2019

Acorn Caps - Part 2 by Judi Kauffman for The Queen’s Inkling

A while back I posted a photo of some acorn caps I’d collected. I used pigment ink pads and treated the caps as ink applicators, experimenting with both the bottom edge and the domed top.

The bottom edges create rings in varying sizes, #3 in the photo above.

The tops presented a bit of a challenge. If I inked only the tip it gave me a few tiny dots, #5 in the photo; when I inked the entire cap and rolled it onto cardstock I got a bull’s eye effect with the darkest dots at the center, #4 in the photo.

#1 shows what happens if the inked cap is ‘walked’ in a side-to-side manner along the cardstock; #2 shows a stamp and drag effect.

The photos below show stamped and/or stamped and dragged effects (in black) combined with effects created by using clean acorn caps on a gold pigment ink pad to create reverse circles.


In an upcoming tutorial I’ll show what happens when the acorn caps took on a whole new look thanks to Magic Stamp blocks!

YOUR TURN:
*If you live where it’s fall and there are oak tress nearby, leave the nuts to the squirrels and take home some acorn caps to use for your own stamping and gel prints.

*I used only pigment inks. I did not get good results with dye ink pads. Substitute paint rolled onto a plate or palette if you prefer.

SUPPLIES:
  • Pigment ink pads
  • Acorn caps
  • Cardstock
  • Optional: Clear, gold or black embossing powder and heat tool

Thursday, November 7, 2019

Clowning Around By Judi Kauffman for The Queen’s Ink

The title of this tutorial says it all! I love using stamps in unexpected ways and the set called What Goes Around by Kae Pea (RubberMoon), part of her Imperfections Collection, is perfect for playful experimentation.
Stamps can be used as-is or you can mask parts to create a different look. Mix in some smudged-on color and finish things off with some doodling using a fine-nib pen and fill in the background areas with an alcohol marker (or several).

Clowns are supposed to be silly, to make you smile! Let the shapes of the stamps guide you as you play.
Practice on scrap paper and then stamp your favorites onto A2 side-fold cards.
SUPPLIES:
  • What Goes Around stamps by Kae Pea (RubberMoon)
  • Inks in blue, red, pink, and orange
  • Fine nib pen in dark blue
  • Alcohol marker in dusky teal
  • A2 card blanks
  • Round craft sponges
  • Lightweight paper for masking

Monday, November 4, 2019

10- and 15-Minute Cards & Envelopes By Judi Kauffman for The Queen’s Ink

In my previous tutorial I showed how to create cards and envelopes in only a few minutes. Now I’m back to demonstrate ways to take them to the next level without spending a whole lot more time. As I always say, Easy Isn’t Cheating.

Tips:
1. Adding color with pens and/or colored pencils takes only five or so minutes more, adding pen doodling another five.

2. Color can be flat or shaded.

3. Stay nside the lines or add color and random patterns around the stamped images.

4. For an extra special touch choose postage stamps that coordinate with the colors you picked for the envelopes!

Supplies:
  • Stamps by Elizabeth St. Hilaire (RubberMoon)
  • Ink pad in a dark color
  • Markers
  • Colored pencils
  • Fine nib pen in color to match the ink pad
  • Craft sponge

Thursday, October 31, 2019

5-Minute Cards & Envelopes: Flowers & Fronds By Judi Kauffman for The Queen’s Ink

Need some cards in a hurry? Here’s the recipe for a batch that is fast and easy. And matching envelopes, too. Just one ink, a fine nib pen and a craft sponge. Even if you decide to color with markers or colored pencils they’re still fast and easy.

Ingredients:
  • Stamps (RubberMoon) -
  • Flowers & Fronds Collection
  • Klimt Triangles
  • Start a new chapter
  • Dark brown ink pad
  • Fine nib pen in same shade of brown
  • White or ivory card blanks (5x7 or other sizes)
  • White or ivory envelopes (sized to match cards)
  • ATC blanks
  • Ink-compatible markers in assorted colors
  • Colored pencils, optional
  • Round craft sponge


How-to:
1. Stamp flowers, leaves, and other elements onto cards, envelopes and ATCs as shown in the photos below, or as preferred. Use fine nib pen in matching color to draw stems where needed. The envelopes have large triangles and are shown above. (Keep the lines you draw loose to imitate the style of the rubber stamps.)
2. Use craft sponge to smudge the same ink as shown, or as preferred.
3. DONE!
4. Optional - Use markers (as shown) or colored pencils (not shown) to color a lot or just a little bit.


Tuesday, October 29, 2019

The Cut-Up! By Judi Kauffman for The Queen’s Ink

Remember that batch of envelopes I stamped with the new collection from Elizabeth St. Hilaire? The batch that included a bunch of absolute DUDS? (Please scroll back if you missed that tutorial...) Well, instead of consigning them to the trash I decided to cut and tear them up and turn the pieces into cards (shown above). And while I was at it, I fussy cut the trio that I did like because the flowers were so pretty and mixed nicely with some of the leaves from the duds.

You may recognize the black/copper oval (an extra from my Build a Pumpkin tutorial). The turquoise and bronze backgrounds are glitter paper dry-brushed with turquoise acrylic paint. The words and phrases are from Tim Holtz.

It’s a lot of fun to turn flops into something new, and it’s always a good idea to combine leftovers from various projects. Nothing wasted. New ways of seeing.


YOUR TURN:
1. Keep those DUDS! Don’t toss the cards, envelopes, gel prints, and other items that haven’t worked out well.
2. Keep looking at them. When an idea strikes, do some slicing and dicing.
3. Combine and rearrange the pieces, mix elements from more than one project.
4. Layer. Over-stamp, add stenciling. Keep going till you’ve created something wonderful OR until you end up with another DUD to use at some point in the future.
5. Instead of cards, bookmarks or other such projects work directly into an art journal.
6. At any point in the process, throw away what you just can’t bear to keep!