Tuesday, January 23, 2018

Klimt-ify It: Class Recap by Judi Kauffman for The Queen’s Ink

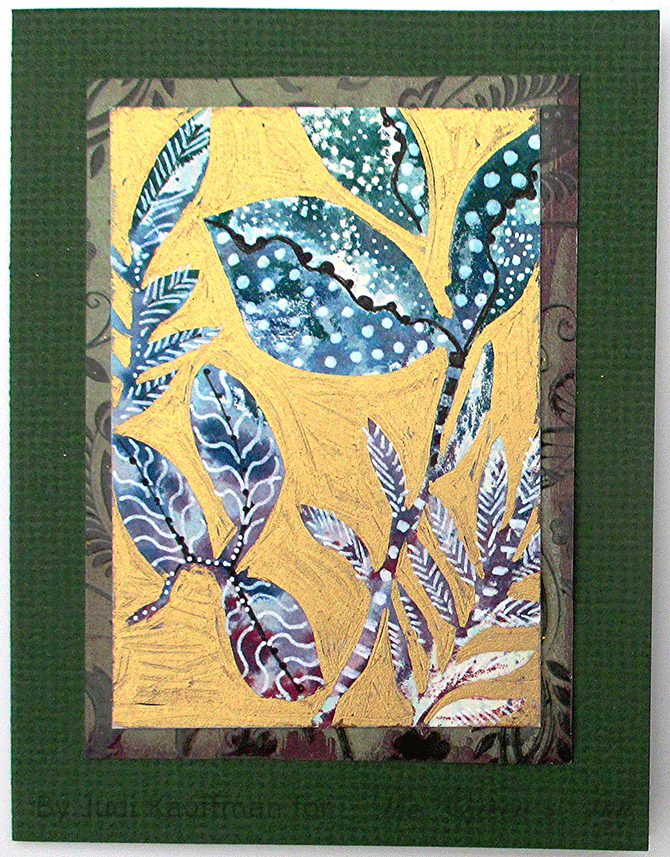
Saturday, January 20, 2018, 11 AM – Fifteen artists (AKA students) arrived at the Queen’s Ink for the first-ever Klimt-ify It class! I’d been planning the workshop for a very long time and was so excited to see what would happen when it went from idea to reality. It was all I’d hoped for, and more!


The premise of the class is that everyone can channel their inner Gustaf Klimt, adding oodles of details and lots of gold to cards, ATCs, journal pages, and other projects. I began with a look at several Klimt paintings and discussed some basic things to use as inspiration.

Then, I front-loaded the lesson with oodles of info about the techniques and materials, allowing everyone to work at her own pace for the duration of the class and allowing me to roam around and answer questions that came up.

At one point, someone said, “I’ve never been in a room with fifteen women so quiet all at the same time!” She was right…You could have heard a pin drop. Everyone was absorbed in her project and chatting was sporadic. And even though we’d factored-in time for a snack break, nobody stopped working till the end of the session when Patti did the judging and we awarded the prize for the best socks (I believe that comfortable feet add to creativity!), followed by a random prize drawing and a look at the ‘Gallery’ where everyone put something on display.

The class filled and there wasn’t space for anyone who was on a waiting list. It went so well that we’re planning to repeat it some time in the late spring or early summer.


A shout-out to Sakura of America for providing Gelly Roll, Glaze, Pigma Micron, Graphic, and Pen-touch pens for the demo and for students to share, and to Clearsnap for the Magic Stamp blocks I prepared and shared. And a huge thank you to Patti and Terri for setting up the class, making a supply kit for each student, for inking the rainbow pads we used (so pivotal to the project), and most of all for making The Queen’s Ink such a friendly, comfortable and special place.

Here’s a look at the class at work, followed by the students’ finished or almost-finished projects:


Supplies:
  • Laurel Burch Blossoming Woman LBCRS01 (Stampendous)
  • Laurel Burch Blossoming Woman die set also available, but not shown
  • Magic Stamp blocks (Clearsnap)
  • Colored pencils
  • Assorted markers
  • Rainbow ink pads (custom made with Stewart Superior large felt pads and a variety of companies’ re-inkers)
  • Pen-touch in Gold, various nib sizes (Sakura of America)
  • Pigma Micron and Graphic in Black, various nib sizes (Sakura of America)
  • Clear Glaze pen (Sakura of America)
  • Assorted rubber stamps
  • Heat tool
  • Stampbord ATCs (Ampersand Art Supply)
  • Tags, cardstock, envelopes

Sunday, January 14, 2018

Red Castle Meets RubberMoon: Canary Coaster by Judi Kauffman for The Queen’s Ink


There’s something so appealing about canaries. Though the birds aren’t all yellow, that’s the color we think of first. I wanted to spruce up the coffee table with a new set of coasters and the sheet of stamps called ‘Canaries, a Study of’ from Red Castle, available exclusively at The Queen’s Ink, seemed like a perfect starting point. The images are realistic and full of life, so beautifully drawn! If you don’t need coasters, these 3.5” squares can serve as oversized fridge magnets or be framed and displayed as wall art.

The ingredients for this project include Claybord squares from Ampersand Art Supply, Red Castle rubber stamps (canaries and textures) and RubberMoon Stampstracts (‘what’s it’ and ‘bubblesndots’).

Because it is so difficult to photograph, I have not yet added the 2-part pour-on resin coating that will make the coasters impervious to liquids (EnviroTex Lite). That’s the final step as explained in the instructions.

Instructions:

1. Stamp one or more canaries onto a 3.5 x 3.5 Claybord square. (The stamp sheet includes ELEVEN!). Stamp the same canaries onto lightweight paper and fussy cut to create masks.
 2. With masks in place, stamp the background, using a mix of stamps that please your eye or duplicate the project as shown. Also stamp seeds on the ground in front of the canaries. (The stamp sheet includes tiny seeds, but I wanted larger ones, therefore I went with the Stampstracts image.)

3. With masks still in place, smudge on a second color ink around the canaries.

4. Remove the masks and color with pencils and markers. Use a scratch art tool or craft knife to add details and white highlights. (A quick Internet image search will yield a wide variety of options for coloring the canaries! Some are a beautiful shade of red-orange and the shades of yellow vary widely…)

5. Following the manufacturer’s instructions*, add a 2-part pour-on coating. Alternatively, cover the surface of the coaster with clear adhesive-backed film. Back the finished coaster with adhesive-backed cork. (*Depending on the inks and markers used, a coat of clear drying glue may be needed prior to the pour-on coating.)

Supplies:

Friday, January 5, 2018

Klimt-ify It by Judi Kauffman for The Queen’s Ink


Happy New Year to all! Here’s to a happy, healthy and creative 2018!

To get your creative spirit off to a good start, I’m hoping you’ll join me at The Queen’s Ink on Saturday, January 20, for a brand-new class called Klimt-ify It, inspired by one of my favorite artists, Gustav Klimt.

I’ll share lots of ways to channel your own inner Gustav Klimt and have fun creating cards, postcards, collage papers and Artist Trading Cards, all with texture, pattern, pattern, and more pattern plus copious amounts of GOLD!


You’ll be rocking out a batch of simple but impressive projects unlike anything you’ve done before.

The class focuses on technique as well as outcome. You’ll go home with finished cards as well as ideas to use for mixed media and more, long into the future.


If you’ve already taken my class called The Magical Land of Magic Stamp it will be very helpful, but it’s not required.

To encourage comfortable feet during the class, I am offering a challenge and a prize: Wear unusual socks – the weirder the better – and you’ll be entered in a random drawing! (I’ll be wearing my brand-new Gustav Klimt socks from The Phillips Collection…)


To see samples and sign up in person, drop by The Queen’s Ink.

To sign up online 24/7, use
THIS LINK.

CLASS FEE INCLUDES:
  • Cardstock and other surfaces
  • 1 Claybord ATC from Ampersand Art Supply
  • 2 Magic Stamp blocks (additional blocks will be available to purchase)
  • 1 Gold Pen-touch pen

AVAILABLE TO SHARE DURING CLASS (or bring your own):
  • Rainbow ink pads
  • Embossing folders
  • Rubber stamps from Judi’s own collection
  • Low-relief textures (leaves, lace)

BRING WITH YOU:
  • Heat tool
  • Basic tool kit
  • Colored pencils
  • Your favorite markers
  • A Sakura Glaze 3D Ink pen (suggested: Clear)
  • Opaque gold pens with fine and broad nibs (Sakura Pen-Touch or brand of choice)
  • Black fine nib permanent ink pens (Sakura Pigma Micron 005, 01, Graphic 1, and other sizes or brand of choice)
  • White opaque ink pens (Sakura Gelly Roll and Pen-Touch)
  • Assorted ink pads

Tuesday, December 26, 2017

Mini Clipboards by Judi Kauffman for The Queen’s Ink


I like to spend the last few days of the year making little gifts to give during the next year. It gives me a good feeling to be getting ahead! And if someone stops by with an unexpected (belated) holiday gift for me, I’m prepared.


Mini clipboards are one of my favorites. They’re endlessly useful – by the phone (for those of us who still favor land lines), bedside (who doesn’t have random thoughts in the middle of the night), in the studio (to display a favorite ATC or photo).

I choose the variety with removable hardware, making it so easy to cover the front with embossed Shimmer Sheetz and then put the hardware back on when the surface is completed. Plus, Shimmer Sheetz can be wiped with a damp cloth if it gets dirty, and the project is DONE. Option: Instead of Shimmer Sheetz, use paint, stencils, and collage and seal the surface well with a couple of coats of matte acrylic medium.

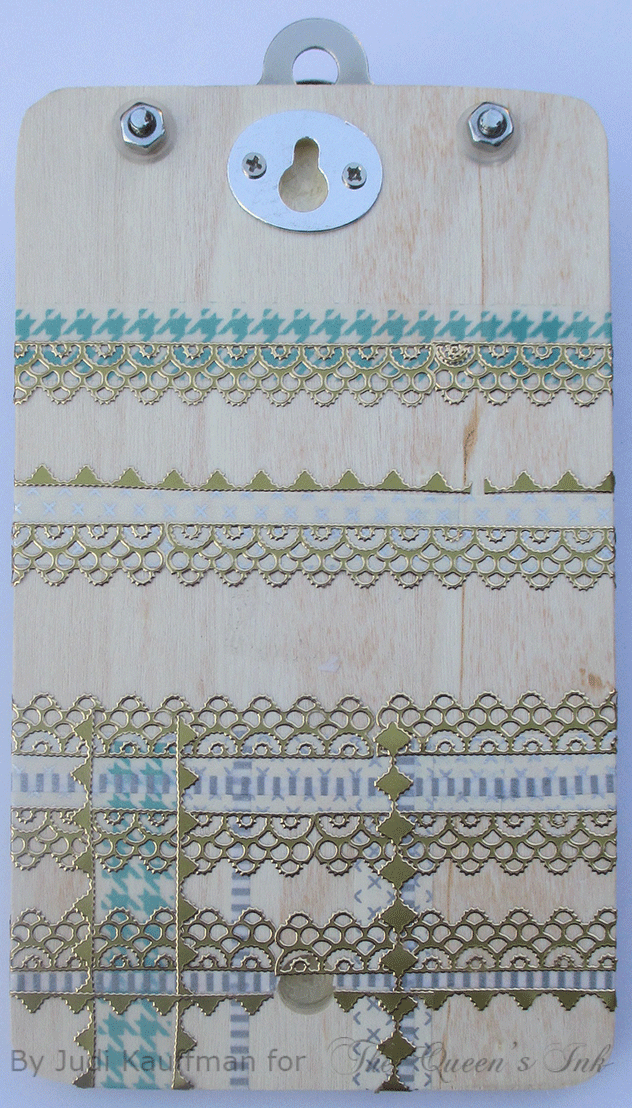
If I’m in the mood to spend a bit more time, I combine lots of different pieces of Shimmer Sheetz as horizontal stripes (always fun to use up the scraps saved from other projects) with strips of washi tape and vinyl peel-offs set both vertically and horizontally to hold the Shimmer Sheetz pieces in place and to create a complex surface on the front. Sometimes I extend the tape and peel-offs around to the back for an extra pop of pattern as I did on the clipboard shown below.

No instructions today. I’ve posted larger clipboards and other Shimmer Sheetz-covered items in the past (notebooks, fan decks, journals), so scroll back for all necessary info.

Supplies:
  • Shimmer Sheetz in colors of choice
  • Embossing folders
  • Optional: Sanding block
  • Double sided adhesive sheets
  • Mini clipboards with removable hardware

Friday, December 22, 2017

Claybord Flower Power Panel by Judi Kauffman

I wanted to share a project I designed for the Ampersand Art Supply blog because the stamps needed are sold EXCLUSIVELY at The Queen's Ink and Patti sells the other supplies as well!

It features Red Castle's Texture Plate 1 stamp sheet, a cradled Claybord panel from Ampersand Art Supply, DecoArt  paints, and a stencil from StencilGirl Products, along with Delight Air-Dry Modeling Compound - one of my all-time favorite products.

Here's the link where you'll find more photos and a step-by-step tutorial:


If you like the project, I'd love it if you'd leave a comment on the Ampersand blog, mentioning that you found out about it on The Queen's Inkling!

I'm thinking about teaching a class that is based on this particular sheet of stamps, so if that would interest you please leave a comment here or call the store and give them your name and contact information so we can call you if the class gets scheduled.

I hope you'll take time from holiday preparations to check it out! 

Thursday, December 21, 2017

Last-Minute Holiday Cards by Judi Kauffman for The Queen’s Ink

There’s still plenty of time to whip up some last-minute holiday cards! In the time it takes for a tray of cookies to bake (around 20 minutes) you can make several of the tree-filled version I’ve designed for today’s tutorial, and probably one or two of the wreath-style. Multi-tasking is baked into the DNA of most creative people, don’t you think? Just don’t get cookie crumbs onto the cards – butter leaves smudges…


Both projects require one main ink (bottle green or black), and secondary inks for the wreath (green and orange). Both incorporate a bit of sponged-on ink (two colors for the wreath, one for the trees). And both include glittery peel-offs for a bit of sparkle (transparent glitter dots and green glitter flowers for the trees, green and orange glitter flowers for the wreath).


I reached for a mix of RubberMoon Stampstracts stamps for the trees and went with Nathalie Kalbach’s Mixed Media ‘Embroidery’ set for the wreath. I picked a quirky color combination – orange and green - for the wreath, but using red instead of orange would bring things back to a more traditional look.

The tree trunks are hand drawn with a green pen to match the stamping, as are the horizon lines.


While you’re at it, stamp some envelopes!


No step-by-step instructions today. The cards are A2 size and I think the photos say it all.

SUPPLIES: 
  • Stampstracts by Kae Pea (RubberMoon)
  • MixedMedia – Embroidery by Nathalie Kalbach (RubberMoon)
  • Inks in bottle or library green, black, and orange
  • Fine nib pen or marker in green
  • Craft sponge
  • Glitter dots and glitter flowers peel-offs (Elizabeth Craft Designs)
  • Panel cards in white
  • Cardstock in off-white, orange and green
  • Polka dot cardstock – orange dots on dark red (BoBunny)
  • A2 envelopes

Tuesday, December 19, 2017

New Copic Class! Hearts & Flowers - January 30th, 2018


Tired of seeing holiday cards? Want to see something fresh and new? Well take a look at what we have in store for you next month at The Queen's Ink! I'll be back in January with a new Copic marker card class featuring the Folk Heart stamp set by Power Poppy. In this workshop, we'll make three cards featuring the beautiful images and sentiments in the Folk Heart stamp set. The images are colored using a very limited set of Copic markers. Details are below. All necessary techniques are taught in class. Seats are limited, so sign up today!

Tuesday, January 30, 2018, 1:00 PM - 3:00 PM
Tuesday, January 30, 2018, 6:00 PM - 8:30 PM
To register, call the Queen's Ink at (301) 497-9449

BRING TO CLASS: The list below reflects the Copic markers that I will use in class. You can follow along using the same colors OR substitute colors based upon your personal Copic collection. Please bring all your markers to class and make sure your Copics are marked with Washi tape or some other means of identification. Markers are available for purchase at The Queen’s Ink. Students will receive a 10% discount on Copic markers. I will be available prior to class to help with selection.

PLEASE NOTE: You must bring your own markers to participate in class. If you need markers, please contact The Queen's Ink in advance of class. If you wait until class time, you may not be able to purchase the markers you need.
  • YG06 - Yellowish Green
  • YG09 - Lettuce Green
  • Y02 - Canary Yellow
  • E35 -  Chamois (you can substitute any medium brown)
  • RV52 - Cotton Candy
  • RV63 - Begonia
  • RV66 - Raspberry
  • BG10 - Cool Shadow
  • BG11 - Moon White
  • BG13 - Mint Greet
  • BG15 - Aqua
  • 0 - Colorless Blender
OTHER SUPPLIES: Please bring scissors (we'll be fussy cutting one image), foam adhesive squares (I used Scrapbook Adhesives 3D Thin Foam Squares), and a tape runner adhesive or double-sided tape. Nuvo Crystal Drops in English Mustard will be used for embellishment.


Tuesday, December 12, 2017

Claybord Artist Trading Cards by Judi Kauffman for The Queen’s Ink


 I make a lot of coil-bound books and my Rubicoil punch accumulates a TON of tiny little circles in the tray underneath. I’ve always kept a sandwich-size zip-lock plastic bag filled with these colorful bits of paper, using them now and then in shaker cards and other projects. Today, they take center stage on some Claybord Artist Trading Cards!


INSTRUCTIONS:

1. Paint, layer on some sequin waste or other collage elements.

2. Use a scratch-art tool to make marks (removing the paint and revealing the white surface of the Claybord). Brush off the debris from the paint – it’s sort of like sawdust.

3. Glue on the little circles.


If you don’t have access to the leftovers from a coil-binding punch, use scissors to further chop up some paper from the shredder or use a hole punch to punch out circles or stars or hearts or other shapes till your hand gets tired and then get the kids to punch some more. (I’ve paid neighbors’ kids with cookies now and then, I’m not ashamed to say…)


If ATCs aren’t your thing, go for larger pieces of Claybord (it’s available in a lot of sizes, both flat and cradled – cradled have wooden sides that will need to be painted.)

MORE IDEAS:
  • Add a magnet to the back.
  • Seal the surface with a pour-on resin coating.
  • Instead of paper circles, glue on some beads or gems.
  • Drill holes; add twine or cord.

SUPPLIES:
  • Claybord Artist Trading Cards (Ampersand Art Supply)
  • Scratch-art tool
  • Paints
  • Paintbrush
  • Glue
  • Sequin waste (AKA ‘Punchinella’)
  • Eighth-inch paper circles (waste from a coil binding punch)

Friday, December 8, 2017

Last Chance! Elf Grumplings Holiday Gift Tags Class - December 13th, 2017 at the Queen's Ink


This is your last chance to get in on the fun making holiday gift tags featuring stamps and sentiments from Taylored Expressions. These are easy, no-stress images to color using a very limited selection of Copic markers. We'll make six gift tags and two gift card holders featuring the Elf Grumplings. Details are below. Seats are limited, so sign up today! CLASS FEE $25

Wednesday, December 13th, 2017, 6:00 PM - 8:30 PM
Register online or call the Queen’s Ink at (301) 497-9449.

BRING TO CLASS: The list below reflects the Copic markers that I will use in class. You can follow along using the same colors OR substitute colors based upon your personal Copic collection. You will need two blendable green markers, two blendable red markers as well as a skin tone and a blush tone (optional). Please bring all your markers to class and make sure your Copics are marked with Washi tape or some other means of identification. Markers are available for purchase at The Queen’s Ink. Students will receive a 10% discount on Copic markers. I will be available prior to class to help with selection.
  • E00 - Skin White (can substitute E50 or E51)
  • YG06 - Yellowish Green
  • YG09 - Lettuce Green
  • R20 - Blush (can substitute RV10 or E93)
  • R24 - Prawn
  • R46 - Strong Red
  • 0 - Colorless Blender
OTHER SUPPLIES: Please bring scissors, foam adhesive squares (I used Scrapbook Adhesives 3D Thin Foam Squares), and a tape runner adhesive or double-sided tape.


Monday, December 4, 2017

Quick and Easy Gifts by Judi Kauffman for The Queen’s Ink


I like to make holiday gifts that are inexpensive, quick, and easy. (My mantra has always been ‘Easy isn’t cheating!’) 

Nothing could be faster than covering the front of a fan deck, a small ring-bound notepad, a magnet-backed pencil holder, or a dollar store journal with Shimmer Sheetz. (Don’t forget to make a couple of the fan decks and books for yourself – they’re mighty handy…)


Shimmer Sheetz is durable and waterproof, fingerprints and dirt will wipe off with a damp cloth. It’s sparkly and elegant when it’s altered with alcohol inks, embossed and sanded, or any combination thereof.


I’m going to let the photos do the talking – no instructions today, just inspiration! I’ve already posted a bunch of projects featuring Shimmer Sheetz as a focal point, so this tutorial is, essentially, a reminder that any flat surface is prime real estate for a bit of embellishment!

Design strategies, things to notice: 
If you’re making fan decks, the hardware can be colored with the same alcohol inks that are used to alter the Shimmer Sheetz. Vinyl peel-offs (like the leafy branches) can be altered with alcohol inks, too, adding an extra special touch!


Adding a decorative element around the hardware adds to the fun.


SUPPLIES:
  • Shimmer Sheetz in colors of choice
  •  (Shown: Amethyst and Peridot Gemstones)
  • Fan decks (Arnold Grummer’s)
  • Ring-bound mini books
  • Journals or composition books
  • Double sided adhesive sheets
  • Embossing folders
  • Leafy Branch vinyl peel-offs in gold to alter with inks (Elizabeth Craft Designs)
  • Tim Holtz Alcohol Inks and Metallic Mixatives in colors of choice
  • Ink applicator tool
  • Sanding block