Thursday, April 19, 2018

Copics and Stencils and Stamping! Oh my!

I've been doing a lot of coloring lately in preparation for upcoming classes, but a few days ago, I took time today to step back and focus on expanding my own range and skills. Recently, I've been experimenting with creating backgrounds using stencils, embossing powders, distress inks, and various other media. This is a big step for me - my card designs have always been so pared down that adding sequins was as close as I ever came to mixed media. But I'm intrigued by all the new embellishing, embossing, and texturing products coming on the market and decided it was time to start incorporating them into my projects.

So I pulled out a new stamp in my stash - Happy Together by Penny Black - and decided to color the image of the potted cacti. I wish I had taken photos while I was coloring, but frankly I wasn't really sure where I was going with this and the coloring just evolved along the way. After stamping the images with Memento Ink, I drew a cast shadow along each of the cacti and pots in BV20 and BV23, but changed my mind and decided to add stippling in W1, W3, W5, and E30. However, I looked at that big expanse of white above the stamped image and decided that I had to turn this image into some sort of scene.

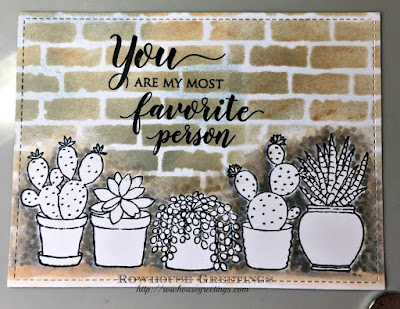
My new love affair with texture pastes has resulted in the purchase of several new stencils. It happened that one of my recent purchases included the Bricked stencil by Tim Holtz. I taped the stencil in place and used Distress Inks in Tea Dye and Pumice Stone to create the pattern. I got as close as I could to the plants without overlapping them with the stencil pattern. After I removed the stencil, I used my blending tool to lightly sweep a little Weathered Wood to soften the remaining white background of the card stock. I blended out the earlier stipling with W1, W3, and E30 to merge into the bricks, combining the earlier background attempt and the new stenciling into one coherent scene. At this point, I was pretty pleased with myself and actually did take an interim photograph shown below.


I debated adding a little texture paste to the stencil, but I wasn't sure how it would react with the X-Press It Blending Card that I had used when I stamped the image. While I'm the first to say "it's just paper," I felt that I was too far along at this point for that level of experimentation. So I'm saving the texture paste for another project.

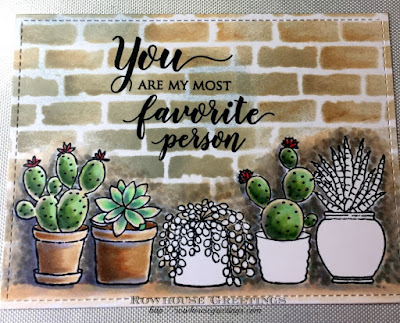
Next, I had to decide on the color scheme for the plants. I debated using bright colors, but decided to stick to a softer, more subtle color scheme. I first colored the two terracotta pots in E30, E31, E33, E35, and E57. I decided that I'd use G40, G43, and G46 for the first cactus, repeating the combination on the other similar cacti. I decided that I wanted to go a little darker for more contrast so I added G85 to the blend. I left a white line around the inside edge of the image as a highlight that I later colored with G20, R00, and Y02 to add highlights. A little R32 and R35 on the flowers provided a pop of color.


For the second plant, I base coated the leaves with YG11, gradually working darker with G00, G02, and adding highlights with Y02 and V000.

I decided that I wanted another pop of color so I used R000, R00, R01, and R02 to color the center pot. I later added R05 to deepen the color and a little Y02 to brighten the highlight. For the plant I used YG11 and BG72, a combination that I probably wouldn't use over a large area, but worked here to depict a highlight and a contrasting low light. I randomly added Y02 to brighten the colors.
The fourth pot reminded me of one that I've seen in my local gardening center which for some reason is only ever available in aqua so I used BG000, B000, BG01, and BG02. I used BV01 and BV02 to add depth and to emphasize the pattern on the pot.

I decided that I wanted the fifth pot to be a burnished gold color so I used Y21, Y23, Y26, and Y28 to achieve the golden color. It's hard to achieve depth when coloring with yellow, so I overpainted the yellow with BV01 and BV02 to add some depth, accentuating the curve of the pot. The final plant was colored using G40, G43, and G46, adding Y02 and R01 to the highlights.
I tried to repeat colors across the entire image to provide some continuity. With that in mind, I swept a little E20, Y02, and R00 randomly on the stenciled bricks to tie the Distress Ink shades into the Copic colors.

After the main coloring was complete, I used BV20 and BV23 to add cast shadows and to deepen areas that needed to recede into the background. A little BV00 on the terracotta pots added a bit of a weathered look to the surface.

And here's the finished product!

It took me several hours (and a lot of markers!) to complete this card, but I think the time and effort was worth it in the end. Hope my project inspires you to try something new!

Supplies

Stamps: Happy Together (*) by Penny Black; Grateful Heart (*) by Penny Black
Inks: Memento in Tuxedo Black by Tsukineko; Versafine in Onyx Black by Tsukineko; Distress Ink by Tim Holtz in Weathered Wood, Tea Dye, and Pumice Stone.
Dies: Small Stitched Rectangle Stackables by Lawn Fawn; Zig Zag Rectangle Stackables by Lawn Fawn
Stencil: Layering Stencil - Bricked by Stamper's Anonymous Tim Holtz
Copics: BV01, BV02, BV20, BV23, V000, R000, R00, R01, R02, R05, R32, R35, Y02, Y21, Y23, Y26, Y28, YG11, G00, G02, G20, G40, G43, G46, G85, BG000, BG01, BG02, BG72, B000, E30, E31, E33, E35, E57, W1, W3, W5

Wednesday, April 18, 2018

New Class! Copics, Stencils and Distress Inks - May 1st, 2018 at the Queen's Ink

I'm returning to the The Queen's Ink on Tuesday, May 1st to teach a Copic marker class featuring stamps from Stampers Anonymous / Tim Holtz. In this class, the emphasis will be on creating simple backgrounds to compliment your Copic coloring. Details are below. All necessary techniques are taught in class. Seats are limited, so sign up today! CLASS FEE: $25

The Queen’s Ink
Savage Mill Box 2048 | 8600 Foundry Street | Savage, Maryland 20763
phone: (301) 497-9449 | website: https://queensink.com

Tuesday, May 1, 2018, 1:00 PM - 3:30 PM
Tuesday, May 1, 2018, 6:00 PM - 8:30 PM

To register, call the Queen's Ink at (301) 497-9449

BRING TO CLASS: The list below reflects the Copic markers that I will use in class. You can follow along using the same colors OR substitute colors based upon your personal Copic collection. Please bring all your markers to class and make sure your Copics are marked with Washi tape or some other means of identification. Markers are available for purchase at The Queen’s Ink. Students will receive a 10% discount on Copic markers. I will be available prior to class to help with selection.

PLEASE NOTE: You must bring your own markers to participate in class. If you need markers, please contact The Queen's Ink in advance of class. If you wait until class time, you may not be able to purchase the markers you need.
  • Y02: Canary Yellow
  • Y32: Cashmere
  • Y35: Maize
  • Y38: Honey
  • R32: Peach
  • R35: Coral
  • B32: Pale Blue
  • B34: Manganese Blue
  • BG000: Pale Aqua
  • E21: Soft Sun
  • E25: Caribe Cocoa
  • 0: Colorless Blender
OTHER SUPPLIES: Please bring 2-3 ink blending tools and clean foam refills (such as Ranger Mini Ink Blending Tools / Foam Refills), liquid glue that dries clear (such as Ranger Multi Medium Matte), scissors suitable for fussy cutting, foam adhesive squares, and a tape runner adhesive or double-sided tape.


Sunday, April 15, 2018

Laurel Burch Blossoming Woman Window Card by Judi Kauffman for The Queen’s Ink

Window cards are such fun and so easy! Simply fold a long strip of cardstock in thirds, hand- or die-cut a window in the middle section (this section becomes the card front), glue something behind the window opening, fold in one of the side panels to line the card front and the other side panel becomes the inside/back.

If you're going to do a lot of stamping or stenciling, don't put anything behind the window until all panels are finished. It's much easier to work when the long sheet is still flat.


This project is a tad narrower than standard A2 size when folded. Each panel is 4” wide rather than 4.25” (the usual A2 width) but is the standard 5.5” height. You can make two window cards from one 12” x 12” sheet of cardstock!

The photo below shows the inside of the card with the panel on the left glued behind the window panel. (Look closely and you'll see where the cut edge meets the fold to the left of the large butterfly.)
This is an ‘FYI’ project: For Your Inspiration! No instructions this time since I think the photos tell the entire story – I used black ink, markers, and cardstock in three colors (one for the card, one for the face, and one for the sentiment). The face is fussy-cut and backed with cork pattern paper.
I used colored pencils for eye shadow and to highlight the woman’s nose. To unify everything and tone it down a bit, I used a stiff-bristle brush to streak on some white paint.

At the time this project was completed, all cling-mounted rubber stamps were in stock at The Queen’s Ink. If you’re looking at this someday as part of the blog archive that might not be the case, but if the stamps haven’t been discontinued they can be special ordered! A side note: There are matching die sets for each of the stamp sets.

SUPPLIES

  • Laurel Burch Blossoming Woman (face) – Stampendous
  • Laurel Burch Imagine Butterflies (butterflies) – Stampendous 
  • Laurel Burch Magical Horses (sentiment stamp) – Stampendous
  • Black ink
  • Markers of choice
  • Colored pencils of choice
  • White gel pen
  • White acrylic paint
  • Stiff paintbrush
  • Square cutting die (2”) or craft knife, ruler, and cutting mat

Saturday, April 7, 2018

Brushstroke Backgrounds Part One by Judi Kauffman for The Queen’s Ink


I have a friend who swears that she has 10,000 backgrounds in her studio, that she likes making them more than using them! I know how she feels. Making gel prints and interesting sheets filled with textures and patterns is so much fun – no agenda, nothing planned, just playful puttering.

So that I can add to my own stash of background papers (under a hundred, I think, but I haven’t counted lately. Or ever…) I’ve gotten in the habit of keeping a stack of quarter-sheets of cardstock on my work table and instead of wiping paintbrushes on a paper towel before washing them I wipe them on the cardstock sheets. I also keep narrow scraps of cardstock and wipe paint onto them while I’m at it.


What do I do with these instant backgrounds? I use them for card fronts, I die cut them, tear them into pieces, make ATCs, incorporate them into collage.

I start with a mix of light and dark color cardstock, allowing the swaths of paint to produce high contrast textures as well as tone-on-tone. I rarely add more than two or three layers of paint because I like the color of the cardstock to remain visible, but now and then I end up with a totally paint-encrusted surface.

Sometimes I keep going, adding stenciling, stamping (ArtFoamies stamps work great!), and layers of torn paper before I declare a background ‘done’.

Now and then what began as a background turns into a fully realized collage, a small piece of art.

Options:
Instead of cleaning your brushes on solid color cardstock, start with patterned paper, pages from damaged books, or gel prints.

Instead of using only the paint that is left over from other projects, put out small amounts of paint and make it an intentional project – but keep the brush almost dry and use very little paint!

YOUR TURN


I would like to challenge you to give this a try some time in April and then leave a comment here on the blog to share what you liked or didn’t like about making Brushstroke Backgrounds.

Today’s ‘show and tell’ is merely a starting point. Tune in later this month to see what evolves when we post Brushstroke Backgrounds Part Two. I’m going to work on a batch of cards.

SUPPLIES

  • Cardstock
  • Acrylic paint
  • Paintbrushes

Wednesday, April 4, 2018

Before and After – Midas’s Chicken Basket by Judi Kauffman for The Queen’s Ink

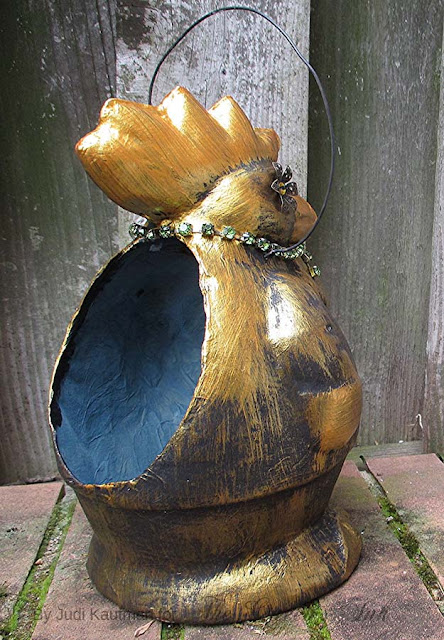
Once upon a time (AKA an embarrassingly long time ago) I bought a set of papier mache chicken-shaped baskets. The largest one (shown) is almost a foot tall, the other five fit neatly inside. Over the last decade or so I’ve given the little guys to friends at Easter, stuffed with candy – of course, but I never wanted to part with the big one, even though I never used it. 

After turning a cardboard shoe box into a fish for The Queen’s Inkling a couple of weeks ago I was on a roll with up-cycling…It was time to give the chicken a new look! I went for the Midas touch. I think it’s going to be perfect for holding craft sponges or perhaps a jar with paintbrushes and rulers. Or candy…Probably candy…

Here’s how it looked before I started:

Here’s what I did:

1. Paint the entire chicken with black gesso.

2. Using an almost dry stiff-bristle brush, highlight the chicken with Emperor’s Gold paint (a warm rose gold rather than yellow gold). Add a heavier coat of paint to the comb, wattle, sleeves and feet, but leave some of the black visible for a vintage effect.
3. Give the chicken a glitzy necklace. (Shown: 12” embellishment from Prima Marketing that I found at The Queen’s Ink, and it’s even my birthstone!).

4. Adhere filigree flowers for the eyelashes and cat’s eye stickers for the eyeballs. Use snippets cut from an Xtreme Adhesive Tab to secure the flowers and gem glue for extra hold on the cat’s eye stickers.

5. Paint the interior with a light contrasting color if needed. (I left it the original blue.)
Here’s what you can do:

1. Given that this chicken from Wimpole Street Creations probably hasn’t been available in twenty years, you’ll have to find another interesting animal-shaped basket. Scour the thrift shops, check out your own attic, see what’s left in the after-Easter sale bin at the grocery or drug store. If you can’t find one, make one! (Start with a plastic bowl, some air dry paper clay and a piece of wire.) 

2. Start with ANY solid color. Just because I chose black gesso doesn’t mean you have to! Substitute silver, bronze, or any other metallic color for the second coat, or use a color that coordinates with whatever color you used first. Purple paint with olive iridescent paint would be dramatic, pale yellow paint brushed with white would look shabby chic, and so on…It’s YOUR basket! 

3. Decorate the eyes, add jewelry, and dude it up as you see fit. 

SUPPLIES

  • 2” wide stiff-bristle paintbrush (Seth Apter’s favorites are available at The Queen’s Ink)
  • Black gesso
  • Gold acrylic paint
  • A papier mache basket shaped like an animal
  • 12” Bohemian Jewels (Prima Marketing)
  • Two filigree flowers
  • Xtreme Adhesive Tabs (Tombow)
  • Non-stick scissors to cut Tabs
  • Gem glue
  • Two 7mm Cat’s Eye stickers (Stanislaus Imports, www.lasioux.com) 

Sunday, March 25, 2018

Shoebox Adventures Part Two: Still Fishy! By Judi Kauffman for The Queen’s Ink

Part One of this tutorial showed how to create a fish from pieces of a cardboard shoebox. It was Kraft brown, except for the eye (a scrap from a gel print plus a button) and the vintage shoelace tag from which it was hanging, a minimalist approach to mixed media. I asked for feedback: Should I keep going or leave it as-is. ‘Keep going’ won, so I did.

I took apart the individual sections, glued pieces of gel prints onto each one, wrapped to the back so the edges are covered, and reassembled the fish. I added an eyelid cut from one of the gel prints and made lips from the end of a zipper I’d used for something else.

I also reconfigured the hanging loop and added another piece of the zipper as an accent at the top of the side fin. I removed the original side fin, a cardboard rectangle, because the gel print had the feel of a fin. I didn't mind losing that dimensional element.

As to the tail fin, I got lucky! One of my gel prints had a fan-like pattern that had the feel of a fin. PERFECT!
How about the back? Glad you asked! I traced around the fish to make a newsprint paper pattern, then cut a single piece of heavy chipboard about a half-inch smaller than the pattern to glue to the back of the finished fish.

I thought about doing some stamping and more collage but for now the fish is making me happy as is.

Should Part Two be the final stage, or should I keep going??? One of my friends thinks the fish needs eyelashes (after all, it's got orange lipstick, right? Another said sparkly scales. Please weigh in!

Here’s how it looked ‘Before’ and another peek at ‘After’:


YOUR TURN

If you created a fish, animal or something else from a shoebox last week, now it’s time to add torn or cut gel prints, collage papers or whatever else you think would be fun.

Paint and stencil directly onto the cardboard if you prefer.


SUPPLIES

Gel printing plate
Acrylic paints
Brayer
Stencils or other textures
Lightweight white printing paper
Parts of a zipper or other collage elements
Paper glue

Sunday, March 18, 2018

Shoe Box Adventures Part One: Something Fishy! By Judi Kauffman for The Queen’s Ink

Today's tutorial is a trash-to-treasure tale: I was breaking down a shoe box to put into recycling when it hit me that the hole in one of the flaps looked like an eye, and the notched area in another flap looked like the fin on a fish. Instead of taking it to the bin I took it to the studio, did some more cutting and before I knew it the fish was finished.

I backed the hole with a scrap from a gel print, removed the shank from a button and added it for the eye.
A taped section from the side of the box became the fin.


To hint at the origins of the cardboard, a shoe box, I chose a vintage card from some old shoelaces and used one of the shoelaces for the loop from which the fish will hang. The card is reinforced for added stability with a piece of the shoe box as well as a contrasting piece of cardstock. This rectangle is glued behind the fish where it also helps stabilize the fin.

I can’t decide if I like this minimalist approach to mixed media or not. I’m thinking about taking the fish apart and doing more to the pieces: paint, stencil, collage. 

What do YOU think? Please leave a comment! If the ‘vote’ says yes, I will do more to the fish and there will be a Part Two to this tutorial… 

NOW here’s YOUR CHALLENGE: 
  1. Find a cardboard carton. (Shown: Box from LL Bean slippers)
  2. Cut it into pieces.
  3. Arrange and rearrange the pieces until you’ve created an animal or a whimsical figure.
  4. Alter the pieces or leave them plain.
  5. Glue the pieces together.
  6. Embellish a little, a lot, or not at all.

  (Had it been a bird instead of a fish I know I would have added feathers!)

Monday, March 12, 2018

Horsing Around by Judi Kauffman for The Queen’s Ink


I’ve been horsing around with my newest set of Laurel Burch stamps again – Magical Horses. This time, I’ve corralled the set of matching dies as well! 

This project took shape because of the things that were on my drafting table at the same time. Serendipity, no intentional planning. On one side was a stack of stamped, colored, and die cut unicorns,horses and sentiments waiting to be turned into projects. Fanned out on the other side were some origami papers I brought back from a recent trip to San Francisco where I’d stopped at the famous Japanese import store, Daiso.

A silly thought popped into my head. The horses could go surfing in the waves on one of the papers and could cavort near the volcano on another. And the hologram square pattern would make an interesting wonky background, too. Bingo! I was off to the races...
 
If you don’t have access to similar origami paper, start with rubber stamps or stencils, scrapbook papers, or photos from magazines. The goal is to find unique places for the horses and unicorn to play – realistic as well as imaginary!

Note that when there is a pair of wings one of the wings is tucked behind the mane while the other is in front of the die cut horse or unicorn. It's fine to add a single wing rather than a pair and you'll see both options among the samples.


Make square cards with full sheets of origami paper* atop a coordinating patterned paper or solid color cardstock card base or trim the sheets and make rectangular side-fold vertical cards. Cards shown are 5” x 7” and 6” x 6”. (*Origami papers were 6” x 6” so I trimmed a scant eighth-inch on all sides, allowing me to get two cards out of one sheet of 12” x 12” heavy scrapbook paper.)

Be sure to stop by The Queen’s Ink to check out the Laurel Burch stamps that are in stock or if you’re following this blog from afar, check for your favorites at the web store or call on the phone line if you prefer. Patti and her team love to fill mail orders and are always happy to greet you in person!

Supplies:
  • Magical Horses stamp set by Laurel Burch (Stampendous)
  • Magical Horse die set by Laurel Burch (Stampendous)
  • Markers and pens of choice (gold, black, white, green, medium purple)
  • Kraft brown cardstock
  • Dark cordovan tone-on-tone pattern scrapbook paper
  • Blank deckle-edge fluorescent white 5” x 7” cards (Strathmore)
  • Dark green inkpad
  • Acrylic blocks for temporarily mounting the cling-backed stamps
  • Origami papers with scenes or patterns
  • Foam tape
  • Double-sided adhesive tape or glue stick
  • Craft knife, cutting mat

Friday, March 9, 2018

New Class! Calm, Carefree and Colorful - April 3rd, 2018 at the Queen's Ink

I'm returning to the The Queen's Ink on Tuesday, April 3rd to teach a new Copic marker class. In this workshop, we'll create three cards featuring the fun and exuberant images from Penny Black and sentiments from Ranger. The images are colored using a very limited set of Copic markers. Details are below. All necessary techniques are taught in class. Seats are limited, so sign up today! CLASS FEE: $25


Tuesday, April 3, 2018, 1:00 PM - 3:30 PM
Tuesday, April 3, 2018, 6:00 PM - 8:30 PM
Register online or call the Queen's Ink at (301) 497-9449


BRING TO CLASS: The list below reflects the Copic markers that I will use in class. You can follow along using the same colors OR substitute colors based upon your personal Copic collection. Please bring all your markers to class and make sure your Copics are marked with Washi tape or some other means of identification. Markers are available for purchase at The Queen’s Ink. Students will receive a 10% discount on Copic markers. I will be available prior to class to help with selection.

PLEASE NOTE: You must bring your own markers to participate in class. If you need markers, please contact The Queen's Ink in advance of class. If you wait until class time, you may not be able to purchase the markers you need.
  • V20: Wisteria
  • Y32: Cashmere
  • Y35: Maize
  • Y38: Honey
  • R35: Coral
  • R37: Carmine
  • R59: Cardinal
  • BG0000: Snow Green
  • B0000: Pale Celestine
  • B32: Pale Blue
  • B34: Manganese Blue
  • B37: Antwerp Blue
  • E000: Pale Fruit Pink
  • E00: Cotton Pearl (formerly Skin White)
  • E21: Soft Sun (formerly Baby Skin Pink)
  • E51: Milky White
  • E53: Raw Silk
  • E55: Light Camel
  • 0: Colorless Blender
OTHER SUPPLIES: Please bring scissors, foam adhesive squares, and a tape runner adhesive or double-sided tape.


Thursday, March 1, 2018

Magical Horses: Tags, Envelopes & ATCs by Judi Kauffman for The Queen’s Ink

If you’ve been following this blog, you know by now that I’m a big fan of the Laurel Burch stamps and dies from Stampendous that Patti keeps in stock at The Queen’s Ink and sells through the web store. If you’re a new subscriber, I hope you’ll scroll back through older tutorials to check out some previously-published projects…


One of my favorite sets is also the newest addition to my collection: Magical Horses. It includes two horses, a unicorn, two different wings (one facing left, one facing right), whimsical stars, and a sentiment – “You make this world a magical place,” as well as templates (both stencils and masks) for the horses and wings. As my grandmother would say, “Such a deal!”
Saying that there are endless possibilities for this set is an understatement. The wings can be combined with other stamp sets. Winged dogs and cats come to mind. The horses and unicorn can be winged, or not. Wings can be added via masking (as I’ve done on the horses shown below) or can be cut out and adhered with foam tape for dimension. Are you envisioning a herd of horses on a long accordion card? I am… Stay tuned for more projects in the near-future.
Oh, and I would be remiss if I didn’t mention the matching die set! I haven’t used it for today’s tutorial but have tested them and there are many ideas in the works. The dies cut so beautifully, right up to the stamped outlines, no halo. If I’m starting to sound like I’m on Stampendous’s payroll, I can assure you that I’m not! I’m simply an unabashed fan, grateful that Laurel Burch’s legacy continues via the stamps, templates and dies they’ve made available and grateful that Patti orders and re-orders so often.


Experienced paper crafters – use the photos for inspiration, skip the instructions, and head to the supply list.


Beginners – I’ve written detailed instructions, treating this like a class where you’d want to know the ‘how’ as well as the ‘why’. It’s a lot to read, but I hope it’s worth your time!


Design Strategies/Instructions:


1. To duplicate the projects as shown, choose a mid-value background color rather than white. I picked Kraft brown. Stamp with dark green, dark blue, or dark brown ink. Shown: Dark green. (If you prefer a more traditional approach, start with white and stamp in black.)


2. To duplicate the projects as shown, use 2.5” x 4.75” tags, 3” x 5.5” end-flap envelopes (a good fit for the tags!), and standard 2.5” x 3.5” Artist Trading Cards (ATCs). (If you prefer envelopes and tags in other sizes, go for it, but remember that ATCs are always 2.5” x 3.5”.)

3. Tags: Stamp a ghost print with the Mixed Mesh background, then stamp a horse or unicorn. Color with pencils, markers, white and gold pens as shown or as you choose. (A ghost print, also called a second-generation print, is when the stamp is inked and stamped on scrap paper, then stamped a second or third time on the project without re-inking to create a lighter impression.)

4. Envelopes: Orient the envelope so it is vertical or horizontal. Two horses or a horse and a unicorn will fit when the envelope is horizontal, but only one will fit when it’s vertical. To add wings – practice on scrap paper, use lightweight paper masks. Refer to the photos. Add stamped stars or draw white dots for the stars. Add the stamped sentiment above the horse as shown, or hand-letter a name or message. (Notice that the little bird on the smallest horse must be carefully masked so the wing won’t cover its face, or you can use the gold paint pen to fill its face and not worry about overlapping the stamped images.)

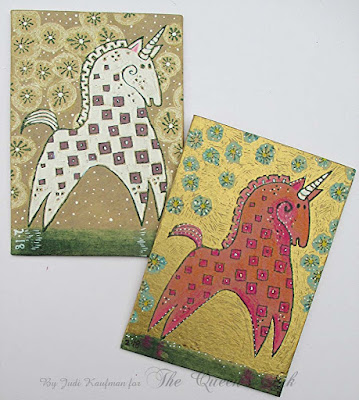
5. ATCs: Keeping the ATC as a vertical rectangle, stamp a unicorn (shown) or a horse. Add stars. Color with pencils, markers, white and gold pens.


6. Things to Notice (beginners, this is especially for you!):


I chose an Extra Fine (EF) nib gold pen so the marks remain visible when coloring large areas like the background around the pink unicorn and the winged horse on the right side of the horizontal envelope. The EF nib also makes it easy to color inside and around the stamped lines and add fine details. A broader nib would create smoother gold areas, but I wanted evidence of my hand at work! Test several Pen-touch pens in other nib sizes, you may like a different one or want to mix several.


I used broad nib alcohol markers to color the unicorn and horse on the tags, the pink unicorn, and the background on the two-horse envelope. I like the smooth flat color these markers provide on Kraft brown. The colors are transparent, therefore they will darken rather than remaining bright and true, so test on scrap paper before working on the actual project.


Colored pencils work great on top of marker-colored areas. The pink unicorn’s cheek, neck and legs are shaded with pink pencil and is face, neck, and haunches are shaded with orange pencil. Colored pencils also work well on the Kraft brown substrate, no markers added. For example: Use a white pencil around a shape to highlight it and help it pop off the background as I did on the horse tag.


Tiny lines and dots in white and gold abound! The more, the better, I think. (Skip them if that’s not the look you’re after.)


Supplies:
  • Magical Horses (Stampendous)
  • Mixed Mesh (Stampendous)
  • 6” x 6” Handle for temporarily mounting Mixed Mesh (Stampendous)
  • Smaller acrylic blocks for temporarily mounting other stamps
  • Dark green ink
  • Envelopes, tags, ATCs in Kraft brown or color(s) of choice
  • Gelly Roll White 08 (Sakura of America)
  • Pen-touch EF Gold (Sakura of America)
  • ProMarkers (Winsor & Newton)
  • Colored pencils