Monday, November 27, 2017

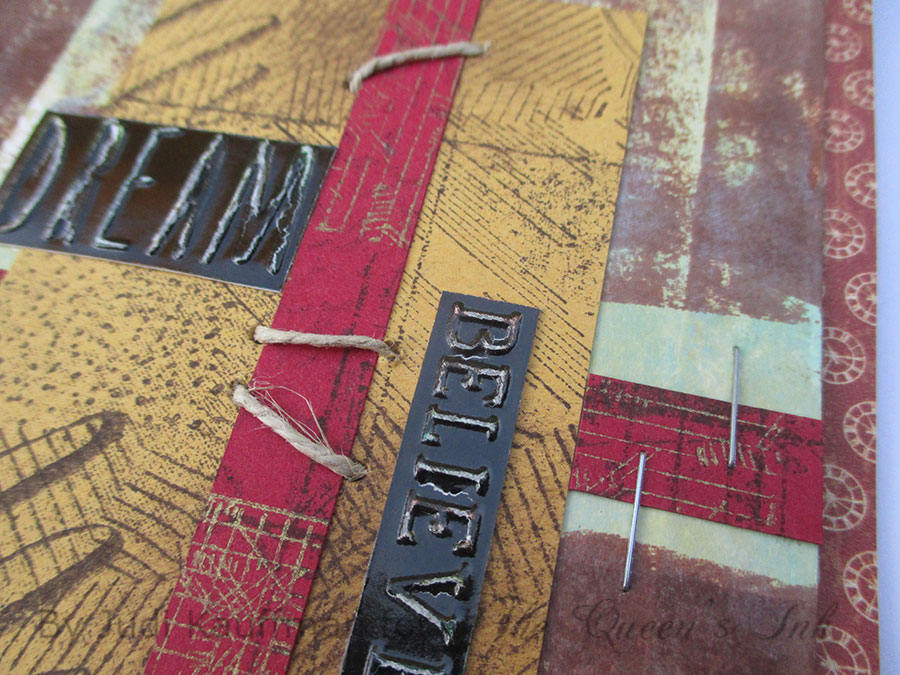
Texture Cards by Judi Kauffman for The Queen’s Inkling

Here’s an easy recipe for a big batch of fun mixed media collage cards, bookmarks, and a coil-bound notebook!

MIX TOGETHER –

Ink-Only Backgrounds from yesterday’s post:

AND

Stamped pieces created with rubber stamps from Red Castle sheets called Texture Plates 1 and 2 (available exclusively from The Queens Ink) shown last week:

FOR CARDS –
  • Tear and/or cut assorted pieces
  • Mix in other collage papers
  • Layer, arrange and rearrange till pleased
  • Glue, sew and/or staple the layers
  • Add more stamping
  • Embellish with word stickers, paper clips, safety pins, brads, key charm, and such
  • Add details with pens
  • Add color with pencils, markers and paint pens

(Cards shown: 5 x 7, 4.25 x 5.5, 6 x 6, and ATC-size 2.5 x 3.5)

OTHER PROJECTS –

Cut strips for bookmarks, laminate
Laminate 5.5 x 11 notebook covers, punch covers and inside pages, coil-bind
Add a calendar pad and punch a hanging hole, create a ribbon loop

PHOTO GALLERY –

Dip into the photo gallery for inspiration and ideas. (The supply list follows the gallery.)


SUPPLIES -
  • Red Castle Texture Plates 1 and 2
  • Stamped papers created with Red Castle Texture Plates 1 and 2
  • Solid color cardstock
  • Patterned papers and cardstock
  • Ink-Only Backgrounds from yesterday’s tutorial
  • Inks
  • Assorted rubber stamps (eyes, arrows)
  • Embossing folders with words and phrases
  • Tim Holtz idea-ology ‘Clippings’ word stickers
  • Low-relief embellishments
  • Pigma Micron pen 01 in black (Sakura)
  • Pen-touch in Gold Metallic (Sakura)
  • Colored pencils
  • Twine
  • Awl to pierce holes for sewn elements
  • Needle with large eye (to sew twine)
  • Brads (round, square, triangle, dragonfly)

New Class! Holiday Gift Tags - December 5th, 2017

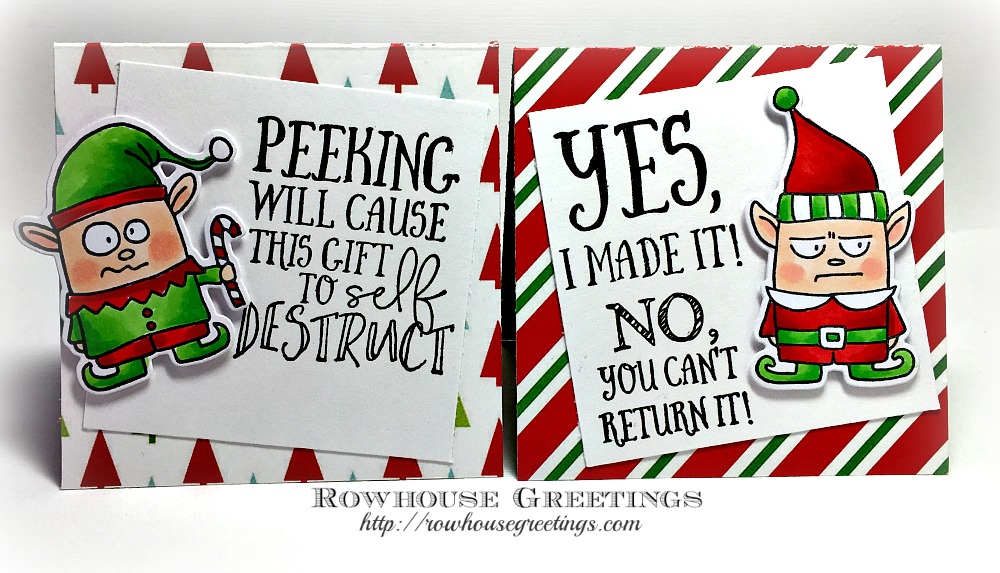
I'm returning to the The Queen's Ink on Tuesday, December 5th to teach a holiday gift tag class featuring stamps and sentiments from Taylored Expressions. In this workshop, we'll make six gift tags and two gift card holders featuring the Elf Grumplings. The images are colored using a very limited set of Copic markers. Details are below. Seats are limited, so sign up today!

Tuesday, December 5th, 2017, 10:30 AM - 1:30 PM
Register online or call the Queen's Ink at (301) 497-9449

BRING TO CLASS: The list below reflects the Copic markers that I will use in class. You can follow along using the same colors OR substitute colors based upon your personal Copic collection. You will need two blendable green markers, two blendable red markers as well as a skin tone and a blush tone (optional). Please bring all your markers to class and make sure your Copics are marked with Washi tape or some other means of identification. Markers are available for purchase at The Queen’s Ink. Students will receive a 10% discount on Copic markers. I will be available prior to class to help with selection.
  • E00 - Skin White (can substitute E50 or E51)
  • YG06 - Yellowish Green
  • YG09 - Lettuce Green
  • R20 - Blush (can substitute RV10 or E93)
  • R24 - Prawn
  • R46 - Strong Red
  • 0 - Colorless Blender
OTHER SUPPLIES: Please bring scissors, foam adhesive squares (I used Scrapbook Adhesives 3D Thin Foam Squares), and a tape runner adhesive or double-sided tape.


Sunday, November 26, 2017

Ink-Only Backgrounds by Judi Kauffman for The Queen’s Ink

I played with Red Castle Texture Plate stamps last week, creating backgrounds that I promised to use for projects in an upcoming post. (And some envelopes, because I love stamping envelopes so much…)

I’ll be keeping that promise in the next tutorial, but today I wanted to show backgrounds that involve no stamps at all – just INKS! In this case, Tim Holtz’s Distress, Distress Oxide, and dye inks.

See you in a day or two with a batch of projects that combine the Texture Plate pieces with the ones you see here! There will be LOTS of cards, bookmarks, and a coil-bound notebook, too…

TIP:
Take digital photos of your Ink-Only Backgrounds before you cut or tear them up to use in projects! Because you created them without any rubber stamps* or other elements that are under copyright where electronic reproduction is not allowed, you can alter them in your computer and, best of all, make as many photo prints of them as you want. That way, you can use the photo prints as collage papers or backgrounds in your projects, along with – or instead of – the originals!

(*Reminder: Each rubber stamp company has an ‘Angel Policy’ outlining how its stamps can be used. Red Castle’s policy is hand-stamping only, no electronic reproduction via photos, scanner, etc., but Red Castle does allow you to sell whatever you hand-stamp! This means I could use photo prints of my ink-only creations on my cards, but the stamped elements must be hand-stamped.)


INSTRUCTIONS:
  1. Use the pads as ink applicator tools
  2. Activate the Distress Oxide Inks with a bit of water from a fine mist spray bottle.
  3. Air-dry the pieces that are on uncoated cardstock.
  4. Add clear embossing powder and use a heat tool to set the Distress Oxide Inks on coated cardstock.
  5. Use the photo gallery below to give you some ideas for color combinations and compositions.


SUPPLIES:
  • Distress Oxide Inks in colors of choice
  • Distress Inks in colors of choice
  • Other dye inks in colors of choice
  • Coated and uncoated cardstock
  • Panel cards
  • Fine mist spray bottle, water
  • Heat tool

Tuesday, November 21, 2017

It’s Texture Time: Red Castle Texture Plates 1 and 2, Part 1 By Judi Kauffman for The Queen’s Ink

I’ve been in love with Red Castle Texture Plate 1 and 2 stamp sheets for almost two decades. They came out in 2000 and I can’t even begin to count how many times I’ve used them for my projects.

Now that these amazing full sheets of red rubber stamps are available again, exclusively at The Queen’s Ink, perhaps you’ll fall in love with them, too…

No projects today. This time I just wanted to show a variety of ways that the stamps can be combined and layered using stamps from only one sheet, or both. I created super simple backgrounds that will be cut up and used for cards, tags and collage, plus some #10 envelopes (shown in the photo at the start of this post).


Where you see fine lines in the photos above, I used the edge of an inkpad touched against the card stock to create them. Wherever you see soft colors the inks were applied with an almost-dry round craft sponge. And where there are straight edges, I used newsprint to create a mask.

I worked on small sheets of ivory cardstock as well as full 8.5” x 11” pieces of red, rust, and mustard yellow cardstock. I chose cranberry, denim, raisin, espresso and metallic gold inks.


Texture Plate 1 includes 19 stamps – 18 different 1.5” texture squares and a 1.25” x 2.25” Celtic knot rectangle. Texture Plate 2 includes 6 stamps – four different 3.25” squares, a 2” x 3” Celtic knot rectangle and a 1.25” x 3.75” diagonal stripe rectangle.

IDEAS & OPTIONS:
  • Stamp big sheets of gift wrap.
  • Stamp tags, collage papers, backgrounds for cards.
  • Make texture squares to use for paper mosaics.
  • Stamp into polymer or air-dry clay. (Red Castle stamps are VERY deep etched and perfect for clay!)
  • Consider the stamps as drawing tools and create large letters, landscapes, animals, and more.
  • Putter! (The more you stamp, experiment and play without a plan, the more ideas will pop into your head…)

REMINDER:
The remaining Red Castle inventory is quite limited, and it bears repeating: If you like something, order it right away, please, to avoid disappointment.

As of today, there are still 15 Texture Plate 1 stamp sheets available, but only half a dozen of Texture Plate 2. And when they’re gone, they’re gone forever.

SUPPLIES:


Thursday, November 16, 2017

Fa La Llama from Neat and Tangled by Nancy Sheads for The Queen's Ink

Welcome back to The Queen's Inkling!

Today I'm back with a new Copic coloring project featuring the adorable Fa La Llama stamp set from Neat & Tangled. Danielle Walls, from Neat & Tangled will be bringing with her a Trunk Show of her stamp images to the Queen's Ink this Saturday. But more about that in a moment!

Presenting Fa La Llama!
Featuring the Fa La Llama stamp set from Neat & Tangled
Dies from Lawn Fawn
Paper from Authentique
Embellishments from Ranger, 28 Lilac Lane, and Zig.
All available from The Queen's Ink!

I knew as soon as I saw this stamp set that I had to color this image so I pulled out my Copic markers and got to work. The full list of Copic colors are listed below. After the coloring was complete, I embellished the sky to look like snow, adding dots with gel pens in white and silver as well as a little Kirarina Wink in White Pearl. I added Wink of Stella in Clear to the blanket and scarf for some shimmer. For additional sparkle, I added Ranger Stickles to the sky and the ground to give the snow some dimension. 

Products on my supply list below are all available from The Queen's Ink. 

JOIN US ON SATURDAY FOR
THE NEAT & TANGLED TRUNK SHOW!

On Saturday, The Queen's Ink will be hosting "The Coloring Challenge Road Trip" featuring Kathy Racoosin, a Maryland artist (and friend of the Queen) who hosts a wonderful technique filled blog “The Daily Marker”. Although seats for this event are sold out, you can still get in on the fun. Danielle Walls, from Neat & Tangled will be joining Kathy and bringing with her a Trunk Show of her stamp images that are great for coloring. They will be available for purchase on the day of the event. 

As a way of giving back to the community Kathy is donating her time and $30.00 of the registration fee will go to support Dan DiGennaro, Danielle’s dad who is suffering from CRPS (Complex Regional Pain Syndrome). The Queen’s Ink will be donating 10% of our sales from that to support Dan and his journey toward wellness.

Stop by, check out the Trunk Show and join in on the fun!

SUPPLY LIST

Paper: X-Press It Blending Card by Copic; Frosty Winter Two by Authentique; Bazzill Basics in Smokey
Stamp: Fa La Llama by Neat & Tangled
Ink: Versamark Watermark Ink and Memento in Tuxedo Black, both by Tsukineko
Die: Small Stitched Rectangle Stackables by Lawn Fawn
Embellishments: Sakura Gelly Roll Pens in White and Silver (snow); Kirarina Wink in White Pearl (snow); Stampendous Detail White Embossing Powder (sentiment); Ranger Stickles in Crystal (snow); Zig Wink of Stella in Clear (blanket and scarf) Festival of Light Sequins from 28 Lilac Lane.
Copics: B37, B39, C9 (sky); W00, W0, W1 E30 (llama); E00, E97 (face); BG49, BG53, BG57, V01, V05, V06, V09 (scarf); V01, V05, V06, BG59, BG53 (blanket); BG49, BG53, BG57 (gift wrap); V01, V05, V06, V09 (ribbon); BG0000, BG000, BG10, B0000, B000, BV00 (snow)


Wednesday, November 15, 2017

Laurel Burch Whiskers by Nancy Sheads for The Queen's Ink

Welcome back to The Queen's Inkling!

I'm back with a new project featuring products from Stampendous, Tim Holtz, and Lawn Fawn, all available from The Queen's Ink!

I've always loved the Laurel Burch feline images - colorful, quirky - just like most of the cats in my life. So when I saw that Stampendous released Whiskers as a stamp, I had to have it. While the image would be beautiful in all sorts of bright Copic inks, today I just didn't feel like figuring out all of those colors. 

Sometimes I'm a lazy colorist. There, I've said it.

So instead, I pulled out six shades of Distress Inks in rainbow hues to form a colorful background. I heat embossed the image, added a bit of vellum and attached a die cut "hello" cut from gold foil. And with little effort, I have a card ready to pop in the mail to brighten a friend's day.

Supplies

Paper: Neenah Solar White 110#; Bazzill Basics in Black; Arches Hot Press Watercolor Paper; Gold Foil by Bazzill
Stamp: Whiskers (Laurel Burch) by Stampendous!
Inks: Versamark Watermark Ink by Tsukineko; Tim Holtz Distress Inks in Blueprint Sketch, Seedless Preserves, Picked Raspberry, Ripe Persimmon, Spiced Marmalade and Mustard Seed
Embellishments: Black Detail Embossing Powder by Stampendous
Die: Scripty Hello by Lawn Fawn

Tuesday, November 14, 2017

At the Dog Park with Laurel Burch By Judi Kauffman for The Queen’s Ink

I can’t seem to resist Laurel Burch’s stamps! Every time I visit The Queen’s Ink a few more of them find their way into my basket. The set called Dog Park is the newest addition to my collection. It includes five cling-mounted gray rubber dog stamps and a bonus template with positive and negative pieces for masking and stenciling. A matching die set is available, too. Wish I had already bought it – it’s on the list for my next trip. As much as I enjoy fussy cutting, it would have been easier and faster to simply die cut the dogs instead of using scissors.

Cat lovers: Not to worry! Laurel Burch’s line has a similar set with a trio of cats just for you…

I created three cards, an envelope and an Artist Trading Card for today’s tutorial.

INSTRUCTIONS:


1. Stamp dogs onto white cardstock or envelopes; color with pencils. Go for realistic colors or pick a whimsical imaginary palette. Use markers instead of pencils if you prefer. For cards, cut out the dog(s) and adhere to a background stamped with Magic Stamp textures or purchased patterned papers. Layer onto a solid color side-fold card base.


2. Alternatively, stamp dogs onto dogs onto cardstock that has previously been stamped in pink with a Magic Stamp block for an allover background pattern. Accent with Glitter Dots peel-offs and/or color with pencils. Another option: Stamp onto tone-on-tone printed cardstock. For cards, cut out the dog(s) and adhere to a background stamped with Magic Stamp textures or patterned papers. Optional: Add a shiny moon made from a White Iridescent Shimmer Sheetz circle topped with leftovers from a sheet of Silver Glitter Dots peel-offs as shown in the project photo at the start of this blog post and shown in close-up below.


3. For ATC, add a sentiment and adhere a rectangle for the dog to sit on.


4. For the polka dot card, mix dot patterns in two sizes. Emboss a piece of Pink Iridescent Shimmer Sheetz with rose pattern folder, lightly sand; adhere to the card for the dog to stand on.


SUPPLIES:
  • Laurel Burch Dog Park stamp set LBCRS04
  • Dylusions whimsical phrase stamp by Dyan Reaveley
  • Black ink
  • Chameleon Color Tones pencils or pencils of choice
  • Cardstock in white and assorted colors
  • Dot pattern papers
  • Shimmer Sheetz in Pink and White Iridescent
  • Glitter Dots in Purple, leftovers from Silver
  •   (note: Purple Glitter Dots are pinkish raspberry in color)
  • Background papers (hand stamped or purchased)