Wednesday, July 17, 2019

Stencil, Paint, Doodle by Judi Kauffman for The Queen’s Ink

I’m puttering in my Traveler’s Notebook again! This time I used dye inks and a sponge wedge to stencil an allover pattern, followed by some Finetec pearlescent and iridescent watercolors to slightly blur the pattern, followed by doodling with a Pigma Micron pen 05. (The sparkle and shine of the Finetec paints isn’t obvious in the photos, but it’s there and it looks beautiful in person.)
Choose a stencil with a repeat pattern. It doesn’t matter if it’s simple or complex. Move the stencil and use different colors to create two sections that align like a landscape with ground and sky.

Alternatively, choose a stencil with a random pattern! (That’s what I’m going to do next...) 
If you don’t want the stenciled pattern to blur, use permanent inks before painting with watercolors. (I like the blurred effect.)

Outline the pattern with a mix heavy and fine lines, dots and little dashes; color a few of the negative areas. I used one pen, varying my hand pressure to produce fine lines and reinforcing the thickest ones by working in the same area with more marks and strokes.
The heavy drawing paper pages in this particular insert/booklet are perforated and can be removed to send as a postcard, but I plan on leaving them intact.

YOUR TURN
*Stencil, paint and doodle in an art journal, on pieces of cardstock to use for cards or lightweight papers to tear and cut for collage.
*Add more paint AFTER the doodling is done! 
*Instead of white cardstock, start with black or other dark color, or stencil onto a gel print or purchased patterned paper.

SUPPLIES
  • Traveler’s Notebook with drawing paper insert
  • Pigma Micron pen 05 nib (black or color of choice) 
  • Finetec watercolors
  • Paintbrush
  • Inks
  • Sponge wedge

Tuesday, July 16, 2019

Paper Mosaics by Judi Kauffman for The Queen’s Ink

Patti Euler’s Paper Mosaics class teaches a technique I’ve returned to again and again and again. If you missed it, give her a call and I’m sure if enough people want her to schedule another session she’ll do so! Her class project is a piece of wall art, but during my vacation I decided instead to make square note cards. Same technique, different outcome.

The cards shown here are made with her unique way of putting together a mix of papers, leafing foil, embossing powders and stamps. (I won’t share the steps because it’s her class and technique - I’m here as her student and fan showing how much fun it is to keep using what I learned!)

Options:
  • The squares on my cards measure 1” x 1” but they can be sized to suit your taste and project. 
  • Instead of square cards, line up the mosaics in longer rows for rectangular cards or make single rows for bookmarks.
  • Gift tags? Of course! Magnets? Why not!
  • Circles or diamonds instead of squares? Sure. Get out the dies instead of a ruler and craft knife...

Endless possibilities - Thanks, Patti!

Monday, July 15, 2019

Copic Coloring With Nancy Sheads - July 30, 2019


Copic Coloring With Nancy Sheads
Tuesday, July 30, 2019, 1:00 PM – 3:00 PM 
Register online or call the Queen’s Ink at (301) 497-9449

Join Nancy for a new Copic markers class featuring quirky, eclectic and always fun images from RubberMoon Stamps. In this class, you will make three cards with emphasis on basic Copic techniques. The coloring has been kept simple in order to spend more time creating mixed media backgrounds with stencils, washi tape, embellishment mousse, and more. Be prepared to get your fingers inky! All necessary techniques are taught in class. Seats are limited, so sign up today! 

BRING TO CLASS: The list below reflects the Copic markers that Nancy will use in class. You can follow along using the same colors OR substitute colors based upon your personal Copic collection. Please bring all your markers to class and make sure your Copics are marked with Washi tape or some other means of identification. Markers are available for purchase at The Queen’s Ink. Students will receive a 10% discount on Copic markers. Nancy will be available prior to class to help with selection.

PLEASE NOTE: You must bring your own markers to participate in class. If you need markers, please contact The Queen’s Ink in advance of class. If you wait until class time, you may not be able to purchase the markers you need.
  • E000: Pale Fruit Pink
  • E01: Pink Flamingo
  • E04: Lipstick Natural
  • E11: Barley Beige
  • BV00: Mauve Shadow
  • BV01: Viola
  • B00: Frost Blue
  • B02: Robin's Egg Blue
  • YG13: Chartreuse
  • YG17: Grass Green
  • R24: Prawn
OTHER SUPPLIES - Please bring:
  • 12×12 glass media mat (such as the one by Tonic Studios or We R Memory Keepers) OR a non-stick craft sheet
  • Distress Inks in Twisted Citron, Evergreen Bough and Broken China
  • Three ink blending tools - one for each color for stenciling (can be brushes, sponges, etc.)
  • Scissors suitable for fussy cutting
  • Foam adhesive squares
  • Tape runner adhesive or double-sided tape


Saturday, July 13, 2019

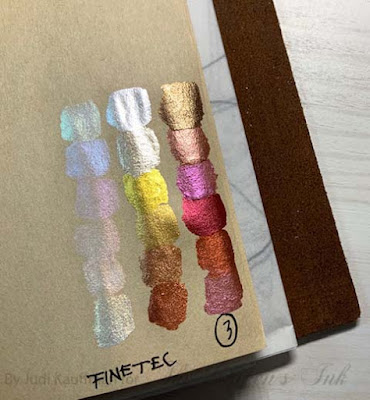
Puttering with Finetec Watercolors in my Traveler’s Notebook By Judi Kauffman for the Queen’s Ink

I treated myself to three 6-color Finetec iridescent and pearlescent watercolor palettes (F0603, F0600, F5600) and have been happily puttering with them. I’m going to invest in more next time I’m at The Queen’s Ink - I didn’t get the blue, purple, and green color families yet. I’m going to create my own ‘set’ with an empty tin that holds a dozen colors, sold in individual pans. Empty 6-color tins are also available, as are other pre-selected palettes, but now that I’ve had a chance to experiment I want to come up with a custom array!!!
I highly recommend starting to putter with a single brush so the only variable is the paper, but there are no rules. A water brush might be fun, but I stuck with an angled brush and two jars of water - one to clean the brush and the other to pick up water for activating the cake watercolors to a creamy consistency.

I bought a pad of black watercolor paper but haven’t worked with it yet. My color swatches are painted on 100# black and 803 white cardstock, along with some splotches done directly onto a page in the Kraft paper insert/booklet.

I did a lot of random brushstrokes on black cardstock, too. Some of the pieces ended up in a straight-cut collage in the Traveler’s Notebook, I layered other pieces to make a trio of bookmarks.


Your turn! Begin with one or two colors - or more if you like to have a bunch of options right from the start. Vary the background papers, incorporate rubber stamping and heat embossing and do some coloring. Paint a simple flower or stick with overlapping brushstrokes! Check out the samples that are at the store and keep an eye out for my upcoming projects and tutorials featuring the Finetec watercolors!

Supplies:
  • Finetec iridescent and pearlescent watercolors
  • Good quality paintbrush
  • Black and white cardstock
  • Optional: Traveler’s Notebook with insert/booklets of choice

Monday, July 8, 2019

Carved Magic Stamp - Part 2 By Judi Kauffman for The Queen’s Ink

I am really into carving Magic Stamp blocks, though ‘carving’ isn’t quite the right word for the process: It’s really about CUTTING the blocks with scissors or a craft knife. As you saw in Part 1, simple shapes can be super versatile. I combined the heart and starburst from the earlier tutorial with several new shapes, shown below.
I kept going with envelopes, this time adding in quite a bit more doodling. The supply list is the same as for Part 1 - Magic Stamp blocks, craft knife or scissors, inks, pens, envelopes.

Tip for beginners: If you don’t feel confident about cutting freehand, practice by making paper templates for very simple shapes on lightweight paper. Trace the shapes onto the block with a permanent marker before you start cutting the block. Hold onto the scraps: You can make tiny stamps out of the leftover pieces.

YOUR TURN! 

(I’m not done yet. The half-leaf shapes shown in today’s tutorial make wonderful EYES when turned so they are horizontal! Tune in for Carved Magic Stamp Parts 3, 4...I plan to keep going!)


Tuesday, July 2, 2019

“Carved” Magic Stamp - Part 1 By Judi Kauffman for The Queen’s Ink

While I was on vacation I wanted to do some stamp carving but didn’t have tools or carving blocks, so I turned to Magic Stamp. My mantra has always been “Easy Isn’t Cheating” and there’s not much that’s easier than cutting the blocks with scissors or a simple craft knife, both of which I did have with me.
I cut a folk art-style heart, starburst, and a wonky leaf/wing shape. Then I got out some envelopes, inks, and a starfish peg stamp and started playing.

Hearts became petals and leaves, the wing shape became petals, too. The starfish made a nice flower center as well as a nice random accent. I did some random smudging with inks to add soft backgrounds.

Doodling? Of course! Out came the Pigma Micron Black and Gelly Roll White pens.

YOUR TURN: Use these samples for inspiration. Have fun! 


Supplies:
  • Magic Stamp blocks
  • Ink pads
  • Scissors or craft knife
  • Pigma Micron pens in black, assorted nib sizes (Sakura of America)
  • Gelly Roll White 10 (Sakura of America)
  • Envelopes
  • Craft sponge or ink applicator tool