Sunday, March 25, 2018

Shoebox Adventures Part Two: Still Fishy! By Judi Kauffman for The Queen’s Ink

Part One of this tutorial showed how to create a fish from pieces of a cardboard shoebox. It was Kraft brown, except for the eye (a scrap from a gel print plus a button) and the vintage shoelace tag from which it was hanging, a minimalist approach to mixed media. I asked for feedback: Should I keep going or leave it as-is. ‘Keep going’ won, so I did.

I took apart the individual sections, glued pieces of gel prints onto each one, wrapped to the back so the edges are covered, and reassembled the fish. I added an eyelid cut from one of the gel prints and made lips from the end of a zipper I’d used for something else.

I also reconfigured the hanging loop and added another piece of the zipper as an accent at the top of the side fin. I removed the original side fin, a cardboard rectangle, because the gel print had the feel of a fin. I didn't mind losing that dimensional element.

As to the tail fin, I got lucky! One of my gel prints had a fan-like pattern that had the feel of a fin. PERFECT!
How about the back? Glad you asked! I traced around the fish to make a newsprint paper pattern, then cut a single piece of heavy chipboard about a half-inch smaller than the pattern to glue to the back of the finished fish.

I thought about doing some stamping and more collage but for now the fish is making me happy as is.

Should Part Two be the final stage, or should I keep going??? One of my friends thinks the fish needs eyelashes (after all, it's got orange lipstick, right? Another said sparkly scales. Please weigh in!

Here’s how it looked ‘Before’ and another peek at ‘After’:


YOUR TURN

If you created a fish, animal or something else from a shoebox last week, now it’s time to add torn or cut gel prints, collage papers or whatever else you think would be fun.

Paint and stencil directly onto the cardboard if you prefer.


SUPPLIES

Gel printing plate
Acrylic paints
Brayer
Stencils or other textures
Lightweight white printing paper
Parts of a zipper or other collage elements
Paper glue

Sunday, March 18, 2018

Shoe Box Adventures Part One: Something Fishy! By Judi Kauffman for The Queen’s Ink

Today's tutorial is a trash-to-treasure tale: I was breaking down a shoe box to put into recycling when it hit me that the hole in one of the flaps looked like an eye, and the notched area in another flap looked like the fin on a fish. Instead of taking it to the bin I took it to the studio, did some more cutting and before I knew it the fish was finished.

I backed the hole with a scrap from a gel print, removed the shank from a button and added it for the eye.
A taped section from the side of the box became the fin.


To hint at the origins of the cardboard, a shoe box, I chose a vintage card from some old shoelaces and used one of the shoelaces for the loop from which the fish will hang. The card is reinforced for added stability with a piece of the shoe box as well as a contrasting piece of cardstock. This rectangle is glued behind the fish where it also helps stabilize the fin.

I can’t decide if I like this minimalist approach to mixed media or not. I’m thinking about taking the fish apart and doing more to the pieces: paint, stencil, collage. 

What do YOU think? Please leave a comment! If the ‘vote’ says yes, I will do more to the fish and there will be a Part Two to this tutorial… 

NOW here’s YOUR CHALLENGE: 
  1. Find a cardboard carton. (Shown: Box from LL Bean slippers)
  2. Cut it into pieces.
  3. Arrange and rearrange the pieces until you’ve created an animal or a whimsical figure.
  4. Alter the pieces or leave them plain.
  5. Glue the pieces together.
  6. Embellish a little, a lot, or not at all.

  (Had it been a bird instead of a fish I know I would have added feathers!)

Monday, March 12, 2018

Horsing Around by Judi Kauffman for The Queen’s Ink


I’ve been horsing around with my newest set of Laurel Burch stamps again – Magical Horses. This time, I’ve corralled the set of matching dies as well! 

This project took shape because of the things that were on my drafting table at the same time. Serendipity, no intentional planning. On one side was a stack of stamped, colored, and die cut unicorns,horses and sentiments waiting to be turned into projects. Fanned out on the other side were some origami papers I brought back from a recent trip to San Francisco where I’d stopped at the famous Japanese import store, Daiso.

A silly thought popped into my head. The horses could go surfing in the waves on one of the papers and could cavort near the volcano on another. And the hologram square pattern would make an interesting wonky background, too. Bingo! I was off to the races...
 
If you don’t have access to similar origami paper, start with rubber stamps or stencils, scrapbook papers, or photos from magazines. The goal is to find unique places for the horses and unicorn to play – realistic as well as imaginary!

Note that when there is a pair of wings one of the wings is tucked behind the mane while the other is in front of the die cut horse or unicorn. It's fine to add a single wing rather than a pair and you'll see both options among the samples.


Make square cards with full sheets of origami paper* atop a coordinating patterned paper or solid color cardstock card base or trim the sheets and make rectangular side-fold vertical cards. Cards shown are 5” x 7” and 6” x 6”. (*Origami papers were 6” x 6” so I trimmed a scant eighth-inch on all sides, allowing me to get two cards out of one sheet of 12” x 12” heavy scrapbook paper.)

Be sure to stop by The Queen’s Ink to check out the Laurel Burch stamps that are in stock or if you’re following this blog from afar, check for your favorites at the web store or call on the phone line if you prefer. Patti and her team love to fill mail orders and are always happy to greet you in person!

Supplies:
  • Magical Horses stamp set by Laurel Burch (Stampendous)
  • Magical Horse die set by Laurel Burch (Stampendous)
  • Markers and pens of choice (gold, black, white, green, medium purple)
  • Kraft brown cardstock
  • Dark cordovan tone-on-tone pattern scrapbook paper
  • Blank deckle-edge fluorescent white 5” x 7” cards (Strathmore)
  • Dark green inkpad
  • Acrylic blocks for temporarily mounting the cling-backed stamps
  • Origami papers with scenes or patterns
  • Foam tape
  • Double-sided adhesive tape or glue stick
  • Craft knife, cutting mat

Friday, March 9, 2018

New Class! Calm, Carefree and Colorful - April 3rd, 2018 at the Queen's Ink

I'm returning to the The Queen's Ink on Tuesday, April 3rd to teach a new Copic marker class. In this workshop, we'll create three cards featuring the fun and exuberant images from Penny Black and sentiments from Ranger. The images are colored using a very limited set of Copic markers. Details are below. All necessary techniques are taught in class. Seats are limited, so sign up today! CLASS FEE: $25


Tuesday, April 3, 2018, 1:00 PM - 3:30 PM
Tuesday, April 3, 2018, 6:00 PM - 8:30 PM
Register online or call the Queen's Ink at (301) 497-9449


BRING TO CLASS: The list below reflects the Copic markers that I will use in class. You can follow along using the same colors OR substitute colors based upon your personal Copic collection. Please bring all your markers to class and make sure your Copics are marked with Washi tape or some other means of identification. Markers are available for purchase at The Queen’s Ink. Students will receive a 10% discount on Copic markers. I will be available prior to class to help with selection.

PLEASE NOTE: You must bring your own markers to participate in class. If you need markers, please contact The Queen's Ink in advance of class. If you wait until class time, you may not be able to purchase the markers you need.
  • V20: Wisteria
  • Y32: Cashmere
  • Y35: Maize
  • Y38: Honey
  • R35: Coral
  • R37: Carmine
  • R59: Cardinal
  • BG0000: Snow Green
  • B0000: Pale Celestine
  • B32: Pale Blue
  • B34: Manganese Blue
  • B37: Antwerp Blue
  • E000: Pale Fruit Pink
  • E00: Cotton Pearl (formerly Skin White)
  • E21: Soft Sun (formerly Baby Skin Pink)
  • E51: Milky White
  • E53: Raw Silk
  • E55: Light Camel
  • 0: Colorless Blender
OTHER SUPPLIES: Please bring scissors, foam adhesive squares, and a tape runner adhesive or double-sided tape.


Thursday, March 1, 2018

Magical Horses: Tags, Envelopes & ATCs by Judi Kauffman for The Queen’s Ink

If you’ve been following this blog, you know by now that I’m a big fan of the Laurel Burch stamps and dies from Stampendous that Patti keeps in stock at The Queen’s Ink and sells through the web store. If you’re a new subscriber, I hope you’ll scroll back through older tutorials to check out some previously-published projects…


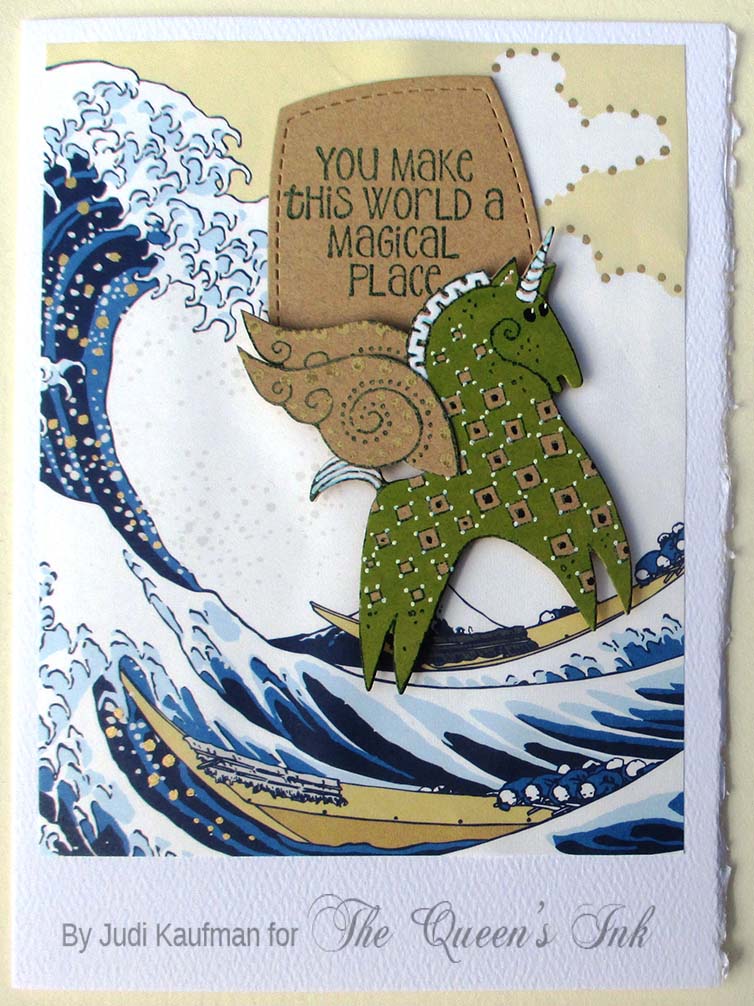
One of my favorite sets is also the newest addition to my collection: Magical Horses. It includes two horses, a unicorn, two different wings (one facing left, one facing right), whimsical stars, and a sentiment – “You make this world a magical place,” as well as templates (both stencils and masks) for the horses and wings. As my grandmother would say, “Such a deal!”
Saying that there are endless possibilities for this set is an understatement. The wings can be combined with other stamp sets. Winged dogs and cats come to mind. The horses and unicorn can be winged, or not. Wings can be added via masking (as I’ve done on the horses shown below) or can be cut out and adhered with foam tape for dimension. Are you envisioning a herd of horses on a long accordion card? I am… Stay tuned for more projects in the near-future.
Oh, and I would be remiss if I didn’t mention the matching die set! I haven’t used it for today’s tutorial but have tested them and there are many ideas in the works. The dies cut so beautifully, right up to the stamped outlines, no halo. If I’m starting to sound like I’m on Stampendous’s payroll, I can assure you that I’m not! I’m simply an unabashed fan, grateful that Laurel Burch’s legacy continues via the stamps, templates and dies they’ve made available and grateful that Patti orders and re-orders so often.


Experienced paper crafters – use the photos for inspiration, skip the instructions, and head to the supply list.


Beginners – I’ve written detailed instructions, treating this like a class where you’d want to know the ‘how’ as well as the ‘why’. It’s a lot to read, but I hope it’s worth your time!


Design Strategies/Instructions:


1. To duplicate the projects as shown, choose a mid-value background color rather than white. I picked Kraft brown. Stamp with dark green, dark blue, or dark brown ink. Shown: Dark green. (If you prefer a more traditional approach, start with white and stamp in black.)


2. To duplicate the projects as shown, use 2.5” x 4.75” tags, 3” x 5.5” end-flap envelopes (a good fit for the tags!), and standard 2.5” x 3.5” Artist Trading Cards (ATCs). (If you prefer envelopes and tags in other sizes, go for it, but remember that ATCs are always 2.5” x 3.5”.)

3. Tags: Stamp a ghost print with the Mixed Mesh background, then stamp a horse or unicorn. Color with pencils, markers, white and gold pens as shown or as you choose. (A ghost print, also called a second-generation print, is when the stamp is inked and stamped on scrap paper, then stamped a second or third time on the project without re-inking to create a lighter impression.)

4. Envelopes: Orient the envelope so it is vertical or horizontal. Two horses or a horse and a unicorn will fit when the envelope is horizontal, but only one will fit when it’s vertical. To add wings – practice on scrap paper, use lightweight paper masks. Refer to the photos. Add stamped stars or draw white dots for the stars. Add the stamped sentiment above the horse as shown, or hand-letter a name or message. (Notice that the little bird on the smallest horse must be carefully masked so the wing won’t cover its face, or you can use the gold paint pen to fill its face and not worry about overlapping the stamped images.)

5. ATCs: Keeping the ATC as a vertical rectangle, stamp a unicorn (shown) or a horse. Add stars. Color with pencils, markers, white and gold pens.


6. Things to Notice (beginners, this is especially for you!):


I chose an Extra Fine (EF) nib gold pen so the marks remain visible when coloring large areas like the background around the pink unicorn and the winged horse on the right side of the horizontal envelope. The EF nib also makes it easy to color inside and around the stamped lines and add fine details. A broader nib would create smoother gold areas, but I wanted evidence of my hand at work! Test several Pen-touch pens in other nib sizes, you may like a different one or want to mix several.


I used broad nib alcohol markers to color the unicorn and horse on the tags, the pink unicorn, and the background on the two-horse envelope. I like the smooth flat color these markers provide on Kraft brown. The colors are transparent, therefore they will darken rather than remaining bright and true, so test on scrap paper before working on the actual project.


Colored pencils work great on top of marker-colored areas. The pink unicorn’s cheek, neck and legs are shaded with pink pencil and is face, neck, and haunches are shaded with orange pencil. Colored pencils also work well on the Kraft brown substrate, no markers added. For example: Use a white pencil around a shape to highlight it and help it pop off the background as I did on the horse tag.


Tiny lines and dots in white and gold abound! The more, the better, I think. (Skip them if that’s not the look you’re after.)


Supplies:
  • Magical Horses (Stampendous)
  • Mixed Mesh (Stampendous)
  • 6” x 6” Handle for temporarily mounting Mixed Mesh (Stampendous)
  • Smaller acrylic blocks for temporarily mounting other stamps
  • Dark green ink
  • Envelopes, tags, ATCs in Kraft brown or color(s) of choice
  • Gelly Roll White 08 (Sakura of America)
  • Pen-touch EF Gold (Sakura of America)
  • ProMarkers (Winsor & Newton)
  • Colored pencils