skip to main |
skip to sidebar
Here’s an Artist Trading Card, another project featuring scraps from a sheet of Forever stamps. (FYI: The scraps bordered a sheet honoring first responders.) Just like the previously published collage cards from Stamp Scraps, Part I, this ATC is a good way to use the zig zag-edged adhesive-backed bits that surround and/or separate postage stamps.
The photo above shows the finished ATC embellished with Tim Holtz words and a vintage photo of a dog, also from Tim. The photo below shows the ATC base created with solid color cardstock, topped with painted corrugated cardboard, wood grain patterned paper, and the scraps from the postage stamp sheet.
YOUR TURN
Have you used any scraps from sheets of postage stamps yet? If not, give it a try! You’ll certainly be surprised at what you create.
Supplies:
- Adhesives of choice
- Tim Holtz word stickers, die cut vintage photos
- Scraps from sheets of postage stamps
- Cardstock, corrugated board, patterned paper
- Paints or inks (optional)
Cardstock plus paint strokes; words plus phrases cut from cast-off, damaged books, magazines, or mailers; gold and black pens - these are the ingredients for Found Poetry ATCs.
YOUR TURN
Backgrounds could be much more complex, layered with collage, stenciled, stamped, and more. Or keep it simple like these! Tip: Be sure to sign and date the back of your creations.
Supplies:
- Pen-touch in gold (Sakura)
- Pigma Micron in black (Sakura)
- Adhesive of choice
- Cardstock
- Finetec pearlescent watercolors
- Black acrylic paint
- Paint brushes
The leftovers from sheets of stamps are sometimes so interesting, zig zag lines with adhesive backing, way too nice to toss in the trash!
Here’s what one sheet yielded:
The card at the start of the tutorial and the two others, shown below, offer a peek at how I used these colorful scraps to create super simple cards, but there are may other possibilities: Add inks, stenciled designs, use some embossing folders for more texture. Instead of vintage photos, go for collage cut from magazines!
Supplies:
- Leftovers from postage stamp sheets
- Cardstock, patterned papers
- Adhesives of choice
- Vintage photos (Tim Holtz)
- Collage papers, paper scraps
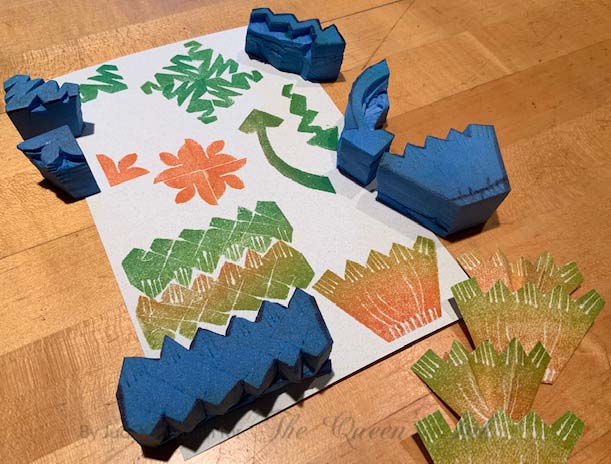
Yes, I’m still cutting up blocks! It’s so easy, so fast, and so much fun. (I have a class in the planning stages so be on the lookout for details!) A single Magic Stamp block gave me two arrows, two big zig zag stamps, one small zig zag corner and a corner with petals.
The photo above shows the six stamps as well as what each one looks like when printed. I did a bit of fussy cutting and pleating to figure out ways to add dimension. There are so many possibilities for repeat patterns, scenes, flowers, and more. And I will be mixing and matching these stamps with others I’ve cut, along with rubber and clear stamps, stencils, and collage.
Zig Zags, Part II will follow as soon as I go from puttering to projects. Yes, I’ll be experimenting on envelopes and making cards, but I think I want to work on some gift wrap as well!
YOUR TURN
Cut up a Magic Stamp block (or several!) using a craft knife, scissors, or both. Keep it to simple shapes. Optional: Add fine details with cut lines and incised marks made with a fingernail, stylus, pencil or pen.
Supplies:
- Magic Stamp block(s)
- Craft knife
- Scissors
- Inks
- Cardstock
In the second installment of this tag tutorial I added stamping and heat embossing to tags that were already altered with inks and paints. I’d planned on doing some layering and collage, but decided instead to keep it simple and do some die cutting. That way I don’t lose the fan patterns from the stamps and the beautiful texture created by the embossing powders.
I die cut the blue/teal/gold tags as a pair, switching the die cut partial circle pieces from one to the other. I liked that effect so much that I repeated it with the red/cranberry tags. That left the black/gold tag. I cut a 2.5” circle and a partial circle at the corner, used StazOn ink to age the edges of the cut pieces. For all tags, the pieces got taped in position.
But it wasn’t quite enough so I used metallic braid to add some touches of embroidery here and there - straight stitches and French knots.
To finish, each tag got some coordinating yarn or braid for a hanging loop and a solid color cardstock rectangle on the back on which to write a title, date, and my name. This covers the tape as well as the lumps and knots from the stitching.
Here’s a photo gallery for inspiration:
Supplies:
- Tags (previously altered - see Tags, Part I and II)
- Circle dies
- Metallic braid
- Yarn to coordinate with tags
- StazOn ink in Black
- Tape
As promised, I’ve continued to work on the tags I started a couple of weeks ago. Round two includes stamped and heat-embossed fans, sometimes arranged in a pattern and sometimes in a random manner. I chose gold and verdigris embossing powders. All but one tag is either-or. The tag at the lower left in the photo above incorporates both!
These still aren’t finished and I’m not sure what I’ll be adding: Paint, maybe a few gems, some doodling, stitching, layered-on collage (torn, cut)? More stamping (something tiny, one large abstract image?) And some sort of cord, twine, yarn or thread, of course.
This same process would be fun for art journal pages, Artist Trading Cards or Coins, card fronts, bookmarks. It’s now YOUR TURN!
Supplies:
- Tags (pre-altered - see Tags, Part I)
- Pigment ink
- Embossing powders
- Heat tool
- Fan stamps by Nathalie Kalbach
It was my fault. As I was edging some tags with a gold Pen-touch paint pen preparing them for a round of Found Poetry, I pressed too hard to get the paint flowing. A blob of gold appeared on a tag where it wasn’t supposed to be! Rather than toss that tag, I pressed it against another tag to see what would happen and I liked the effect so I added even more gold and kept going with more tags to create a series of random shapes that looked like the continents viewed from outer space. After the gold dried, I got out the Finetec pearlescent watercolors and added random strokes and splotches.
What’s next? I’m not sure. I’m thinking that some stenciling is in order and perhaps these tags will end up as backgrounds for Found Poetry after all.
YOUR TURN
Get out those tags you know you have around somewhere, or make a few!
Start with blobs of metallic gold paint (or copper or whatever color you prefer). Smoosh tags together to spread the paint. When the metallic paint is dry, keep going - add pearlescent paint, do some stamping or stenciling or gel printing or... What’s next for YOU?
Instead of tags, work on larger pieces of cardstock or in your art journal. Alternatively, work on small pieces (ATC-size, inchies, twinchies).
TAGS, PART II
I’ll be revealing the next incarnation of my tags in Tags, Part II, coming soon to a theater near you. Just kidding. They’ll be right here on The Queen’s Inkling.
SUPPLIES
- Tags
- Gold paint pen (Pen-touch, Sakura of America)
- Pearlescent watercolors (FInetec)
- Paintbrush
- Anything else you want!