Thursday, October 31, 2019

5-Minute Cards & Envelopes: Flowers & Fronds By Judi Kauffman for The Queen’s Ink

Need some cards in a hurry? Here’s the recipe for a batch that is fast and easy. And matching envelopes, too. Just one ink, a fine nib pen and a craft sponge. Even if you decide to color with markers or colored pencils they’re still fast and easy.

Ingredients:
  • Stamps (RubberMoon) -
  • Flowers & Fronds Collection
  • Klimt Triangles
  • Start a new chapter
  • Dark brown ink pad
  • Fine nib pen in same shade of brown
  • White or ivory card blanks (5x7 or other sizes)
  • White or ivory envelopes (sized to match cards)
  • ATC blanks
  • Ink-compatible markers in assorted colors
  • Colored pencils, optional
  • Round craft sponge


How-to:
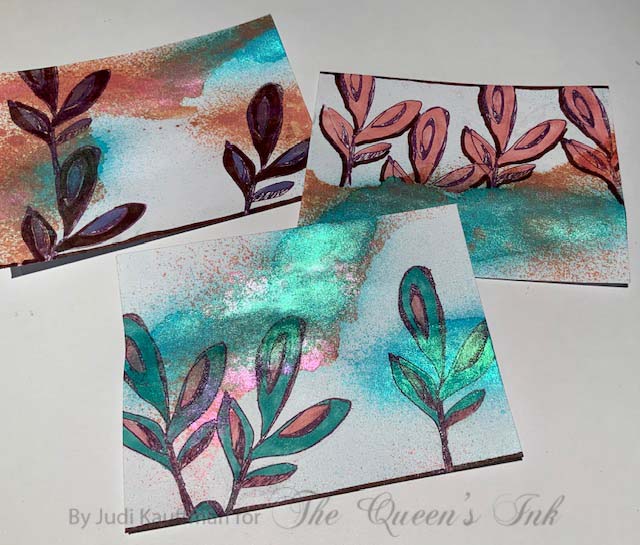
1. Stamp flowers, leaves, and other elements onto cards, envelopes and ATCs as shown in the photos below, or as preferred. Use fine nib pen in matching color to draw stems where needed. The envelopes have large triangles and are shown above. (Keep the lines you draw loose to imitate the style of the rubber stamps.)
2. Use craft sponge to smudge the same ink as shown, or as preferred.
3. DONE!
4. Optional - Use markers (as shown) or colored pencils (not shown) to color a lot or just a little bit.


Tuesday, October 29, 2019

The Cut-Up! By Judi Kauffman for The Queen’s Ink

Remember that batch of envelopes I stamped with the new collection from Elizabeth St. Hilaire? The batch that included a bunch of absolute DUDS? (Please scroll back if you missed that tutorial...) Well, instead of consigning them to the trash I decided to cut and tear them up and turn the pieces into cards (shown above). And while I was at it, I fussy cut the trio that I did like because the flowers were so pretty and mixed nicely with some of the leaves from the duds.

You may recognize the black/copper oval (an extra from my Build a Pumpkin tutorial). The turquoise and bronze backgrounds are glitter paper dry-brushed with turquoise acrylic paint. The words and phrases are from Tim Holtz.

It’s a lot of fun to turn flops into something new, and it’s always a good idea to combine leftovers from various projects. Nothing wasted. New ways of seeing.


YOUR TURN:
1. Keep those DUDS! Don’t toss the cards, envelopes, gel prints, and other items that haven’t worked out well.
2. Keep looking at them. When an idea strikes, do some slicing and dicing.
3. Combine and rearrange the pieces, mix elements from more than one project.
4. Layer. Over-stamp, add stenciling. Keep going till you’ve created something wonderful OR until you end up with another DUD to use at some point in the future.
5. Instead of cards, bookmarks or other such projects work directly into an art journal.
6. At any point in the process, throw away what you just can’t bear to keep!

Sunday, October 27, 2019

Envelopes or Card Fronts? By Judi Kauffman for The Queen’s Ink

Do I need more envelopes? NO! And yet...whenever I get a new set of stamps it’s the first thing I do. I experiment on a batch of envelopes, testing and puttering. The envelopes shown above are the ones that I feel are a success. The combination of iridescent sprays, inks, embossing powder and markers is one I will return to for card fronts. And I might just cut or tear up these envelopes and use the pieces for collage cards.

The envelopes that follow are, to my eye, absolute DUDS! And yet even though I don’t like them, I had fun and learned a lot. For example: An opaque copper pen over embossed outlines looks pretty terrific, and markers over iridescent sprays produce some really great effects.

I’m definitely going to tear up all six envelopes and see if I can come up with something interesting that uses the bits and pieces!

What do you like or dislike? Do you agree with my assessment? (I don’t usually show projects that I think are unsuccessful, but I’ve noticed that many blogs include designers’ rejects as a way of exploring alternatives, so I’m giving it a try!)


YOUR TURN
  1. Start with cardstock or pre-folded card bases instead of envelopes
  2. Instead of only one stamp, mix and match several.
  3. Instead of iridescent sprays go for splattered paint or use stencils to create backgrounds.
SUPPLIES:
  • Stamps from the Elizabeth St. Hilaire “Fronds & Florals” collection - RubberMoon: es7623h Cosmic Mum;  es7621g Among the Clover; es7620i Aloha
  • Iridescent spray mists (2 coordinating colors)
  • Alcohol markers
  • Metallic paint pens
  • Embossing powders in colors to coordinate with mists
  • Embossing ink
  • Heat tool
  • Envelopes or cardstock

Friday, October 25, 2019

Circles and Squares Card Quartet by Judi Kauffman for The Queen’s Inkling

While I was making the pumpkin cards (already published here on the blog) I used the same collections of RubberMoon rubber stamps and the same inks to stamp four extra 4” square pieces of copper pearlized metallic cardstock. 

Next, I used circle dies to cut into each pair, switching around the pieces in the same way that I’ve done for some mixed media tags (also published on this blog - scroll back if you missed them!). For two of the squares I added extra black ink along most of the edges.

Here are photos of the fronts and backs of the pairs, showing how I taped the pieces in place:


And here are the 5”x5” side-fold cards I made with the revised squares:

To finish things off I added Tim Holtz word stickers, angled so they radiate outward from one of the circles.

YOUR TURN
  1. Stamp abstract patterns onto cardstock.
  2. Cut the pieces into matching size shapes (squares, rectangles, tags, banners).
  3. Die cut the pieces in pairs using circles or ovals.
  4. Switch the shapes from one square to the other, tape from the back. Die cut again one or more additional times. Tape from the back after each cut. (Optional: Add ink to edges of shapes.)
  5. Make cards or tags or adhere the pieces into an art journal and keep going: Use paint, stencils, colored pencils, add more layers with torn or cut collage elements.


Wednesday, October 23, 2019

Welcome Fall - Copic Coloring with Nancy Sheads

Join Nancy Sheads for a new Copic markers class featuring Oddball and Tiny Townie stamps from Stamping Bella. In this class, you will make two cards featuring stamps from Stamping Bella with emphasis on basic Copic techniques. All necessary techniques are taught in class. Seats are limited, so sign up today! CLASS FEE $25

Wednesday, November 13, 2019 - 1:00 PM - 3:30 PM
To register, call the Queen’s Ink at (301) 497-9449

BRING TO CLASS: The list below reflects the Copic markers that Nancy will use in class. You can follow along using the same colors OR substitute colors based upon your personal Copic collection. Please make sure your Copics are marked with Washi tape or some other means of identification. Markers are available for purchase at The Queen’s Ink. Students will receive a 10% discount on Copic markers. Nancy will be available prior to class to help with selection.

PLEASE NOTE: You must bring your own markers to participate in class. If you need markers, please contact The Queen’s Ink in advance of class. If you wait until class time, you may not be able to purchase the markers you need.
  • BV20: Dull Lavender
  • BV23: Grayish Lavender
  • BV25: Grayish Violet
  • R24: Prawn
  • YR21: Cream
  • YR23: Yellow Ochre
  • YR27: Tuscan Orange
  • YG03: Yellow Green
  • YG17: Grass Green
  • YG67: Moss
  • BG000: Pale Aqua
  • BG70: Ocean Mist
  • BG72: Ice Ocean
  • BG75: Abyss Green
  • E04: Lipstick Natural
  • E11: Barley Beige
  • E25: Caribe Cocoa
  • E50: Egg Shell
  • E51: Milky White
  • 0: Colorless Blender
OTHER SUPPLIES: Please bring
  • Scissors suitable for fussy cutting
  • Foam adhesive squares
  • Tape runner adhesive or double-sided tape


Sunday, October 20, 2019

Build a Pumpkin by Judi Kauffman for The Queen’s Ink

Need to whip up some fall cards in a jiffy? These are easy, easy, easy:

1. Punch, die- or hand-cut five ovals.

2. Add texture with an embossing folder plus paint or use rubber stamps. If stamping, allow inks to blend here and there. Optional: Edge each oval with a dark ink. (Shown - Black and white inks for orange pumpkin, copper paint for black pumpkin.)

3. Stamp squares and rectangles, sized in the appropriate scale in proportion fo the ovals, to use for the background pieces. Use the same inks as for the ovals. Allow the inks to blend. (Shown - squares, rectangles). Stamp with a mix of patterns, large and small sizes. Optional: Edge the background pieces with a dark ink.

4. Glue the background layers to a top-fold card base or add an easel.

5. Adhere the ovals, overlapping as shown to create a pumpkin. Add foam squares beneath the center-front oval for a bit of dimension.

6. Add a stem made from tree bark. (Substitute a flat hand-cut stem to mail for standard postage.)

Options:
  • Make a 2-sided pumpkin and hang as an ornament.
  • Frame in a shadow box.
  • For a more realistic pumpkin, hand-cut misshapen ovals instead of using dies; blend and shade instead of stamping or embossing.

Supplies:
  • Ink pad - RubberMoon Moonlight White and Eclipse Black
  • Stamps - kp7612h Imperfect Wheels by Kae Pea (RubberMoon); Es7633k Eccentric Concentric by Elizabeth St. Hilaire (RubberMoon)
  • Other - Adhesives of choice, Oval dies or punches, Acrylic paint in copper metallic, Embossing folder with allover pattern, Cardstock or heavyweight paper in black, orange, copper, mustard, or color(s) of choice


Sunday, October 13, 2019

Fun with Acorn Caps by Judi Kauffman for The Queen’s Ink

I filled my jacket pocket with acorn caps the other day, thinking it would be fun to use them for who-knows-what! I do know what...but I’m not going to show how the projects came together for a few days. That will give those of you who live near an oak tree time to gather your own assortment!

Tune in later this week for some fun surprises. I wonder if you could guess what I decided to do. And I am curious to hear how YOU would put acorn caps to use, too. Leave a comment if you’d like to speculate here on the blog.