Friday, August 30, 2019

New Class! Oddball Alice in Wonderland Coloring with Copics with Nancy Sheads

Join Nancy for a new Copic markers class featuring the Oddball Alice in Wonderland Collection from Stamping Bella. In this class, you will make three whimsical cards featuring basic Copic techniques as well as embossing and ink blending. All necessary techniques are taught in class. Seats are limited, so sign up today! CLASS FEE $25

Tuesday, September 24, 2019, 1:00 PM – 3:00 PM 
Register online or call the Queen’s Ink at (301) 497-9449

BRING TO CLASS: The list below reflects the Copic markers that Nancy will use in class. You can follow along using the same colors OR substitute colors based upon your personal Copic collection. Please make sure your Copics are marked with Washi tape or some other means of identification. Markers are available for purchase at The Queen’s Ink. Students will receive a 10% discount on Copic markers. Nancy will be available prior to class to help with selection.

PLEASE NOTE: You must bring your own markers to participate in class. If you need markers, please contact The Queen’s Ink in advance of class. If you wait until class time, you may not be able to purchase the markers you need.
  • BV25: Grayish Violet
  • BG10: Cool Shadow
  • BG11: Moon White
  • BG23: Coral Sea
  • BG15: Aqua
  • Y11: Pale Yellow
  • Y21: Buttercup Yellow
  • YR23: Yellow Ochre
  • YR24: Pale Sepia
  • R24: Prawn
  • R46: Strong Red
  • B91: Pale Grayish Blue
  • B93: Light Crockery Blue
  • B95: Light Grayish Cobalt
  • B97: Night Blue
  • E000: Pale Fruit Pink
  • E01: Pink Flamingo
  • E04: Lipstick Natural
  • E11: Barley Beige
  • C1: Cool Gray No. 1
  • C3: Cool Gray No. 3
  • C5: Cool Gray No. 5
  • 0: Colorless Blender
OTHER SUPPLIES: Please bring:
  • Scissors suitable for fussy cutting
  • Foam adhesive squares
  • Tape runner adhesive or double-sided tape


Sunday, August 25, 2019

The Eyes Have It by Judi Kauffman for The Queen’s Ink

One of the nice things about Magic Stamp blocks is how lightweight they are! I can pack a dozen in a tote bag and it doesn’t weigh as much as a corned beef sandwich...

Today’s tutorial shows four different almond shapes cut from a single block. I cut cardstock into quarter-sheets, thinking that I would use the blocks as eyes, but one thing led to another and the project went in other directions.


Instead of sending them as postcards or incorporating my doodled pieces into card fronts I decided to make a book. Because the drawings extend to the edges I didn’t want to use a coil or disk binding system that would have cut off part of the image.
As you can see from the photo above, each pair of pages is glued back-to-back with a hinge extending at the edge. (Those pieces are teal cardstock, 1” x 5.5”, scored lengthwise at .5”.) There is a .5” x 5.5” strip glued as a spacer between pages. I used washi tape to decorate and help keep the pages neatly bound.

Below is a photo gallery for inspiration. Watch the Queen’s Ink calendar - Patti and I are scheduling a class where I’ll be teaching how to cut up Magic Stamp blocks for cards, collage, mono-printmaking and more! (We haven’t figured out a good name for the class yet - Any ideas???)


Supplies:
  • Magic Stamp block(s)
  • Cardstock
  • Craft knife
  • Cutting mat
  • Cardstock
  • Inks of choice
  • Pigma Micron pens, black, assorted nib sizes (Sakura)
  • Gelly Roll, white (Sakura)
  • Colored pencils
  • Washi tape

Tuesday, August 20, 2019

Torn Paper Collage by Judi Kauffman for The Queen’s Ink

I’m still spending a lot of time puttering in my Traveler’s Notebook! This time I used some lightweight mulberry paper, some Magic Stamp blocks, and touches of Finetec pearlescent watercolors to create 12 x 12 collage sheets. Some of them ended up on the 2-page spread shown above. Others ended up torn into pieces and adhered to heavyweight mulberry paper or cardstock, as shown in the gallery of photos that follows.

I may do some stenciling on the 2-page spread, add some found poetry, more stamping, or all three!

By creating the collage on large sheets before adhering them to the pages of the Traveler’s Notebook the notebook paper doesn’t ripple. If that wouldn’t bother you, work straight into the notebook.


Friday, August 16, 2019

New Class! Coloring With Copics - Techniques for Clothing - Queen's Ink

Join Nancy Sheads for a new Copic markers class focusing on techniques for coloring drop folds in clothing. In this class, you will make two cards featuring stamps from Stamping Bella with emphasis on basic Copic techniques. All necessary techniques are taught in class. Seats are limited, so sign up today! CLASS FEE $25

Tuesday, August 27, 2019, 1:00 PM – 3:00 PM 
Register online or call the Queen’s Ink at (301) 497-9449


BRING TO CLASS: The list below reflects the Copic markers that Nancy will use in class. You can follow along using the same colors OR substitute colors based upon your personal Copic collection. Please make sure your Copics are marked with Washi tape or some other means of identification. Markers are available for purchase at The Queen’s Ink. Students will receive a 10% discount on Copic markers. Nancy will be available prior to class to help with selection.

PLEASE NOTE: You must bring your own markers to participate in class. If you need markers, please contact The Queen’s Ink in advance of class. If you wait until class time, you may not be able to purchase the markers you need.
  • BV00: Mauve Shadow 
  • V12: Pale Lilac 
  • V15: Mallow 
  • V17: Amethyst 
  • Y18: Lightning Yellow 
  • YR15: Pumpkin Yellow 
  • YR18: Sanguine 
  • BG10: Cool Shadow 
  • BG11: Moon White 
  • BG53: Ice Mint 
  • BG57: Jasper 
  • E000: Pale Fruit Pink 
  • E01: Pink Flamingo 
  • E11: Barley Beige 
  • E19: Redwood 
  • E49: Dark Bark 
  • E50: Egg Shell 
  • E53: Raw Silk 
  • E57: Light Walnut 
  • C3: Cool Gray No. 3 
  • C5: Cool Gray No. 5
  • C7: Cool Gray No. 7
NOTES
  • You can substitute BG23 and BG15 in place of BG53 and BG57
  • If you have a favorite hair color combination, you can substitute it in place of E49, E50, E53, and E57.
OTHER SUPPLIES Please bring:
  • Scissors suitable for fussy cutting
  • Foam adhesive squares
  • Tape runner adhesive or double-sided tape


Tuesday, August 13, 2019

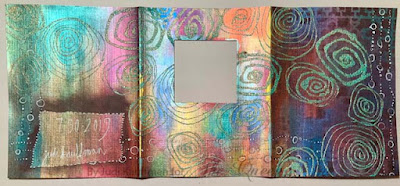
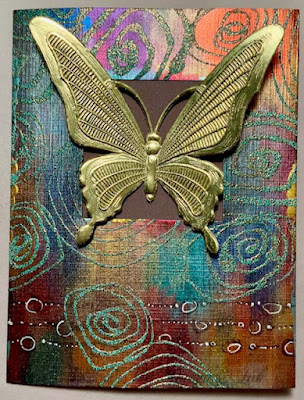
A2 Window Card by Judi Kauffman for the Queen’s Ink

I’m having so much fun with the Finetec pearlescent watercolors! They are fabulous for backgrounds and easy to blend.

I began with a layer of randomly applied colors on navy blue cardstock cut and scored to make a window card with a square window hand- or die-cut in the second/center panel. Then I stamped and heat embossed a mix of patterns (Elizabeth St. Hilaire stamps from RubberMoon, pigment ink and verdigris embossing powder). 

Next, I stamped and colored a face to put in the window (Her Majesty Patti Euler’s stamp!). As an alternative, a gold butterfly embellishment works great. Add a contrasting panel and a stamped sentiment inside the card or use the space for a hand-written note!

YOUR TURN
Use the photo gallery below to show you the steps and provide inspiration. If you don’t feel like decorating the inside lining of the card front and the back of the card skip those two panels; paint, stamp and emboss only the front. Switch colors to suit your taste and the occasion.


SUPPLIES
  • Stamps from RubberMoon and Her Majesty’s collection by Patti Euler
  • Finetec pearlescent watercolors
  • Flat paintbrush 
  • Pigment ink (dark color)
  • Verdigris embossing powder (or other of choice)
  • Heat tool
  • Colored pencils
  • Cardstock in navy blue or other dark color
  • Cardstock in off-white and mauve
  • Optional: Large gold butterfly (die cut or other)

Friday, August 9, 2019

Simple Die Cut Collage by Judi Kauffman for The Queen’s Ink

My Traveler’s Notebook is getting quite a workout lately! I love the size, the variety of insert booklets, the portability; I’m crazy about the way it’s expanding, the mix of single pages and 2-page spreads. Sometimes I spend hours doodling, sometimes a page comes together in a hurry. No rules. I just know that everything about it makes me happy. (If there’s a Traveler’s Notebook Fan Club, sign me up!)
Today’s pages started when I put the leftovers from a sheet of violet glitter dots peel-offs onto a piece of yellow/orange cardstock so that extra sparkle wouldn’t go to waste. Then I got out some simple silhouette dies and started to play. 

Use the photos for inspiration, or keep reading if you want to know what I did next. A supply list follows the step-by-step instructions.
1. Die cut 5 different butterflies, a horse, a unicorn and a pair of wings from the glitter-dot cardstock.
2. Die cut head and shoulders twice from pale lavender cardstock.
3. Sponged edges of glittery die cuts with heavy application of denim blue ink. Saved the newsprint that I worked on to use in step 5 (background of collage with horse and unicorn).
4. Lightly sponged a bit of denim blue ink on the silhouette faces.
5.  Layered and adhered pieces as shown in the photos. (Largest butterfly cut in half as wings for right side of 2-page spread.)


6. Added embellishments (7mm Lure Eye stickers for eyes on the horse and unicorn; peel-off borders and swirls and glitter dots to make crown and necklace for the faces, etc.)
7. Painted the manes, tails, and unicorn’s wings and horn with Finetec iridescent watercolors.
8. Stamped eyes on newsprint. Cut out the eyes. Added the left eye to the face on the left side of the 2-page spread. Added the right eye to the face on the right side. Optional: Use eyes cut from a magazine instead of a rubber stamp. 
(YES, I know that the eyes are not in proportion to the size of the faces - I wanted that offbeat look!) 

SUPPLIES:
  • Traveler’s Notebook (inserts: Grid, Kraft paper)
  • Laurel Burch dies from Stampendous
  • Glitter Dots and other assorted peel-offs
  • Finetec iridescent watercolors
  • Paintbrush
  • Eyes (rubber stamp or cut from magazine)
  • Adhesives of choice
  • Blue ink pad
  • Cardstock in yellow/orange and pale lavender
  • Craft sponge or ink blending tool
  • Lure eye stickers
  • Newsprint

Wednesday, August 7, 2019

Cards and Traveler’s Notebook: Finetec Watercolors Plus Stitching By Judi Kauffman for the Queen’s Ink

My first batch of experiments with the Finetec watercolors have been simple: Flat pieces and minimal layering. This time I’ve done some stitching on a few of the pieces, adding linear elements and a bit of dimension. Instead of black cardstock, one of the samples began with a square piece of multi-color scratch board, another has dimensional butterfly stickers, and one of the ATCS includes embossed Shimmer Sheetz.
 Nothing else has changed. I’m still using the same paintbrush and the same three sets of paints. I’m still putting some of the pieces into my Traveler’s Notebook and turning others into note cards.
The photos shown above, a 2-page spread in my Traveler’s Notebook, include an Artist Trading Card, the scratchboard square, and a collage with 3D butterfly stickers. (Instead of stickers, substitute hand- or die-cut butterflies or a row of buttons or other elements.)
The photos shown above, another 2-page spead in my traveler’s Notebook, include two ATCs, one with stitching, and a collage with chopstick-thin strips of cardstock held in place with stitches.

YOUR TURN
Get out the watercolors and your favorite brush; use five or more colors to paint circles and other kinds of brushstrokes. Layer the colors, allowing them to dry between color changes.

Cut or tear and recombine the pieces. Add embellishments; do a bit of stitching.

Tip: Sewing on cardstock is different from sewing on fabric. You need to pierce the holes BEFORE stitching.

SUPPLIES
  • Finetec watercolors
  • Paintbrush
  • Black cardstock
  • Traveler’s Notebook or journal (optional)
  • Solid color cardstock in colors to coordinate with paints
  • Kreinik #16 Medium braid in colors to coordinate with paints
  • Tapestry needle
  • Craft knife, straight edge and cutting mat OR paper trimmer
  • Paper piercing tool