Tuesday, October 31, 2017

Little Monsters Cards featuring Paper Artsy and Penny Black


Welcome back to the Queen's Inkling! 

I just finished teaching the Little Monsters class at The Queen's Ink and wanted to show off the cards made for the class. They all feature the quirky and fun images from Paper Artsy paired with a more traditional Penny Black sentiment stamp. This is the first of the three, featuring a smiling, happy monster ready to hug you and probably willing to go home with you!

The background was first colored with a variety of Copic markers in shades of blue and blue green (see below for exact colors). I then dampened a scrap of terry cloth with colorless blender and dabbed the shaded area with the fabric, adding some texture to the background. This is one of my favorite ways to add a background to an image colored with Copics. Students like the technique as well because the colors do not need to be perfectly blended - an added plus when you're just starting out using Copics.

The second card featured quirky flowers from Paper Artsy that are fun to color. I embellished them with some dots and dashes made with a Sakura Gel Pen in white. I thought it added to the eccentric nature of the image.


The third card featured another of the monster kids from Paper Artsy. I loved the juxtaposition of this batty girl with the sentiment from Penny Black. Here's a young lady definitely willing to be herself!


All stamps and Copic markers are available from The Queen's Ink. Be sure you also check out the schedule of coming events - you don't want to miss out on all the fun!

Supply List 

CARD 1
Stamps: ZA02 by elenazinki Art from Paper Artsy; Happy Thoughts by Penny Black
Copics: BG0000, B000, B01, BG10, colorless blender with terry cloth for texture (background); Y02, Y15, Y19, R22, B02, B06 (head); Y15 (hands); R20, R22, B06 (pants); YG09, R22 (sleeves); YG05, YG09, B01, B02, B06 (shoes)

CARD 2
Stamps: ZA09 by elenazinski Art from Paper Artsy; Happy Thoughts by Penny Black
Copics: YG05, YG09, Y02 (leaves); Y02, Y15, Y19, YG05, YG09 (top flower); B06, YG05, YG09, Y02, YG15, YG19 (middle flower); YG05, YG09, Y02, R22 (bottom stalk)

CARD 3
Stamps: ZA02 by elenazinki Art from Paper Artsy; Happy Thoughts by Penny Black
Copics: E000, E00, E02 (face); E000, E02 (hands and legs); R20, R22 (hair); B000, B01, B04, B06 (dress); Y02, Y15, Y19, R22 (wings); B06 (shoes)

Monday, October 30, 2017

Holiday Head Start - Embossed Shimmer Sheetz Journals by Judi Kauffman for The Queen's Ink


It's so easy to totally transform a simple little journal or composition book by adding strips of durable, waterproof embossed Shimmer Sheetz and a couple of pieces of border (linear) peel-offs! I'm making a batch of them for holiday gifts.

Care to join me?

Journal A - shown above.

1. Cover all but the spine of the book with double-sided adhesive sheet.

2. Add narrow horizontal bands of embossed and sanded Shimmer Sheetz to the exposed adhesive.

3. Add vertical bands of linear peel-offs near the spine. Optional: Add Glitter Dots and or Glitter Flowers (peel-offs).

4. Use an ink applicator tool and alcohol inks in shades of brown, purple and some black to unify the colors. Lightly sand one more time.


5. Optional: Repeat for the back cover.

Journal B - shown below.

1. Cover all but the spine of the book with double-sided adhesive sheet.

2. Add wide horizontal bands of embossed and sanded Shimmer Sheetz to the exposed adhesive.

3. Optional: Add leafy branch or other peel-offs.

4. Use an ink applicator tool and alcohol inks in shades of brown, purple and some black to unify the colors. Lightly sand one more time.

SUPPLIES
  • Journal with black cover (Moleskine or similar)
  • Composition book with black spine
  • Double sided adhesive sheet
  • Shimmer Sheetz in assorted colors
  •   (Shown: Turquoise and Fire Opal Gemstone, Black Iridescent)
  • Various embossing folders
  • Sanding block
  • Linear peel-offs
  • Leaf peel-offs
  • Alcohol inks
  • Ink applicator tool


Sunday, October 29, 2017

Red Castle Vase Dolls by Judi Kauffman for The Queen's Ink


Have you seen the sheet of Red Castle vase stamps yet? They're elegant and classic with lots of detail. But I like to look at rubber stamps for what they could be and not just for what they are, don't you? It adds to the fun! Vases with handles look a lot like women's bodies to me, and a vase turned upside down can easily be turned into a head and neck.

Stamping in a medium blue on ivory flannel finish cardstock instead of black on white lets the vases remain visible and at the same time they become a shape and a mid-range color value rather than an object. The added doodling, drawing and coloring take center stage.

Like all of the other full sheets of deep etched red rubber Red Castle stamps now exclusive to the Queen's Ink, this one is only available until all sheets are sold and there are only a few available, so don't delay if it's something you'd like to own.


SUPPLIES:
  • Red Castle Vases stamp sheet
  • Medium blue ink
  • Pigma Micron pen in black (01, 005, 1)
  • Gelly Roll Medium pen in white
  • Colored pencils

Saturday, October 28, 2017

Red Castle Stamps Project by Nancy Sheads for the Queen's Ink


Welcome back to the Queen's Inkling!

Nancy here today on behalf of The Queen to announce that all remaining sheets of rubber stamps from Red Castle Stamps are now exclusively available at The Queen's Ink. There are sixty individual collections and only 2 or 3 sheets left for many of them. They will be sold first-come, first-served. These stamps are deeply etched and create a clear, crisp impression. Subject matter ranging from antique images of cats, leaves, and vases to classic art, the Gibson Girls, canaries, alphabets, snowflakes, dominoes, textures, prayerful expressions, and more.

To inspire you, I've put together a simple, but elegant card featuring an image from Red Castle's Leaves Plate 4. I used the new Tim Holtz Stamping Platform to stamp the image on watercolor paper with Versamark ink. Since the stamps are unmounted, I set up the stamping plate as if I were using a clear stamp and adhered the stamp to the plate with a low-tack double-sided tape. 
I recently acquired a set of the Nuvo Aqua Flow pens and decided that this would be the perfect opportunity to try them out. I dabbed a little color along the vein lines of the leaf and blended it out with a damp watercolor brush. Once the ink dried, I fussy cut the leaf and mounted it to the card with foam tape for added dimension.

The design papers are from the Bountiful Collection by Authentique, available from the Queen's Ink. I selected a sentiment from Penny Black's Heartfelt stamp set and used Versafine ink in Vintage Sepia to coordinate with the autumn tones of the card.

Hope my project has inspired you! Be sure to stop by the Queen's Ink to check out the new products available in the store. And remember - these Red Castle Stamps are only available in limited quantities. Once they're gone, they're gone! So don't miss out on this unique opportunity to stock up on a high quality stamp.

Supplies

Paper: Neenah Solar White 110#; Watercolor Paper by Strathmore; Bountiful One and Bountiful Six by Authentique
Stamps: 42031 - Leaves Plate 4 by Red Castle Stamps, available exclusively at The Queen's Ink; Heartfelt by Penny Black
Dies: A2 Matting Basics A & B by Spellbinders
Embellishments: Gold Fine Detail Embossing Powder by Ranger
Inks: Versafine in Vintage Sepia by Tsukineko; Versamark by Tsukineko; Nuvo Aqua Flow Pens by Tonic Studios in Red Apple, Fresh Green, Lemon Zest, Spiced Ginger

Thursday, October 26, 2017

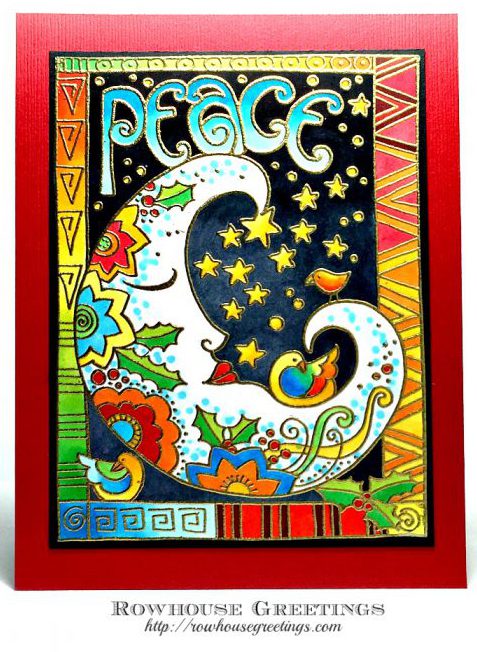
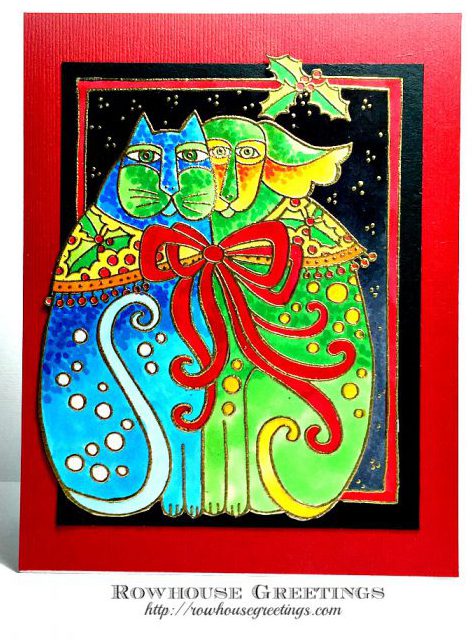
New Class! Laurel Burch Holiday Cards - November 12th and 14th, 2017

Welcome back to the Queen's Inkling!
Nancy here again today to announce a new holiday card class featuring images from Laurel Burch.

I'm returning to the The Queen's Ink on Sunday, November 12th and Tuesday, November 14th to teach a holiday card featuring the Laurel Burch holiday stamps by Stampendous. In this workshop, I'll show how to heat emboss your images after Copic coloring. Details are below. Seats are limited, but there's still room in both classes for you to join us, so sign up today!

To accommodate requests, we are offering two different sessions:
Sunday, November 12, 2017, 11:30 AM – 2:30 PM 
Tuesday, November 14, 2017, 11:00 AM – 2:00 PM
To register, call the Queen's Ink at (301) 497-9449.

Rowhouse Greetings | Peace Moon (Laurel Burch) by Stampendous Rowhouse Greetings | Kindred Spirit (Laurel Burch) by Stampendous

BRING TO CLASS

COPIC MARKERS: The list below reflects the Copic markers that I will use in class. You can follow along using the same colors OR substitute colors based upon your personal Copic collection. You will need a blendable selection of blues, greens, yellows, reds, and dark grays. Please bring all your markers to class and make sure your Copics are marked with Washi tape or some other means of identification. Markers are available for purchase at The Queen’s Ink. Students will receive a 10% discount on Copic markers. I will be available prior to class to help with selection.
  • R35: Coral 
  • R46: Strong Red
  • R59: Cardinal 
  • YR16: Apricot 
  • Y02: Canary Yellow 
  • Y15: Cadmium Yellow
  • Y19: Napoli Yellow 
  • YG03: Yellow Green 
  • YG06: Yellowish Green
  • YG09: Lettuce Green
  • G09: Veronese Green 
  • B000: Pale Porcelain Blue
  • B02: Robin’s Egg Blue
  • B05: Process Blue
  • B18: Lapis Lazuli
  • C5*: Cool Gray No. 5
  • C7*: Cool Gray No. 7 
  • C9*: Cool Gray No. 9
  • 100*: Black 
* NOTE: C4, C6, C8, C10 can be substituted for the Cool Grays and Black listed above.

OTHER SUPPLIES
  • Tape runner adhesive or double-sided tape
  • Scissors

Wednesday, October 25, 2017

A Little Penny Black Magic by Nancy Sheads for the Queen's Ink

Welcome back to The Queen's Inkling!

Nancy here today with another Copic holiday project featuring 
the Joy to the World, Believe, and Joyful Wishes stamp sets from Penny Black and
new holiday design papers from the Vintage Christmas Collection by Authentique,
all available at The Queen's Ink.


I love the adorable cats, mice, and hedgehogs featured in many of the Penny Black stamp sets. I hope you do too because I'm going to be featuring more of them in future blog posts. The images are perfect for someone just starting with Copic markers because they are quick and easy to color with a limited number of markers. I also like to mix and match different styles of paper and stamps. Initially, I thought that I wanted a background that was brighter, contemporary, and more graphic. However, the traditional pattern of Authentique's Vintage Christmas Four ended up being the perfect complement to this fun and quirky Penny Black critter, adding visual interest without competing with the central image. 

Students often ask me about the paper that I use for Copic coloring. I've experimented with various papers suggested for use with Copic markers, including papers by Hammermill, Neenah, Cougar, and Spectrum Noir. When selecting a paper, my testing criteria includes:
  1. Does the paper have a smooth surface? A rough or textured paper may create a drag on the marker as you color, affecting blending of the ink.
  2. How easily does it blend? Some papers work better than others for achieving a smooth ink blend.
  3. Does the ink feather or over saturate the paper? 
  4. How well does the paper interact with colorless blender? Important if you are using blender for special effects or color removal.
  5. Is the paper acid-free? 
Papers recommended by some of my friends were not necessarily a good choice for me. I found that X-Press It Blending Card by Copic works best with my particular style of coloring so that is the paper that I use for personal projects as well as projects in the classroom.  If you'd like to give it a try, stop by the Queen's Ink where you'll find not only X-Press It, but a wide range of Copic markers and other supplies that the store has to offer.

Supplies

Paper: Neenah Solar White 110# (card base); X-Press It Blending Card by Copic; Bazzill Basics in Devil Red; Vintage Christmas Four by Authentique 
Stamps: Joy to the World by Penny Black (image); Believe by Penny Black (front sentiment); Joyful Wishes by Penny Black (inside sentiment)
Inks: Memento in Tuxedo Black by Tsukineko; Versafine in Onyx Black by Tsukineko 
Dies: A2 Matting Basics A by Spellbinders; A2 Matting Basics B by Spellbinders 
Copics: E00, E02, C3, C5, RV10 (cat); R35, R46, R59, YG03, YG67 (gift); E30, E31 (shadow)

Monday, October 23, 2017

Matchbox Challenge by Judi Kauffman for The Queen's Ink

I never smoked, but I always enjoyed collecting matchboxes. I toss the matches and use the boxes to hold tiny gifts. I've also opened and flattened them, adding them to place mats and collage projects.

The one above is from a long-ago trip to Paris. The one below is from a fun place where we go for pizza and the ginormous meatball!
These days, restaurant matchboxes are few and far between, but they're not hard to find at hardware stores.

THE CHALLENGE

I'm not going to show finished projects today. Instead, I'm issuing a challenge:

Create something unique and surprising that begins with one or more matchboxes and fits in the palm of your hand!

Find a few matchboxes. Empty them out. Decorate the exterior. Decorate the interior, too if you want. Use collage papers, stencils, air dry clay, flat elements, dimensional elements...Anything goes!

Tuck in a small doll or a found object; make tiny clay animals, a miniature Christmas tree, or tuck in a small photograph or a scroll with a poem or letter to your future self.

Get some friends and the kids in on the act! This is a fun project to share with others.

I'll be showing my matchbox projects in the near future, but not yet. I don't want to influence YOUR projects in any way by showing my own.

SUPPLIES

  • Matchboxes
  • and any of these:
  • Ribbon
  • Paper
  • Gesso
  • Paint
  • Stencils
  • Stencil Paste
  • Air dry clay
  • Charms
  • Found objects
  • Stamps

Friday, October 20, 2017

Last Chance! Little Monsters Copic Coloring Class - Tuesday, October 24, 2017

Welcome back to the Queen's Inkling!

Nancy here on behalf of the Queen with an important announcement!

This is your last chance to join in on the fun in the Little Monsters Copic Coloring Class at the Queen's Ink. We'll make three cards featuring stamps by Paper Artsy with sentiments from Penny Black. Basic understanding of Copic shading is helpful, however I will cover all necessary techniques in class. Supply list provided below. Seats are limited, but there's still room for you to join us, so sign up today! 

Little Monster's Copic Coloring Class
Tuesday, October 24, 2017, 6:30PM – 8:30 PM 

To register, call the Queen's Ink at (301) 497-9449.


BRING TO CLASS

COPIC MARKERS. The list below reflects the Copic markers that I will use in class. You can follow along using the same colors OR substitute colors based upon your personal Copic collection. You will need a blendable selection of yellows, greens, and blues. Please bring all your markers to class and make sure your Copics are marked with Washi tape or some other means of identification. Markers are available for purchase at The Queen’s Ink. Students will receive a 10% discount on Copic markers. I will be available prior to class to help you with your selections.
  • R20: Blush
  • R22: Light Prawn
  • Y02: Canary Yellow 
  • Y15: Cadmium Yellow 
  • Y19: Napoli Yellow 
  • YG05: Salad 
  • YG09: Lettuce Green 
  • BG0000: Snow Green
  • BG10: Cool Shadow
  • B000: Pale Porcelain Blue
  • B01: Mint Blue
  • B02: Robin’s Egg Blue
  • B04: Tahitian Blue 
  • B06: Peacock Blue
  • E000: Pale Fruit Pink 
  • E00: Skin White 
  • E02: Fruit Pink 
  • 0: Colorless blender
  • Copic Colorless Blender refill (the smaller 25cc bottle is sufficient).
OTHER SUPPLIES. Please bring the following to class:
  • Uniball Gel Pen or Sakura Gel Pen in White
  • Tape runner adhesive or double sided tape
  • Scissors

Thursday, October 19, 2017

Vintage Holiday Card by Nancy Sheads for The Queen's Ink

Welcome back to The Queen's Inkling! 

Nancy here with a new Copic coloring project featuring the
Cozy Cupfuls Clear Stamp Set by Power Poppy and
new holiday design papers from the Vintage Christmas Collection by Authentique, available at
 The Queen's Ink

I love this beautiful, elegant image by Power Poppy so I pulled out my markers and some X-Press Blending Card (also by Copic) and got to work. I'll admit that I looked at that tree and my initial urge was to color those sprigs individually. Crazy, right? So I decided that the better course of action was to dab different shades of green (YG01, YG03, G21, G24, G28) following the lines of branches and the shape of the tree to achieve some depth and variation. 


I used my current favorite red combo (R35, R46, R59) to get a lush Christmas red for the ornaments and used the same combo (adding R32 as a highlight) for the ribbon. If you forget to leave a highlight on the ornaments, you can always add it afterward with a white gel pen.


The sentiment on the front of my card is included with the Power Poppy stamp set (and look at that lovely script!), but for the inside, I decided to add one of the sentiments from the Penny Black Festive Cheer stamp set to capture the feeling I wanted for the completed card.

Here at The Queen's Ink, design papers by Authentique are a particular favorite and you'll find the store stocked with several of the new holiday collections. I used two of the designs from the Vintage Christmas Collection because I thought that the colors and the vintage feel would be the perfect complement for this image. 

Supply list is shown below. Want to see this card in person? Be sure to stop by The Queen's Ink and take a look! 

Supplies

Paper: X-Press It Blending Card by Copic; Vintage Christmas Three and Vintage Christmas Seven by Authentique
Stamps: Cozy Cupfuls by Power Poppy; Festive Cheer by Penny Black
Inks: Memento in Tuxedo Black by Tsukineko (image); Versafine in Onyx Black by Tsukineko (sentiment)
Dies: A2 Matting Basics A by Spellbinders; A2 Matting Basics B by Spellbinders
Copics: R35, R46, R59 (ornaments); R32, R35, R46, R59 (ribbon); YG01, YG03, G21, G24, G28 (tree); G21, G24, R30, R32, E41, E42, E43, C1 (teacup); BV20 (shadow)


Monday, October 16, 2017

Stationery Journal by Judi Kauffman for The Queen’s Inkling

Once upon a time, hotels offered their guests beautiful writing paper and envelopes in the desk drawer of each room. I always mailed a letter or two from my travels and I always took home a few sheets and envelopes as a souvenir.

Do you have a similar stash? If so, how about joining me in putting them to good use: Make a Stationery Journal that includes writing paper in varying sizes and a few envelopes to use for pockets. (Scroll down to the ‘OPTIONS’ if you don’t already have a collection of paper ephemera.)

Stationery Journals make great gifts for friends who love to travel. Make a couple for yourself – one to take with you when you’re away from home and another to keep next to your favorite chair where it can hold lists, tickets and such. (Scroll down to the ‘OPTIONS’ for even more ideas.)

INSTRUCTIONS:

1. Paint chipboard covers on both sides with black gesso. Allow to dry.

2. Using matte medium as an adhesive and as a sealer, arrange and adhere torn pieces of stationery on one or both covers and one or both sides of each one. I chose to orient these pieces so they are vertical or horizontal, but not on the diagonal. And I did not overlap them because I wanted to be able to read the names and addresses, but the choice is yours. I used torn paper for the inside of the covers rather than hotel stationery.


3. Again using matte medium, arrange and adhere canceled stamps. I chose to orient the stamps on the diagonal, adding some movement to an otherwise static and formal composition.


4. Dry brush with white paint. Use vertical, horizontal, and diagonal strokes and very little paint.
5. Stack the writing paper so the largest sheets are at the back and the smaller ones stacked on top. Stack the envelopes, offset, on top of the papers, carefully aligning at the left side. If you have a coil binding punch or other binding system, prepare the pages before stacking them between the covers and punch the covers as well. If not, let your local office supply store do the binding for you.


OPTIONS:

Create a planner by binding in a mini-calendar pad and printing calendar pages on the writing paper.

Add dividers, graph paper, drawing paper, or other kinds of pages.

If you don’t have a collection of stationery from different hotels, create that same general look with rubber stamps, stencils, or collage. Writing paper usually has a logo or something small at the top and an address at the bottom, so your design could be a bird at the top and a branch at the bottom, a canceled stamp at the top and a line of poetry at the bottom, or whatever else comes to mind! (You’re going for the ‘feel’ of hotel stationery, not trying to duplicate it.)

Ask friends who travel to bring home paper and envelopes from their trips.

SUPPLIES:
  • Black gesso
  • White acrylic paint
  • Matte medium
  • Paintbrush (1-2”)
  • Chipboard (2 pieces, 8.5” x 11”)
  • Coil binding punch
  • Black coil (or color of choice)
  • Writing paper and envelopes
  • Canceled stamps


Thursday, October 12, 2017

Let Me Introduce Myself

The Queen's Ink is pleased to announce that we will be offering a series of Copic and card making classes as part of our regular monthly class offerings. We are delighted and excited to welcome Nancy Sheads (Copic Colorist extraordinaire, so sayeth the Queen!) to our teaching staff.  Nancy is a patient and easy going spirit, a wonderful teacher, very creative, and with a great eye for color. She has generously made many of the card sample we have on display in the shop. Check out our current class offerings on line and sign-up for one of her great classes. Nancy will also be contributing to our Blog regularly with Copic techniques and great card ideas. Read on and get to know more about the newest member of the Queen's Court!

Artist Nancy Sheads

Did you know that the Queen's Ink is once again offering classes in Copic coloring? Yes, it's true and since I'll be leading you on your Copic journey, let me step in here and introduce myself.

Example from Colors of Autumn Copic Class
Some of you may know me from my creative pursuits as a member of the Power Poppy Instant Gardener and the Passionate Paper Creations Design Teams. I can also be found in my corner of the Internet at Rowhouse Greetings and on Instagram.

I've been a crafter for many years - my grandmother taught me to crochet when I was five years old - and over the years I learned a variety of crafts including knitting, sewing, quilting, and needlepoint. A few years ago, I became interested in card making and fell into Copic coloring. Since that time, I've had the opportunity to study with some of the best instructors – Rhea Weigand, Jennifer Dove, Cindy Lawrence, and Debbie Olson – who have always gone out of their way to help me improve my craft.

My teaching philosophy is simple - I want you to feel confident when you color and have fun with your markers. In class, I'll walk you through the techniques you'll need in order to complete the class projects. My goal is for you to be able to incorporate the techniques and skills you learn in class in order to develop a style that is uniquely your own.

When I first started coloring, I only had a few Copic markers in my collection, primarily a variety of reds, greens, and yellows so that I could make that season's holiday cards. Over time as I started coloring other images – flowers, people, landscapes – I added to my Copic collection with the colors that I needed for the types of images that I wanted to work on.

I realize that building a collection of Copic markers can be a significant investment and where possible, I try to limit the number of markers used in class. For each class, I list the markers that I'll be using for demonstration purposes, but you should feel free to bring all of your Copic markers to class and substitute as necessary so that you can still participate. If you want to expand your collection, The Queen's Ink is fully stocked with Copic products and students receive a discount on Copic markers.

Check out the class schedule for the latest offerings and call the shop to register. My classes are full of fun, laughter, and good times! You won't want to miss out!

I'll also be blogging here at the Queen's Inkling with new projects that will hopefully give you some crafty inspiration. Upcoming projects include holiday cards featuring stamps by Power Poppy and Penny Black as well as some of the new holiday design papers by Authentique. 

Monday, October 9, 2017

Faux Camo Purse by Judi Kauffman for The Queen’s Ink


Do you have an old purse that could use a facelift? A canvas tote, a leather bag that has seen better days? In my case, it was a khaki bag with a belt loop on the back, purchased at an army navy surplus store and worn in the days when I was skinny. (Alas, belts and I haven’t been best friends for two decades!)


The Queen’s Ink has such wonderful acrylic paints – iridescent, metallic, you name it – and that gave me a lightbulb moment: Faux camouflage! But not the kind that would blend in with a forest. No. This Faux Camo would be glitzy and quirky with a sophisticated flair, something I can use as an out-to-dinner bag. I chose metallic gold, metallic purple, and two shades of green. I picked up Tim Holtz’s Alcohol Inks in similar colors to alter the hardware. 

For contrast I picked a silky woven paisley ribbon for the strap. It’s an unexpected juxtaposition that pleases my eye and the pattern picks up the purple, green and gold. Plus, I love the pop of bright red!
I backed and strengthened the soft ribbon with a purple zipper, fusing the layers with iron-on webbing, though I could have used fabric glue.

After I finished the project and had taken photos of it for this blog post I realized that I wanted a longer strap to wear cross-body. I backed another piece of ribbon with a second zipper, this time a red one. I cut the first strap at the midway point and added an extra 22”.

I covered the two places where the pieces join with rings made from the same ribbon. But all of a sudden it needed something else: CHARMS to accent the ribbon rings. The inside of the strap is so lively and bright, and with the charms it looks like I intended it that way right from the start!

YOUR TURN
  • Find a purse that needs a facelift. Sponge, brush and splatter it with paints.
  • Alternatively, use stencils.
  • Alter the hardware with Alcohol Inks.
  • Add a strap if needed, or cut off and replace the existing one.
  • Sew ribbon rings or small strips of suede to the strap and add charms at those spots.
  • Embellish the pocket flaps or other areas with charms and beads if you want more dangling elements.

SUPPLIES:
  • Acrylic paints in 3 – 5 colors
  • Paintbrush and/or sponge wedges
  • Purse to alter (shown: Khaki canvas)
  • Ribbon and zipper(s)
  • Fusible webbing or fabric glue
  • Charms
  • Needle and thread


Monday, October 2, 2017

Start a New Chapter by Judi Kauffman for The Queen’s Ink

Mixed media is often messy and there’s almost always a lot of layering. Gesso and paints, stencils, stamps, pens, a mix of tools – they’re not exactly the most portable of projects. So, what if you want to get that look, that visual complexity, without as much work? (You know my mantra: Easy Isn’t Cheating!) And what if you want to do at least part of the project with supplies you can tuck into a purse? (I don’t like to work with wet media unless I’m home and near a sink.)

That was my challenge! Here’s what I did:

1. Before heading out, stamp cardstock with Magic Stamp blocks or do some gel printing. Use a mix of colors that are in the light to medium value range. If time is short, start with smooth finish, purchased patterned cardstock with a random all-over design, making sure that the surface accepts both ink and colored pencil.

2. Using permanent black ink, stamp an intricate image and a sentiment on top of the pattern. I chose ‘Mantilla’ by Sandra Evertson and ‘Start a new chapter’ by Kae Pea, both from RubberMoon Art Stamps.

3. Also stamp ‘Introspective’ (the face) onto pale pink or tan cardstock.

4. Now, pack up the stamped cardstock, colored pencils, small scissors, and a sandwich baggie for trash. Head off on your jaunt to the doctor’s office, the soccer field, or to the living room…

5. Color and shade the Mantilla image, allowing the design within the stamp and the pattern beneath to guide your color choices. Take advantage of the opacity that colored pencils produce with a lot of blending and hand pressure. Don’t worry about being precise, it’s okay to color over and outside of the lines. (Remember, the goal is to create the look of mixed media.) 

6. For the card without a face, cut the sentiment into 3 pieces as shown in the photos above and below, adding color to the edges of each of the pieces. For the card with a face, keep the words in one long strip as shown on the card at the start of the tutorial.

7. Shade the face; cut it out.

8. Go home, get out coordinating cardstock, adhesives, folded cards in A2 and A7 size. It’s time to finish the cards.

Card with face –
Trim around the Mantilla image, leaving a border to highlight the background pattern. Cut out the center for cards with the face in the middle. TIP: Stamp some black cardstock with white ink and add it behind the opening before gluing down the face since the face is not a precise fit. Use the Mantilla stamp or ‘Flores’ (also by Sandra Evertson) to continue the theme of flowers and create the feel of a lace collar! This is a tiny detail that adds a great deal. Add a double mat. Adhere to an A7 side-fold card base. Adhere the sentiment, centered, under the matted rectangle.

Card without face –
Trim around the Mantilla image, leaving a border to highlight the background pattern. Use a craft knife to cut the right edge of the inner frame. Tuck and adhere the three sections of the sentiment at angles, the end of each piece under the frame. Add a double mat. Adhere to an A2 side-fold card base.

9. Keep going. Use this strategy with other stamps and papers. Experiment; see what else happens when you layer intricate designs over random patterns.

SUPPLIES:
  • RubberMoon Mantilla - SE6010 K
  • RubberMoon Introspective - SE6012 E
  • RubberMoon Flores - SE6007 F
  • Start a new chapter (not yet in the web shop, call the store to see if it's in stock)

Other supplies:
  • Permanent black ink
  • Colored pencils
  • Cardstock in white and assorted colors