

There’s an old joke about a woman who keeps pieces of string
in two jars, one has pieces that will be useful but the other holds pieces that
are too small to use. My scrap box falls into the ‘too small to use’ category.
It’s where I whisk interesting bits and pieces of stenciled and stamped
cardstock and Shimmer Sheetz, along with wonderful pieces of embossed and handmade
paper – AKA ‘stuff I just can’t throw out’…
I like looking through it now and then. The scraps remind me
of past projects and it’s rare that I can close the box without getting an idea
for a collage or card or some other project. I’m proud to say I only allow
myself a very small hinged plastic box for this stash so it never gets out of
hand (6” x 6” x 3” – holds a lot but not too much!).
I also save some larger pieces, too, especially sturdy
cardboard mailing envelopes I can re-use. Put the two together – tiny scraps
and a big envelope, mix in some feathers and staples and washi tape and the
results became today’s project: Scrap Box ATCs and a Calendar.


Layer One – Cut the cardboard envelope into 2.5” x 3.5”
pieces. Glue and/or staple on additional pieces from the labels and other
portions of the envelope.
Layer Two – Glue and/or staple on pieces from YOUR scrap
box! Move things around for a while, don’t glue anything in place till you’re
happy with the layout. Tip: Leave your work table for an hour or two or a day
or more. Come back with fresh eyes.
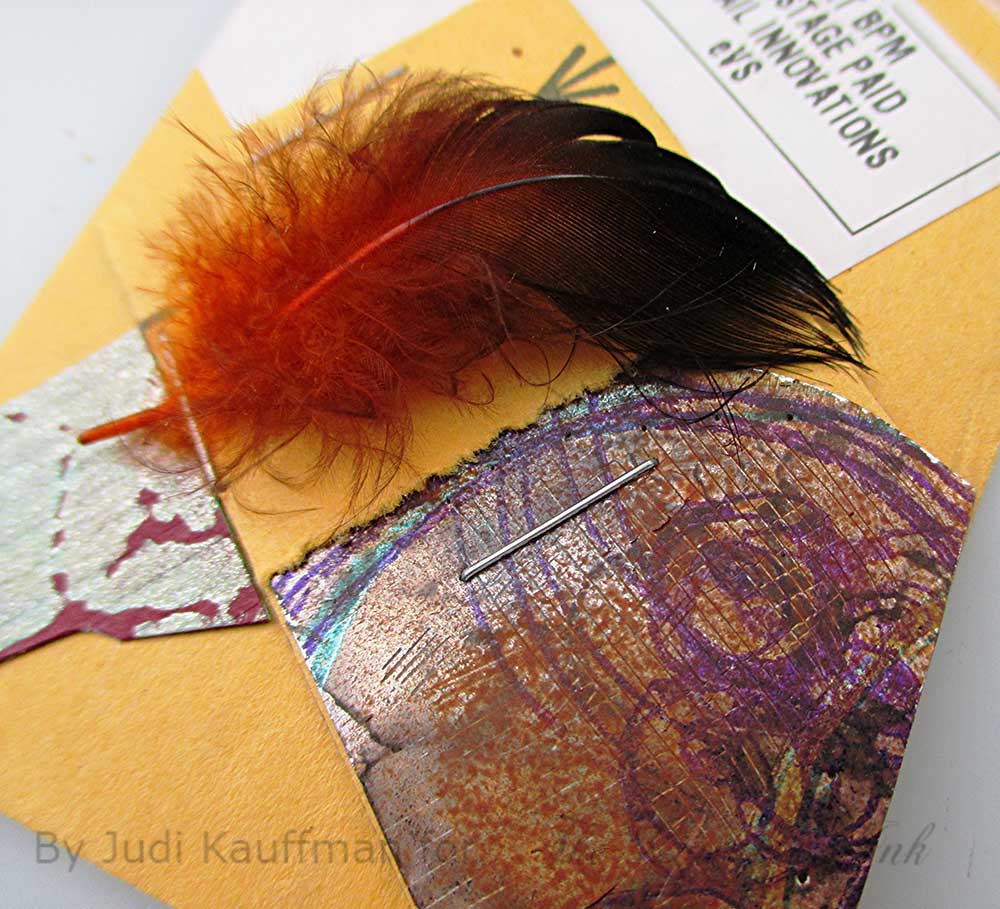
Layer Three - Add twine, feathers or other embellishments as
the final layer.
For the calendar: Choose
two decorated ATCs and one that has only the first layer completed. Arrange
them in a row, vertically. Punch a hole, centered, at the top of the first one.
Add a calendar page or pad to the second (plainest) ATC. Connect the three with
pieces of washi tape. Hang from twine, doubled and knotted as shown.


For all other ATCs:
Display on a small easel, swap with friends, tuck the ATCs away in an album,
add to a card front.
More ideas:
Instead of making ATC-size collages, work larger. Or
smaller!
Paint the first layer before adding the scrap box elements.
At any point in the project add in stenciling, stamping,
paint, found objects.
Use brads instead of staples. (Use an awl to pierce holes
for the brads.)
Layer envelope and scrap box elements into an art journal.
Alter the sides of a box, the covers of a sketch pad, a
photo mat or frame.
Supplies:
- Stenciled Shimmer Sheetz scraps stamped in StazOn inks with Stampstracts ‘surround’ and ‘spiralstract’ (RubberMoon)
- Good stuff from the scrap box
- Cardboard envelope (book mailer, etc.)
- Glue stick
- Stapler
- Feathers
- Twine
- Washi tape
- Quarter-inch punch

I love these. I can't find my scraps since dgd rearranged my craft room :( I need to get serious in finding them (or make some more, lol) to create some of these ATCs. Thanks for more inspiration
ReplyDelete