

Mail art, mail art! It’s time for
some mail art…Faux (fake) postage, to be precise!
Have you ever made your own sheets of
faux postage? It was a trend a decade or so ago, but I and many mail
art fans have never taken a hiatus. So welcome back if you remember
it from those days (everything old is new again, right?), and welcome aboard, newcomer, if it’s something you’ve
never heard of before!
For today’s tutorial, I chose Red
Castle Leaf Plates 1 and 2. Each sheet has five large vintage image
stamps filled with realistic and very detailed leaves and
small type (each one large enough for the front of an A2 card).
Creating faux postage is easy and fun
and the hand-stamped sheets are perfect for cards, collage, art
journals, ATCs, and to decorate envelopes. For envelopes: Position
faux postage to the left of actual stamp, spaced so the post office
knows you’re not trying to use your creations to fool them.

Last time I checked at The Queen’s
Ink, there were only a few Red Castle Leaf Plate 1 and 2 stamp sheets left,
and that means once they’re gone, they’re gone forever. In fact, they may be sold out by the time this tutorial is published. But if they're still there and you
like this tutorial and want the stamps, please don’t wait.
Reminder: Red Castle’s
generous ‘Angel Policy’ allows you to hand-stamp
as many projects as you want for your own use, and you can sell
hand-stamped cards and other projects (as many
as you want!), but electronic reproduction is not
allowed – no scanning or re-sizing, no photocopying. Therefore, you
can’t photocopy or scan and print duplicates of your faux postage
sheets to use for your own projects or to sell by the sheet or
otherwise. (Angel policies vary, so check with the manufacturer to be
sure that what you want to do does not violate anyone’s copyright.)
INSTRUCTIONS:


1. Use a graphics program to create a
faux postage grid (dotted lines that look like perforations on a
sheet of old-school adhesive-backed stamps). Print onto lightweight
white paper. Alternatively, use a sewing machine with no thread in
the needle to perforate straight vertical and horizontal on sheets of
paper. Individual stamps for faux postage sheets shown: 1.25” x
1.75” and 1.5” x 1.5”.


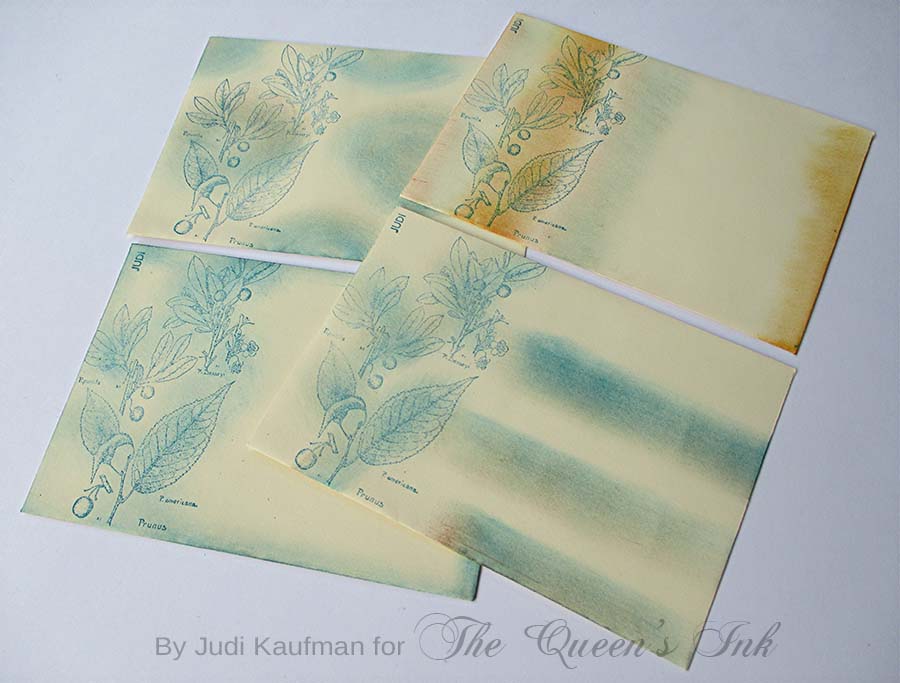
2. Using a craft sponge, smudge two
different inks across the perforation-printed or machine perforated
paper, alternating colors. Shown: One sheet has vertical smudges, the
other is horizontal.


3. Repeatedly stamp images from Leaves
Plate 1 and 2 in a dark, coordinating color. Trust your eye or use a
positioning tool. (Red Castle stamps are un-mounted. Use whatever temporary mounting system you prefer - cling foam on the back of the stamps, or an acrylic block covered with Poster Tape and NOTHING on the back of the stamps. With the Poster Tape method, stamps can be immersed in water for clean-up and this is my method of choice!)

4. Stamp a 3” x
5” rotary file card for each card front. Smudge with inks in colors
that coordinate with the faux postage sheet. For each card back, turn
a second rotary card so that the tab is positioned in the opposite
direction and add ink to that one as well. Score a line lengthwise on
the top rotary card only and ink the ridge of the score/fold line.
Using the Tim Holtz Tiny Attacher, staple each pair of cards three
times along the score line. Stapling along the score/fold line allows
the card front to hinge open like a folder.
Options: Substitute index cards with
die cut tabs or pieces of recycled manila folders for the rotary
cards! Before stapling the front and back, add un-tabbed cards and
create a booklet.


5. Add torn collage paper (shown: faux
cork gift wrap) and faux postage from the finished sheets to the
rotary card fronts.
5. While you’re at it, stamp a batch
of envelopes!
6. Don’t forget the inside of the
cards. Add an ATC-size clear sleeve to the inside of the card and
tuck in a gift card, poem, love note, or an ATC. Stamp a sentiment,
add more collage and faux postage.
Here’s another look at the finished
cards:

SUPPLIES:
- Red Castle 42010 Leaves Plate 1 and Red Castle 42020 Leaves Plate 2 available exclusively at The Queen’s Ink
- Tim Holtz Tiny Attacher (stapler)
- Four coordinating ink pads
- Craft sponge
- Rotary cards (3” x 5”)
- Lightweight white paper
- Graphics software or sewing machine

So pretty; love the soft colors and the way you put everything together.
ReplyDelete