Friday, March 29, 2019

Happy Spring Postcards by Judi Kauffman for The Queen’s Ink

I took my doodling supplies outside this morning, the first time it was warm enough to be in the yard without a coat. The gold pen sparkled just like the sunshine! Here’s hoping you’re having good weather wherever you are, and that you’ll set aside some time to make (and SEND) some postcards...
How-to and Design Strategies (DS):

1. Cut sheets of cardstock in quarters. (DS - Red, teal, and other bright hues are a great starting point because black and white both show up against backgrounds in that color range and gold really pops!)

2. Color AROUND a single flower, stem and leaves (or whatever you decide to draw!) using a wide nib opaque gold pen. If you’ve used pencil guidelines, erase any marks that are not covered by the gold ink. (DS - The negative shapes around the flower and leaves are what makes these postcards unique and interesting. Beginners: Practice on scrap paper with a pencil before you ‘commit’ to the red cardstock. More experienced cardmakers: Don’t use a pencil - just go for it!)

3. Doodle within the petals, leaves and stem, and add a saying, greeting, date and your signature around the gold rectangle. (DS - space out the lettering so it becomes a border. Keep the words small so the flower remains the focal element.)
4. Divide the reverse side in half with a vertical line like a purchased postcard. Note: At the time that this tutorial was published, postcards cost 35 cents to mail in the USA. (DS - Write a message on the left half using the black pen, adding some doodles in black and white if you want to keep drawing; write the name and address of the recipient in big block letters and numbers on the right half using the white pen to make it easy for the post office to speed your creation to its destination!)

5. Other options -
*Use silver or copper metallic, black or any other opaque color paint or ink to fill the background instead of gold. 
*Instead of a flower and leaves, draw a butterfly, a branch with a bird, a squirrel or other animal. (DS - Any simple shapes and subjects that conjure spring!)
*Instead of black and white, use Gelly Roll Moonlight pens in pink and green (or any other opaque ink pens).

Supplies:
  • Red cardstock
  • Pen-touch in Gold (Sakura of America)
  • Pigma Micron in nib size(s) of choice (Sakura of America)
  • Gelly Roll 10 in White (Sakura of America)
  • Optional - soft pencil, eraser

Wednesday, March 27, 2019

Color With Nancy: Faux Watercoloring with Copic Various Ink - Tuesday, April 30, 2019, 1:00 PM – 3:00 PM

Join Nancy Sheads for a new Copic marker class featuring three new floral stamps sets from Stampendous. In this class, you will make three cards using Copic ink and a water brush filled with colorless blender to create a faux watercolor effect. Details are below. All necessary techniques are taught in class. Seats are limited, so sign up today! CLASS FEE $25

Tuesday, April 30, 2019, 1:00 PM – 3:00 PM
Register online or call the Queen’s Ink at (301) 497-9449

BRING TO CLASS: The list below reflects the Copic markers that Nancy will use in class. You can follow along using the same colors OR substitute colors based upon your personal Copic collection.

Please bring all your markers to class and make sure your Copics are marked with Washi tape or some other means of identification. Markers are available for purchase at The Queen’s Ink. Students will receive a 10% discount on Copic markers. Nancy will be available prior to class to help with selection.

PLEASE NOTE: You must bring your own markers to participate in class. If you need markers, please contact The Queen’s Ink in advance of class. If you wait until class time, you may not be able to purchase the markers or other supplies you need.
  • RV52: Cotton Candy
  • R37: Carmine
  • YR04: Chrome Orange
  • Y38: Honey
  • YG03: Yellow Green
  • YG67: Moss
  • B00: Frost Blue
  • B04: Tahitian Blue
  • 0: Colorless Blender
OTHER REQUIRED SUPPLIES: Please bring:
  • Water brush - must either be new and unused or only ever filled with alcohol or colorless blender. If the brush has ever contained water, this technique will not work.
  • Bottle of Copic Various Ink Colorless Blender - at minimum, the 25cc bottle, but preferably the larger bottle. You may need to fill your water brush more than once during class.
  • Scissors suitable for fussy cutting
  • Foam adhesive squares
  • Tape runner adhesive or double sided tape
OPTIONAL SUPPLIES: Please bring IF you have the following:
  • 12x12 glass media mat such as the one by Tonic Studios or We R Memory Keepers.
  • Copic Various Ink Refills in the colors listed above.


Saturday, March 23, 2019

Mix and Match Magic Stamp Mats by Judi Kauffman for The Queen’s Ink

Here’s a fun way to mat your favorite photos, drawings, art prints, or other special items: Create Magic Stamp blocks that you’ve heated and pressed against a variety of low-relief patterns and textures. (Examples: Lace, shells, leaves, buttons, packaging materials.) Use the blocks plus assorted inks, embossing powders and narrow strips of removable tape to decorate mats with openings in a variety of sizes. (Buy, die-cut, or hand-cut your mats.)

Mix and match and layer two or more mats, or stick with just one. Add a frame (not shown). DONE!

A photo gallery to inspire you follows the supply list.

Note: I hold one or two workshops at The Queen’s Ink each year featuring amazing, wonderful Magic Stamp blocks! Check the calendar to see when the next one will be scheduled.

Supplies
  • Magic Stamp blocks
  • Heat tool
  • Mats or mat board
  • Inks
  • Embossing powders


Tuesday, March 19, 2019

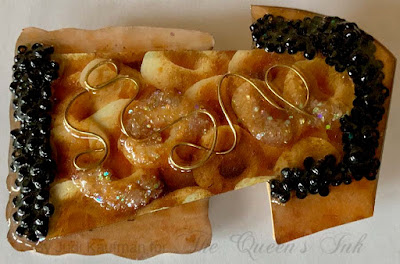
Whimsical Wearables: Mixed Media ‘Box Brooches’ by Judi Kauffman for The Queen’s Ink

If you think of your eye as having a zoom lens, looking at cereal, cracker, pasta and other boxes will soon give you lots of food for thought! (Sorry, I couldn’t help myself...) Close-up photos of the contents of the box are usually larger than actual size and there’s so much detail. When cut into pieces, the designs become somewhat abstract, even though on close examination it’s clear what you’re looking at!

I hope you’ll have fun cutting up some of those boxes before they go into the recycling bin to make your own mixed media brooches. Whenever I don my whimsical wearables I get tons of comments and compliments!

1. Using the photos for inspiration, cut pieces from the fronts and sides of cereal, cracker, pasta, and other boxes. (Cut with scissors or a craft knife - whichever gives you the best control.) Allow some of the edges to be straight, other edges rippled and curvy. Layer, arrange and rearrange the pieces and when pleased with the layout, glue them together.

OPTIONAL: To add yet another layer of pattern and further abstract the cardboard pieces, stamp or stencil onto them prior to layering and gluing them!

2. Arrange, pile on and glue in place wire, beads, glitter, buttons, or whatever embellishments please your eye. Allow glue to dry.

3. Seal with one or more coats of pour-on resin.

OPTIONAL: Add chunky glitter to the wet resin rather than starting with it underneath the coating. The brooch won’t be as smooth, but it will have more sparkle.

DESIGN STRATEGIES/TIPS:
*Let the boxes guide your design decisions and color palette. I chose black seed beads to create the effect of caviar and used slightly larger red beads to embellish the red section of one of the pins (a strawberry on the original cereal box).
*Stand back from the brooch while working on it to envision what someone else will see when you’re wearing it.
*For an especially striking effect, always wear two or more box brooches at the sme time!

FINISHING: 
*Per the photo below, cover the back of the brooch with synthetic suede. Add a pin back. Also cover the bar of the pin back with synthetic suede.

SUPPLIES:
  • Printed cardboard boxes
  • Scissors or craft knife
  • Cutting mat (if using craft knife)
  • Wire, beads, buttons, chunky iridescent glitter
  • Pour-on resin
  • Gem glue
  • Pin back

Friday, March 15, 2019

Color with Nancy: House Mouse Designs - March 26, 2019

Join Nancy Sheads for a new Copic marker class featuring Muzzy, Amanda, Monica, and rest of the House Mouse crew from Stampendous. In this class, you will make two cards, with emphasis on basic Copic skills such as ink blending. There will also be a bonus card that you can make in class if time permits or take home to make at your convenience. Details are below. All necessary techniques are taught in class. Seats are limited, so sign up today! CLASS FEE $25

TUESDAY, MARCH 26, 2019, 1:00 PM - 3:00 PM 
Register online or call the Queen's Ink at (301) 497-9449

BRING TO CLASS: The list below reflects the Copic markers that Nancy will use in class. You can follow along using the same colors OR substitute colors based upon your personal Copic collection.

Please bring all your markers to class and make sure your Copics are marked with Washi tape or some other means of identification. Markers are available for purchase at The Queen’s Ink. Students will receive a 10% discount on Copic markers. Nancy will be available prior to class to help with selection.

PLEASE NOTE: You must bring your own markers to participate in class. If you need markers, please contact The Queen’s Ink in advance of class. If you wait until class time, you may not be able to purchase the markers you need.
  • BV20: Dull Lavender
  • Y02: Canary Yellow
  • Y19: Napoli Yellow
  • YR09: Chinese Orange
  • G40: Dim Green
  • G43: Pistachio
  • G46: Mistletoe
  • BG10: Cool Shadow
  • B0000: Pale Celestine
  • B000: Pale Porcelain Blue
  • B60: Pale Blue Gray
  • B63: Light Hydrangea
  • B66: Clematis
  • E000: Pale Fruit Pink
  • E00: Cotton Pearl
  • E21: Soft Sun
  • E93: Tea Rose
  • C1: Cool Gray No. 1 *
  • C3: Cool Gray No. 3 *
  • C5: Cool Gray No. 5 *
  • 0: Colorless Blender
(*) NOTE: Nancy colored all of the mice in gray in order to reduce the number of markers required for class. However, if you want to vary the color of your mice, see the House Mouse Designs by Stampendous Copic Coloring Chart for more color options.

OTHER SUPPLIES: Please bring:
  • Scissors suitable for fussy cutting
  • Foam adhesive squares
  • Tape runner adhesive or double-sided tape


Wednesday, March 13, 2019

Soda Carton Card and Tags by Judi Kauffman for The Queen’s Ink

A week ago I treated myself to a 4-pack of Brownie Caramel Cream Root Beer. Yum!!! In addition to having a happy tummy (root beer floats are the best!), I kept grinning at the carton that held the sodas. 

You know where this is going...I didn’t throw it away. Instead, I cut it into pieces and made pocket cards and tags from the sides and ends. Pockets can hold a note pad, gift card or tickets to an event, a letter or a greeting card.

The stapler didn’t reach the left side of the pocket on the card so I pierced holes and tied that part with twine. All of the other edges are secured with staples.

Use this idea with parts of cereal boxes or pieces of other printed cartons that appeal to your eye. And be sure to get the kids in on the act. Up-cycling is a fun family project.


Monday, March 11, 2019

Shimmer Sheetz Easter Egg Ornaments by Judi Kauffman for The Queen’s Ink

I make Shimmer Sheetz Easter Egg Ornaments every year. They’re flat and lightweight, easy to make and easy to mail. Sometimes I use embossing folders to add texture and pattern, sometimes I add die cuts, gems, and stickers, while other years it’s a little bit of everything. This year it’s all about the peel-offs!

Both Shimmer Sheetz and vinyl peel-offs are waterproof, so these ornaments can hang outdoors or on a house plant that gets a good sprinkling every few days. If they get dusty, a gentle wipe with a damp cloth will bring back the sparkle!

Tip: Combine border line stickers (a mix of wide and narrow), along with flowers, butterflies or whatever you have on hand. Imagine that you are Fabergé, creating elaborate Easter eggs for aristocrats - this is no time to be a minimalist!


1. Die cut eggs in whatever size and colors you choose. (Shown: Blue and Purple Iridescent Shimmer Sheetz, 2.5” and 5” eggs.) If you don’t have an egg-shaped die, make a paper template and hand-cut them.

2. Decorate with glittery and metallic stickers as shown or as preferred. Trim stickers at the edges as needed.

3. Pierce a hole at the top of the egg and add a metallic cord; knot to form the hanging loop. Optional: Skip the cord and use the egg to decorate a card front or place card for Easter brunch.

Supplies:
  • Shimmer Sheetz
  • Vinyl peel-offs (glittered, gold, silver, multi-color)
  • Metallic cord
  • Piercing tool
  • Non-stick scissors

Saturday, March 9, 2019

Imaginary Flower by Judi Kauffman for The Queen’s Ink

Anybody up for some simple drawing? Imaginary flowers are always a good subject. Based on real flowers in that they can have leaves, stem, and petals, they nevertheless have unrealistic proportions and exaggerated elements. 

This card began with a scrap of smooth watercolor paper on which I drew my imaginary flower, pot, and tiny table. I used two black pens, one with a fine nib and the other one bolder. Instead of a square or rectangle around the drawing, I cut away all of the background.

When I adhered the drawing onto the top-fold 7” x 5” landscape-style card base I let part of the flower grow beyond the edge, my way of making it seem like the flower might continue to grow! For dimensional accents I chose a strip of corrugated cardboard and three little buttons that are the same size as the polka dots.
TIP: If you’re not confident about drawing without some guidance, sketch first! Use lightly drawn pencil lines that can be erased when the inked lines are completed.

Not into black and white? No problem - Before adding the embellishments color the drawing with pencils, pens, paint pens, markers, watercolors, or a combination.

Don’t feel like making a card? Adhere the fussy-cut drawing to a square piece of dot- patterned cardstock, mat and frame in a shadow box that accommodates the dimensional embellishments. 

Supplies:
  • Pigma Micron pens in black (Sakura of America)
  • Smooth white watercolor paper
  • Polka dot cardstock (10” x 7”, folded to 5” x 7”)
  • Three buttons or oversized brads
  • Strip of corrugated cardboard
  • Scissors
  • Adhesive
  • Optional: Soft drawing pencil, eraser

Tuesday, March 5, 2019

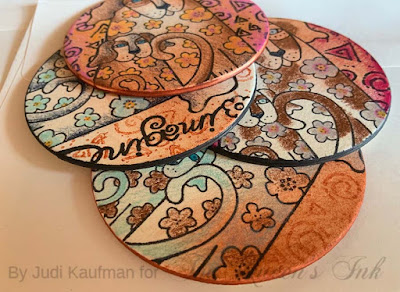
Artist Trading Coins - Laurel Burch Dog Duo By Judi Kauffman for The Queen’s Ink


My newest Laurel Burch stamp, Dog Duo, arrived the other day and I thought it would be fun to make some more Artist Trading Coins. The last batch were mixed media and abstract (scroll back to see them...), but this time I went for whimsical. And while I was at it, I stamped a bunch of envelopes.

The dogs remind me of a pair of friends or maybe a puppy with an adult dog (mom, grandma?). Like all of Laurel Burch’s stamps, this one makes me smile and I know it will get a lot of use!

Instructions:

1. Die cut a batch of 2.5” diameter circles. (Mine are mat board that was die cut on the AccuCut GrandeMARK machine. Cut, stack and glue together layers of cardstock to make thick coins if your machine won’t cut heavier board.)


2. Smudge the circles with a bit of ink in a ginger, orange, or soft brown ink. Then stamp the Dog Duo as shown.

3. Using black ink, stamp the Dog Duo again on lightweight paper and cut a mask. Stamp icons in the background in either ginger, orange, soft brown, or black. Add a word if space allows.

4. While you’re at it, stamp a batch of envelopes!


5. Color the Artist Trading Coins with colored pencils (as shown) or markers compatible with the ink used for stamping. Optional: Color the envelopes.

SUPPLIES:

  • Stamps - Dog Duo, Icons, Imagine (from Imagine Butterflies set) by Laurel Burch (Stampendous)
  • Die cut 2.5” circles
  • Black ink (VersaFine Clair)
  • Ginger, orange or soft brown ink of choice
  • Craft sponge
  • Colored pencils or markers
  • Optional: Envelopes

Sunday, March 3, 2019

Flower Doodle Postcards by Judi Kauffman for The Queen’s Ink

I love to doodle! It is no surprise to anyone who’s been following this blog. In fact, ‘Doodle’ could be my middle name if it weren’t already ‘Chocolate’!

Care to join me? It’s so easy:

Cut some middle-value cardstock* into postcard-size quarter sheets. Using wide nib markers in two or more colors, draw some basic simple circles and ovals, along with stems and leaves. Now, get out a white opaque ink pen and a black pen or two (one or more nib sizes) and DOODLE! 

*TIP: Use something other than white so the white marker will show up against the background. If it’s too dark, the black won’t show so keep it in the middle. Be sure to try out the markers on scrap cardstock before you begin the project. Because marker ink is translucent, colors will change significantly when used on non-white cardstock. Colors shown are bright red, purple and turquoise/teal. On the mustard/gold and reddish/ginger cardstock I used, the red is slightly darker than on white, purple appears to be gray/brown, and the teal turns green.
Turn ‘em over, add a message on the left half and the name, address and postage stamp on the right half. If marker bleed-through bothers you, back each one with another quarter sheet of cardstock.

NOW: Get those postcards in the mail the same day that you finish them! No procrastination allowed...there’s a friend out there with an empty mailbox and it’s your role to make sure something fun arrives soon!

NOTE: This is a perfect on-the-go project. Everything fits in a small zippered pouch or plastic baggie.

Supplies:
  • Cardstock 
  • Markers (Winsor & Newton ProMarkers)
  • Pens (Pigma Micron Black and Gelly Roll White, Sakura of America)

Friday, March 1, 2019

Inlay Technique - Cat Cards By Judi Kauffman for The Queen’s Ink

I mentioned in my last tutorial that I love making cards with what I’ve dubbed ‘Inlay Technique.’ Like inlaid wood, the surface is smooth - kind of like a puzzle with the pieces glued in place.

This time, I reached for iridescent paints, black cardstock, and cat face shapes from Laurel Burch’s ‘Tribal Cats’ die set. Here’s the recipe so you can make your own versions:

1. Cut two pieces of black speckled (shown) or solid black, navy, brown, or forest green cardstock to 3.75” x 5”. (To make a big batch of cards, cut cardstock in pairs.)

2. Choose 3 or more iridescent paints and cover most of the dark-colored cardstock with strokes of the paints. Overlap. When dry, add a bit more color.

3. Die cut two cat faces from each of the painted rectangles. Switch the faces so the two from one rectangle fit into the spaces in the other rectangle. Working from the back, use one-sided tape to secure the inlaid pieces in place.

4. Using double-sided tape, adhere the rectangle to a top-fold A2 card base made from coordinating patterned cardstock.

5. Add cat’s eye stickers for eyes and silver or gold fine line stickers for whiskers. Refer to photos for placement. Alternatively, draw the eyes and make your own whiskers from thin strips of adhesive backed metallic cardstock.
Option: Instead of working in pairs, make a big batch of backgrounds, die cut the cat faces; mix and match among the pieces!

Supplies:
  • Tribal Cats dies by Laurel Burch (Stampendous)
  • Dark color cardstock
  • Iridescent paints
  • Paint brush
  • One-sided tape
  • Double-sided adhesive tape
  • 7mm cat’s eye stickers in yellow and green (www.lasioux.com)
  • Silver border line stickers